Grab My Button!

Grab My Button





Fabric Fascination Quilt Along


another Quilt Along!

May For Me - BINGO!




My Blog List
-
-
Crochet: An end and a beginning1 week ago
-
DIY Mesh Thread Zipper Pouch1 week ago
-
Glacé Garden6 months ago
-
49 Unique DIY Valentines Gift Ideas8 months ago
-
2nd Annual Garver Pumpkin Party3 years ago
-
End of blog4 years ago
-
-
A Japanese Stash Buster Quilt6 years ago
-
Quilted Tassel Pouch Tutorial7 years ago
-
H2H Quilt Challenge 20197 years ago
-
Shuffling7 years ago
-
Quiltsy Cares 3/31/197 years ago
-
Eco-living On A Budget7 years ago
-
a new day dawns7 years ago
-
-
-
-
-
Hand Maker Blog Tour9 years ago
-
-
The San Salvador Sails By ...10 years ago
-
-
Gift of love10 years ago
-
-
New Updates Coming Soon10 years ago
-
Sweet Jenny Belle11 years ago
-
-
-
Winning Treasury #22011 years ago
-
Dianabol11 years ago
-
Dandelions12 years ago
-
A Quilty Finish13 years ago
-
A walk in the snow13 years ago
-
-
the harvest begins~14 years ago
-
-
My Blog Has Moved!14 years ago
-
Polka Dotted Dress Envy14 years ago
-
Come visit our new blog!14 years ago
-
Handmade Christmas Recap 214 years ago
-
-
-
-
-
-
-
-
-


What’s Your Style: Avant Garde
 8:27 PM

from www.thefreedictionary.com
a·vant-garde (ävänt-gärd, vänt-)
n.
A group active in the invention and application of new techniques in a given field, especially in the arts.
adj.
Of, relating to, or being part of an innovative group, especially one in the arts
'What's Your Style: Avant Garde' by TheApple
 Avant Garde Black Felt Hat w...
$155.00
|  Crumpled Plastic Cuff Bracel...
$50.00
|
 Pastel earrings - Avant Gard...
$16.00
|  Avant Garde Full Length Drop...
$35.00
|
 Butterfly Silver Ear Cuff Wr...
$14.95
|  Mohawk Avant Garde Headpiec...
$199.00
|
 Avant Garde Comics ALL OVER ...
$38.00
|  Longsleeve collar shirt ecru...
$52.00
|
 Blue Bear Claw Coat - haute ...
$752.00
|  SALE 30% off - Avant garde,...
$20.80
|
 Pottery Geode Bowl Irregular...
$64.00
|  Avant Garde Wedding Clutch-M...
$90.00
|
 Fine Art Avant Garde Paper S...
$50.00
|  SALE Punk and Black avant ga...
$70.00
|
 Indicolite Avant-Garde Swaro...
$30.00
|  Avant Garde Statement Maille...
$575.00
|
Past Styles:
 Labels:

Project Quilting, Season 3, Challenge 4 – Barn Quilts
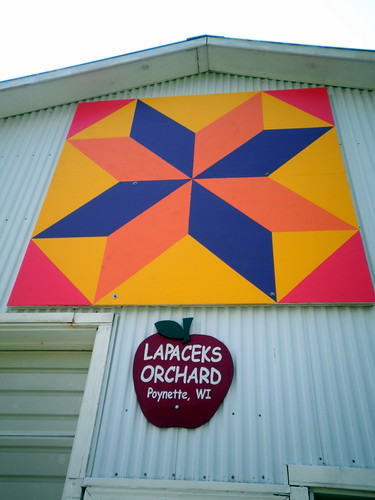
close up of the Barn Quilt at Lapacek’s Orchard
Wow! As I was typing up the title of this post I realized we’re half way through the 3rd season. I don’t know about you but I’ve really enjoyed myself this far – can’t wait to see what the last three challenges bring us!Sticking with tradition, before we get to the challenge – let’s go over all the
PRIZES
Prize 1 QuiltsbyBarb is giving a gift certificate for $20 off machine quilting. The coupon expires in 6 months from the date issued and is not transferablePrize 2 Quilties is giving away an adorable ‘I Love Quilting’ Keychain!
Prize 3 Marcia’s Crafty Sewing and Quilting is offering a Gift Certificate of $30.00 off Quilting on a Baby size or larger. The Gift Certificate will be good for 60 days from the date of issue. The gift certificate is transferable so you can share it with a friend if you’d like.
Prize 4 The Fat Quarter Shop will be giving one lucky winner a layer cake of their choice!
Prize 5 LoveBugStudios is giving a Quiltspirations! Mystery Card Pack from her latest venture, quiltspirations.com.
Prize 6 Dye Candy is donating one yard of stunning hand-dyed fabric.
Prize 7 Fabric Fascination is donating a Fabric Bundle: 6 Fat Quarters from Kathy Davis Happiness Collection for Free Spirit in Indigo - 1 1/2 YDs (ps. I have this collection in another color way – SPECTACULAR!
Prize 8 Quiltology is giving a coupon for her longarm quilting services for 20% off with a minimum $40 purchase. All of her patterns are online.
Prize 9 PennyFabricArt is donating pretty little mini quilts from for a prize!
Prize 10 OddStuffbyXanthe is giving a beautiful small, original collage on a wooden block and a fun pin with a print of her original art work.
Prize 11 TheApple is donated $10 to be redeemed at her etsy store on her handmade jewelry. (aka my other etsy shop)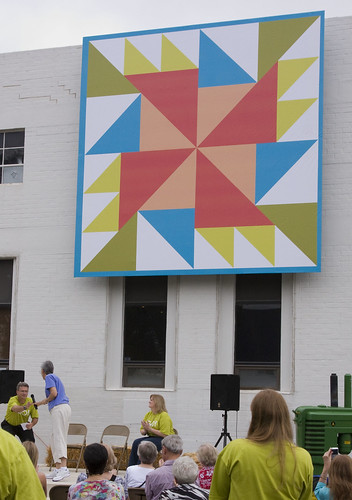
AccuQuilt’s Barn Quilt
The Challenge – Barn Quilts
As many of you already know, we have a barn quilt at Lapacek's Orchard. Last week, a new barn quilt went up a few miles for us on a barn that is being converted into a wedding venue. Since barn quilts are on my mind, this week's challenge is inspired by barn quilts.- Your inspiration for this week is Barn Quilts.
- Your project must include at least one block that would make a great barn quilt. Official barn quilts are usually 8 feet square, but you can make yours any size you choose.
- The block can be manipulated and/or incorporated into a larger project, or it can stand on its own.
- Both the block and the project must have a name. It is OK for the name of each to be the same, but it is not necessary.
- Please remember that these projects need to be created during the week of the challenge.
- POST your entries with a description of your creative process, including where you are (ie, I create in Madison, WI) and the size of your project by Sunday, February 26th, 2012, at noon, CDT, to this flickr group – Project QUILTING with KimsCraftyApple: http://www.flickr.com/groups/1401824@N21/ OR email a picture/description of your completed project to {lapaceksorchard at gmail dot com} with PROJECT QUILTING in the subject line.
- If you wish to receive critiques on your piece – the good and critical – please add your photo’s to this group as well:http://www.flickr.com/groups/1628629@N24/
- Are you stuck? Need a little ‘Tim Gunn’ advice during the week? Or are you just so excited on how things are going along and what to share your WIP? We have a group for that!http://www.flickr.com/groups/1430386@N24/
- If this is the first Project Quilting challenge you've participated in, please email Kim at {lapaceksorchard at gmail dot com} with PROJECT QUILTING in the subject line so that Kim can keep you updated on the behind the scenes going-ons.
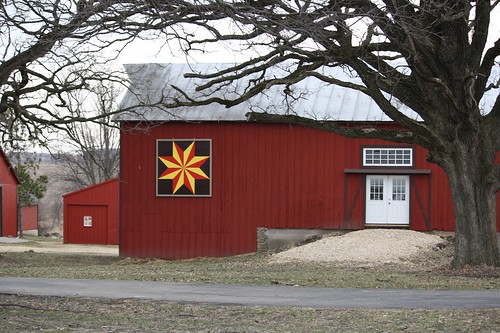
Illinois barn Quilt – photo by wantadog
EXTRA LINKS for this week!
If you want to see how our Barn Quilt was put together check out these blog posts:- Barn Quilts
- How to Make a Barn Quilt
- Barn Quilt – Orange
- Barn Quilt – Time for Purple
- Barn Quilt – Poppy
- Barn Quilt – Last Color – Bumblebee
- How to Make a Barn Quilt – Hanging the Quilt
- Cre8tive Quilter from Wisconsin has a ‘Quilt Block son Barns’ Block of the Week Blog you should definitely check out!
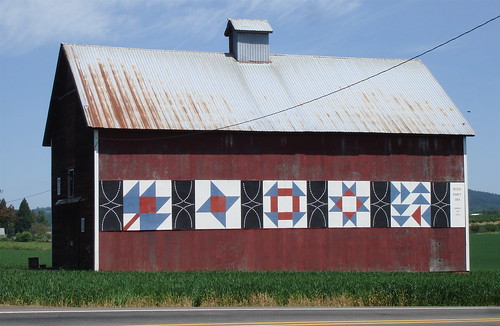
Barn Quilt photo by burke_wicker
If you want your name to be entered into the drawing for the prizes your piece has to follow ALL the rules – including being a FINISHED quilt and completed within the allotted time.Remember, these challenges are intended to help you “Think Outside the Square”. Be creative. Take a risk. DO SOMETHING NO ONE ELSE WILL THINK OF DOING and of course, HAVE SOME FUN!
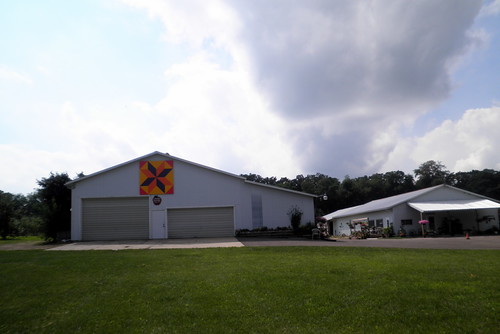
View from the road of Lapacek’s Orchard’s Barn Quilt
Tool Time – A Closer Look – A Quilter’s Garden
I tend to save the last ‘Closer Look’ for the quilt that I created for the challenge.
'Quilter's Garden'
by Kim Lapacek, Poynette, WI
Another fun Project QUILTING Challenge this week. I didn't have a lot of time so I had to make a small piece.
The four 'tools' I used for my inspiration were...
- Rotary Cutter (flowers)
- Needle (stems of the flowers)
- Scissors (leaves)
- Stick Pins (rays coming from flowers).
Using the shapes of these tools I created a sweet little 'Quilter's Garden' Wall Quilt. I used tumbler blocks for the background which reminds me of thread spools (I couldn’t decide if spools of thread would actually qualify as tools so that’s how the stick pins evolved). I raw edge appliquéd the black borders to the quilt.
I have to admit – I felt like I was sort of ‘coping out’ on this challenge since I’ve done the flower garden thing before… but I did know that I was taking it to a different and new level so I went with it.
I kept the quilting simple - Straight line quilting in the bottom third (imitating grass and again, the stick pins), swirly quilting in the rotary cutter flowers, straight rays out of the flowers, and blanket stitching around the needle stems and scissor leaves.
The turning point for me in this quilt was the stick pin rays coming out of the flowers. That was the ‘thing’ that made the difference in this piece – the impact. I love how it turned out.
Approximate Size: 21" x 18.5"

Missed earlier Closer Looks for the Tool Time Challenge? No Worries!
- Tool Time - A Closer Look, Part 1
- Tool Time – A Closer Look, Part 2
- Tool Time – A Closer Look, Part 3
- Tool Time – A Closer Look, Part 4
PS – My ‘Owl Be Your’s Quilt’ That I created during Season 2 of Project QUILTING is in this weekend’s Quilt Gallery Contest – Please take a minute and vote for it: http://quiltinggallery.com/2012/02/17/be-my-valentine-quilts-and-more/ Thanks for your support in advance!
Sashing Bonus – Tall Trees
A personal situation has arisen with our Block 8 designer so I’m not exactly sure when I’ll be posting it. Sorry for the inconvience but I promise I’ll post as soon as I can!
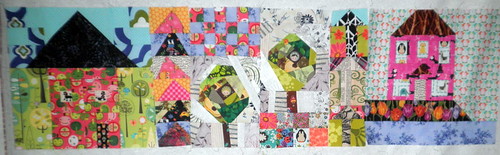 Since we don’t have our block yet I thought I’d share with you all another pieced sashing tutorial.
Cutting Instructions for ‘Tall Trees’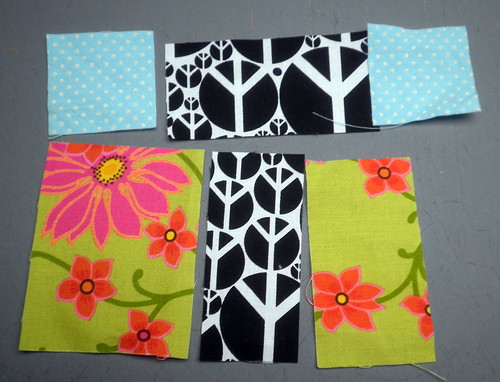 Fabric A (black and white piece sign): 1: 3.5” x 1.75”, 1 – 1.5” x 3” (this length doesn’t really matter – they can be different as we’ll trim to the right length in the end)
Fabric B (blue): 2 – 1.75” x 1.75”
Fabric C (green): 1 – 2.5” x 3”, 1 – 1.5” x 2.5” (again, these can vary just so that they are all 2.5” long and that once they’re sewn together they’ll end up measuring at least 3”)
Time to Start Piecing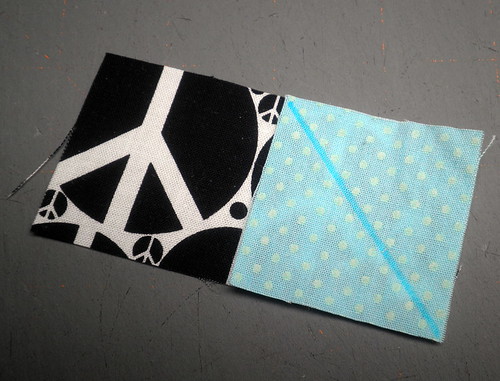 Take you 1.75” square of Fabric B and draw diagonal lines with a water soluble pen.
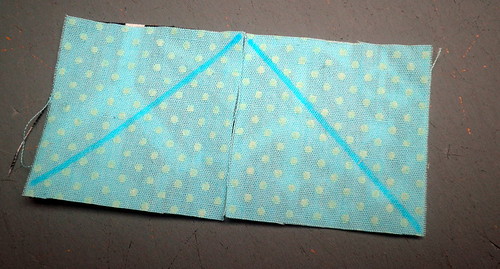 As shown in picture. Sew along this lines and iron toward the Fabric B. Sew the Fabric C strips to either side of the 1.5” strip of Fabric A.
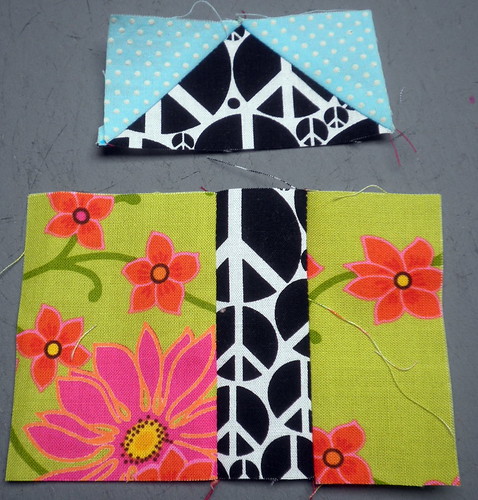 Here’s what it should look like at this point. Trim the piece with the long strips of Fabric A and C’s to 3.5” wide. Sew to the top flying geese piece.

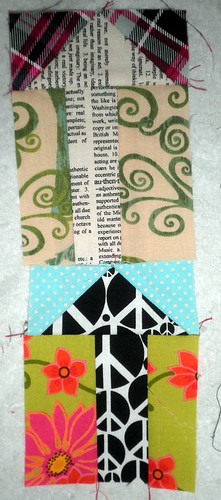 Do this same process again with other fabrics. I’ tried to use fabrics from the blocks I already have made or fabrics I plan on using.
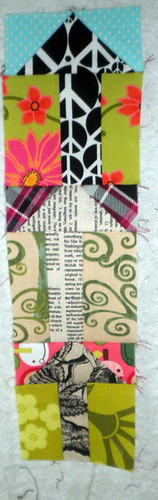
Make at least 3 ‘Tall Tree’ Blocks. It’s okay if they’re all different heights. Once they’re sew together trim down to 12.5”.
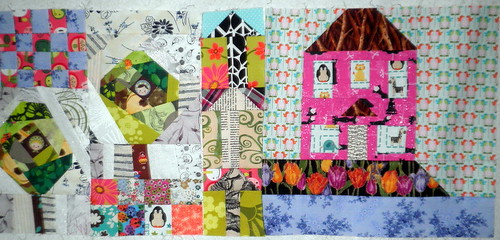
Here is the ‘Tall Tree’ Sashing between Block 2 and Block 3.
Remember – you can make all your sashing like this, just one of your sashings like this OR you don’t have to do any sashing at all! This is just another option to help make your quilt even more fun!
Tool Time – A Closer Look, Part 4

1. Paths of Life Quilt, 2. Project Quilting Week 3- Tools, 3. Dream Big - Project Quilting challenge #3, 4. And Sew It Begins.., 5. 021212 010, 6. projectquilting Created with fd's Flickr Toys
Quilter: Marcia’s Crafty Sewing & Quilting
Paths of Life Quilt
 Marcia Wachuta
Marcia's Crafty Sewing and Quilting
Boscobel, Wisconsin
Quilt measures: 40" X 55"
100% Cotton fabrics
80/20 cotton/poly batting
I was inspired by the tools challenge to create a quilt with paths. I use the tools to create little paths all around my our home in the winter time.
I made a base quilt of squares and tiny black borders. Then I rotary cut curves and formed curvy paths thru' the quilt.
Quilted it with different textures to define the areas.
Signed it at the bottom with name and title of the quilt.
There are several posts about the creating of this quilt on my blog at
marciascraftysewing.blogspot.com/search/label/PQSeason3Ch3
Thank you Kim at Project Quilting for inspiring me to create way outside my comfort zone!
Thanks for inspiring everyone to create!
Quilter: I’m Feelin Crafty
Project Quilting Week 3- Tools
 Project Quilting Week 3- Tools
13x14.5
Seattle, WA
This challenge stumped me for sure! But I got it with the help of some blog  readers!! My tools... Sewing Tools! Scissors, Rotary Knife, Pins, Ruler and Bobbin Blooms
Quilter: Sally’s Angel Works
Dream Big - Project Quilting challenge #3
 Here is my mini quilt for Project Quilting Challenge #3. The challenge was to pick 4 tools to inspire the quilt. I recently began reading Dave Ramsey's EntreLeadership, a book about success in business. In one of the first chapters, he tells four things (tools, in my case!!) to use to start on your journey to success: 1. dreaming, 2. having a vision, 3. writing a mission statement, and 4. writing out your specific goals. These are steps that I need to take for different aspects of my life, especially my business. I love these wonderful inspirational tools, and I was excited to embroider them which constantly reminded me of them!
I used a dresden plate die for the Sizzix. I used the Clover yo-yo maker for my yo-yo (love!!) and I just did a few simple echo quilting curved lines. I also did the quick backing binding, which is to cut your backing 1 in. bigger than your quilt and fold it over your edge and machine sew it on. It's pretty fast and looks good!! :) My quilt hangs on one of those really cool Ackfeld Wire Quilt Hangers! So fun!!
This quilt is 12"x12" and was made in Texas!!!
Quilter: All Things Belle
And Sew It Begins..
 16"x22"
Jennifer Rodriguez of All Things Belle -
West Jordan, Utah
I wasn't planning on entering this week. We had a sudden death in the family and I just wasn't up for doing much. After the initial shock, and my husband traveled back to his hometown to be with his family, I found the desire to finish this project. Quilting and crochet have brought me comfort in many times of distress.
The title, "And Sew It Begins" refers to my pilgrimage to create a new area of mixed media specializing in crochet with quilting/sewing. Our tool prompt was the perfect inspiration. My tools of choice were : the sewing machine and scissors which are visually represented in the quilt, and my free motion sewing foot and crochet hook which were used in the quilt.
I was literally working up until the deadline, so unfortunately the quilt is not properly pressed. I will complete that later today and update with better pictures.
As always, I will blog later this week when our life is a bit calmer..
allthingsbelle.blogspot.com
Quilter: virpalm
 Didn't have time to finish, going to pick up a new puppy today! Here is my entry, with 1-sewing machine. 2-thread. 3-pins. 4-the fabric itself. My sewing machine is my favorite tool, and of course thread. I found my projects come out so much better if I take time to pin. And fabric is another wonderful tool, coming in so many colors and textures.
***I love that Virginia still shared her piece with us even though it wasn’t finished. She didn’t qualify for any prizes this week but a great piece is started which means my goal of inspiration through Project QUILTING was accomplished! Plus, we’re all excited to see what it looks like finished!
Missed earlier Closer Looks for the Tool Time Challenge? No Worries!
- Tool Time - A Closer Look, Part 1
- Tool Time – A Closer Look, Part 2
- Tool Time – A Closer Look, Part 3


My Wonderful Sponsors!

Fat Quarter Shop
Spice Berry Cottage

10% OFF all fabrics!

use coupon code KIMSCRAFTY

Generation Q Magazine

Etsy Treasury Team


Popular Posts
-
I just have to say you all are so TALENTED! I'm in awe with ALL the projects submitted for this challenge! If it weren't for you (th...
-
I am a HUGE HUGE HUGE fan of Project Runway. I don’t have cable so I always wait patiently for each season to come out on Netflix and then ...
-
cannot express just how pleased I am with the amazing entries for this weeks Project Quilting Competition. I would like to say a huge ‘th...
-
WOW! WOW! WOW! I was absolutely blown away by the number of amazing entries that were submitted for the first challenge! You all made a ...
-
I’m really excited to be a part of the Quilting Gallery’s big St. Patty’s Day Blog Hop Party. If this is your first time here I just want t...


