Home Sweet Home Quilt Along
- Schedule
- Block 1 - My Home
- Block 2 - Lapacek's Orchard
- Block 3 - House by the Bay
- Block 4 - My Tilted House
- Block 5 - Two Trees
- Block 6 - Tree of Life
- Block 7 - Under the Moreton Bay Fig
- Block 8 - A Wonky Modern House
- Block 9 - Scrappy Trees
- Block 10 - A Home for the Birds
- Block 11 - The Happy Tree
- Block 12 - the little house
- Block 13 - Three Trees
- Block 14 - Under the Apple Tree
- Block 15 - A Home for Hoot
- Block 16 - Branch Sweet Branch
- BONUS - accuquilt home
- BONUS - Acid Cottage
- BONUS - Marcia's Crazee Patch House
- BONUS Block - Rippling Pond
- Flickr Group - Post your blocks here!
- BONUS - Acid Cottage
Project QUILTING
Feedback & Features
My Fabric is For Sale!
Kim's Crafty Apple
the Apple
Labels
My Flickr Stream!
My Blog List
-
-
2026 Crafty Goals2 weeks ago
-
-
Hemp Leaf Sashiko Table Runner7 months ago
-
2nd Annual Garver Pumpkin Party2 years ago
-
End of blog3 years ago
-
-
A Japanese Stash Buster Quilt6 years ago
-
Quilted Tassel Pouch Tutorial6 years ago
-
H2H Quilt Challenge 20196 years ago
-
Shuffling6 years ago
-
Quiltsy Cares 3/31/196 years ago
-
Eco-living On A Budget6 years ago
-
a new day dawns7 years ago
-
-
-
-
-
Hand Maker Blog Tour9 years ago
-
-
The San Salvador Sails By ...9 years ago
-
-
Gift of love9 years ago
-
-
New Updates Coming Soon10 years ago
-
Sweet Jenny Belle10 years ago
-
-
-
Winning Treasury #22011 years ago
-
Dianabol11 years ago
-
Dandelions11 years ago
-
A Quilty Finish12 years ago
-
A walk in the snow13 years ago
-
-
the harvest begins~13 years ago
-
-
My Blog Has Moved!13 years ago
-
Polka Dotted Dress Envy13 years ago
-
Come visit our new blog!13 years ago
-
Handmade Christmas Recap 214 years ago
-
-
Blech18 years ago
-
-
-
-
-
-
-
-
Favorite Websites
Kim's Crafty Apple has MOVED to www.PersimonDreams.com
I’m re-branding myself from Kim’s Crafty Apple into ‘Persimon Dreams.’
You can now find me at:
www.facebook.com/PersimonDreams
www.twitter.com/PersimonDreams
www.pinterest.com/PersimonDreams
(and my jewelry is still at www.theapple.etsy.com)
TIME TO VOTE for Project QUILTING’s Primary Color’s Challenge
 WOW! WOW! WOW! I was absolutely blown away by the number of amazing entries that were submitted for the first challenge! You all made a bit of work for me in creating this blog post and the judges will definitely have something to do this weekend!
 For those of you just tuning in you can read more about Project Quilting Here: http://kimscraftyapple.blogspot.com/2010/04/project-quilting.html
and about the first challenge of Season 2 here:
http://kimscraftyapple.blogspot.com/2011/01/project-quilting-season-2-challenge-1.html
CHALLENGE WINNERS:
Before I get to the prizes I’m making two minor changes to the prizes for this season.
The first is that one person can no longer win both prizes. If this does happen (as it has), they will take home the ‘JUDGES Choice’ prize and the person in 2nd in the PUBLIC vote will take home the ‘PUBLIC’ prize. As before, each of these winners will not qualify for the random prizes. I’m doing this just to spread around all the amazing goodies so many great sponsors donated!
The second is, I will not even be listing myself (KimsCraftyApple) on the Public Vote. Since this is my ‘creation’ I will never win any of the prizes – I don’t want to seem like this is biased towards me at all. I’m doing this merely for the fun, the challenge, and the camaraderie. I will still, however, be showing off my entry AND sending it to the judges for their critique.
Now…This week’s PRIZES!
The winner of the PUBLIC vote will receive $10 to FabricsNQuilts AND Designing Quilts is Easy by Wayne Kollinger from Uniquely Nancy
The winner of the JUDGES Choice will receive $10 to SpiceBerryCottageAND Pink Ribbon Quilts-Book- from Quilting Diva
TWO randomly drawn participant will receive either a Pattern & Notecardsfrom Marcia's Crafty Sewing & Quilting OR Downloadable Quilter's Cookbook - Volume 2 from the QuiltingGallery
BONUS! One other randomly drawn participant will receive $20 for Machine Quilting Services from QuiltsbyBarb. Thanks Barb for this last minute donation to EVERY challenge this season!
Voting closes at 7pm CDT on Friday, January 21st.
OTHER BONUSES:
Don't forget! Everyone that enters can decide if they want their name entered in a drawing for $50 off the 2011 Quilts by Barb Quilt Retreat Getaway Weekend.
I will also be sending everyone their rank (somewhere between 1 and 10 – be sure you’ve emailed me (lapaceksorchard {at} gmail {dot} com) your email address) and any critique’s the judges have about your creation. The top 3 scoring projects will be posted on my blog this coming weekend.
PUBLIC WINNERS: YES, you can win a prize too! You’ll find out how to WIN at the bottom of this post after you’ve checked out each of our challengers entries.
And now here are all the entries – in no particular order…
***Please note – I have left the images smaller to help the blog load a bit faster. I strongly URGE you to take closer looks at the projects before voting by checking out their submittals on the flickr group:http://www.flickr.com/groups/1401824@N21/
Quilter: Karen’s Crafty World
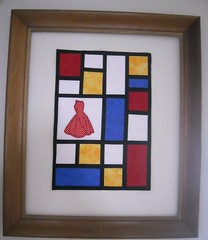
The Story behind ‘Mondrian Art: Ode to a Red Dress’:
The inspiration for this piece was the work of artist Pieter Cornelis Mondriaan, Jr., (March 7, 1872-February 1, 1944). He was a Dutch abstract painter . He painted in a spare, precise, geometric manner mostly using primary colors. It was a style that Mondrian called neoplasticism.
This piece measures 12 inches by 19 inches. The red dress was hand embroidered, stiffened with heavy starch and then cut out and applied to piece with Heat and Bond.
Created in Elgin, IL
Quilter: SewSavvy
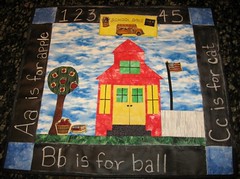
The Story behind ‘School Days’:
Hi! Here is my entry call "School Days". Primary colors...I thought, didn't I learn this in elementary school?" Schoolhouse! I have the perfect fabric...let's go! Well, I will tell you this was easier in my head. Especially when I started re-reading the rules...6" square and trying to make the block. Well, let's make it work (sorry Tim Gunn). From the fabrics I choose it was starting to look like a circus tent instead of school. Back to the drawing board...step back and take a breath. OMG, I have that chalkboard fabric but where is it!?? Well, the garage is now even messier than before but I found it! After all is said and done, I found things in my stash that I had long forgotten was there (I know, so sad) and in a couple of months I have to pack it all up and move it. ugh! My wall hanging is approximately 19 X 20 3/4.
Deneisha Jones
Huntingdon (RAF Alconbury), United Kingdom
Quilter: Christine Hampton
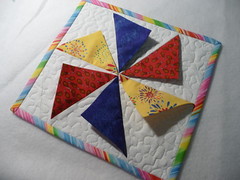
This is my first PQ challenge. I cut each primary square diagonally once to make the pinwheel fins. I used the triangle ruler that has been hanging unused on my wall for 5 years to cut the white-on-white print. I placed a fin in each seam then added some extra white to the corners. I lifted each fin out of the way when I quilted it with a small stipple. It is 10" x 10.5"
Made in Oregon, WI
Quilter: SpringWaterDesigns
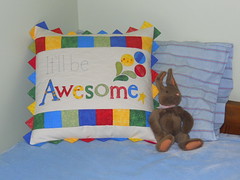 The Story behind ‘It’ll be Awesome!’
I've been wanting to make a quilted pillow from a quote that my daughter says all the time, "It'll be Awesome", and when I saw the challenge involved bright primary colors I knew that's what I wanted to do. I thought this quote was very appropriate for the beginning of 2011, and the start of Season 2 of Project Quilting!
I started with a 6" square of red, yellow & blue and cut them each into four 3" squares. I did the same thing with some more primary colors and that gave me my color blocks across the front and prairie points around the edges. I fused and blanket stitched the word Awesome, and I used scraps to string piece and cut circles for the little stylized accents. I machine quilted with a meandering Loop-to-loop, and the words "It'll be" are hand quilted in using a 12 wt blue thread and a long stitch. The back is the lighter blue print that I used on the front, and I finished the edges with Prairie Points because they add happiness to any project :) I've taken several close up shots to show detail of the stitching and quilting.
The body of the quilted pillow measures 20" square (not counting the prairie points),
Created by Dawn Stewart (aka Spring Water Designs) in Maryland, USA
Quilter: Quilties
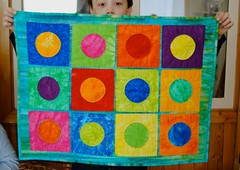
To me, this challenge sounded like a color-theory assignment from art school, so I embraced that idea!! I used some beautiful, vibrant, hand-dyed fabrics in a rainbow of colors, then had fun rearranging the colors and watching the interesting interactions. In order to soften the look and highlight the hand-crafted nature I used big quilting stitches to hold it all in place and let the raw edges stay a little raveled. I wanted it to be immediately obvious that this was not a computer-rendered piece and I had no aspirations for perfection. So the squares are a little off and the background shows through between the circles, but that's the part of the charm.
Finished size 28" x 21". Made in Urbandale, IA, by Emma Thomas-McGinnis
Quilter: Aunt Cindy’s Attic
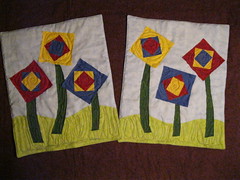
The Story Behind Twin Quilts:
The inspiration for these little quilts was my daughter's twin babies that Santa brought her for Christmas. I thought they needed their own quilts, but I had not been inspired to make them. Couple that with this challenge and me turning colored squares in my head and the square on a square on a square flower was born! Unfortunately the flower concept was not conceived until 12 hours before the challenge was due. So I decided I could make something in an hour or so. I managed both in under 2.5 hours.
The background was made loosely using Ricky Tim's "Caveman Quilting" technique. All flower parts are very roughly raw edge appliquéd. The appliqué stitches double as the quilting.
Each quilt is approximately 18"x15".
Created by Aunt Cindy of Aunt Cindy's Attic, Crawfordsville, IN
Quilter: Marcia’s Crafty Sewing & Quilting
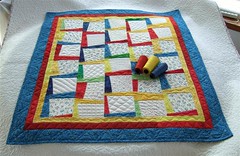 The Story behind ‘Primary Quilt’:
I am from rural Boscobel, Wisconsin. I first cut strips in random sizes from 1 3/4 inch to 3 inches. Then sewed strips on two sides of each 6 inch square. (top and one side) Then I squared up the block at an angle to 6 1/2 inch square. Next step was to lay them out in random order...... I changed the order many times before sewing them together. I should have just picked them up in any order and sewed them. After all the blocks were in rows I sew them together unevenly to offset them. Then added three borders - one of each of the primary colors. I started with the lightest border, so the blocks would flow into the border and then stopped the edge with the red border and finally with the blue border. I chose to bind with the blue too! I quilted it with many repetitive patterns like Zentangle patterns, thus creating textures in each block. I quilted a wavy line with daisies on each end of the line in each lattice strip. I quilted a double wavy line and daisies in the yellow border and then finished with zig zag patterns in the two outside borders. It was a fun challenge and I really enjoyed the whole process!!!
Quilter: Dashasel
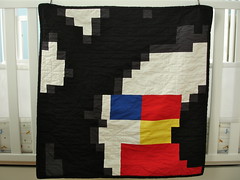
The Story behind ‘inspired by Miro’:
Hi! My name is Elaine and I am very excited to have discovered Project Quilting! Here is the story behind my quilt:
When I saw the challenge, I immediately thought of a print that my father had selected for me when I was a baby, claiming that the print reminded him of me. The print, "Sonnens", is by Joan Miro and in the print he uses primary colors and geometric shapes/lines. Inspired by this print, I decided to try and mirror an aspect of his print, a portion of the left eye, in my quilt. I would have loved to freehand this aspect and then perhaps tried my hand at paper piecing the quilt top, but here's the thing-- I have made quilt tops before but have never actually machine quilted or done binding before (yes, I am a relatively new quilter) so I knew I would have enough new techniques to learn for this challenge! I decided I better get some help with the pattern and I turned to this link (http://www.vam.ac.uk/microsites/quilts/patchwork) which can take an image and turn it into a quilt pattern! I uploaded the portion of the eye that I wanted to try and quilt, got a pattern, and then it was time to get to work as the pattern consists of approximately 400 2x2 squares and then 9 2x6 rectangles (these rectangles were cut from my 6x6 primary color blocks).
For the quilting, I drew upon Miro's use of lines, asterisks, and triangles. I quilted in only the white and black areas, using matching threads for those sections so that the quilting would be very subtle on the quilt top and more obvious on the quilt back. I had so much fun making this quilt and can't wait to see if my dad can recognize the inspiration!
The quilt measures 29" X 29" and was made in Milwaukee, WI.
Quilter: MoranArtandQuilts
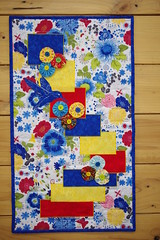 The Story behind ‘Pretty in Primary’:
 I knew this challenge would be a toughie since I'm not a big primary color person. I took the 3 blocks and cut them into 3 different sized pieces then spent a lot of time laying them out into a pleasing design. I found a pretty flowered background that matched perfectly. I like the way they seem to recede into the distance so then appliquéd them on.
I knew at this point that the quilt needed more so I added the yo-yos with button centers. I felt It still needed more so I added the cute hummingbird, painting in the details by hand with white acrylic paint. At this point I called it finished!
It measures 14" x 24"
Catherine (MoranArtandQuilts)
Columbus, OH
Quilter: Miranda’s Place
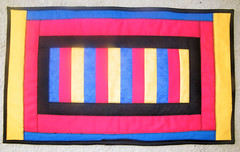
The Story:
When I first saw the challenge, I thought Primary Colors!, do I even have those? Then I said, remember when you were teaching elementary school and the students always chose the primary colors for their projects. I look at this as a big box of primary colors only crayons, ready for the next child to begin creating their masterpiece. The size is 23.5 X 13.5
Created in Atlanta, GA
Quilter: Kathy Krieg
Primary colors made me think of crayons, young kids, and school. This is the first crayon roll I have made -- it just seemed to fit the challenge. I will be giving it to a toddler who turns 3 next week.
It is a Crayon Roll. It is 8 x 15 inches. I live in Chandler Arizona.
Quilter: Quilting Diva
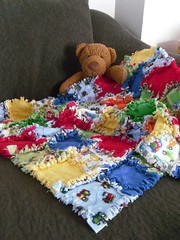
The Story:
I decided to start with all 6" blocks. I ran the flannel squares through my AccuQuilt Die cut to rag the edges and put together this little "The Places You will Go" mini quilt. The finished quilt is 28" x 25" and was created in Tampa, FL. I love the bright contrast of the primary colors and the alternating novelty blocks.
Stacy Edell
Quilter: Mauby’s
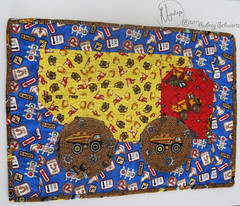 The Story Behind ‘All Boy, Dump Truck in Primary’:
The first thing I think of when seeing primary colors are boys and their toys. Maybe I am just too wrapped up in being a mom to a toddler.
But that is what I thought of when I read this challenge. So I grabbed the graph paper and some crayons and started designing a dump truck.
I used all construction fabric prints to emphasize the dump truck.
I went out of my way to cut out the 6" red square being sure to have the dump truck viewable. Did the same with the fabric circles I appliquéd as the wheels.
It measures 21" x 14.5"
Aubrey (Mauby's)
Brevard County, FL
Quilter: Kelsey Rose
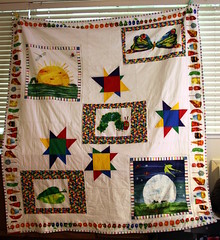
The Story behind Caterpillar Quilt:
Hi, this is Kelsey, crafting from Mountain View, CA. For this entry, I really wanted to play with the bright colors of the primaries and go with a more juvenile theme. I used my primary squares (along with several additional squares) to make 4 wonky stars (my first ever!) I then combined those blocks with come The Very Series prints I had previously purchased and sort of improvised my quilt as I went. This is my first time not planning a project in detail before beginning and kind of stopping after each step to decide what to do next. I used white minky fabric for a soft backing, and used Warm n White for batting. The binding is Very Series stripes. This is also only my second quilt overall, and I'm pleased with how quickly this came together (less than a week), compared to my last one.
Size: 70" x 78"
Kelsey
P.S. Sorry for the bad lighting, but I ran out of daylight hours and was still working on this. :P
Quilter: Sally of Sally’s Angelworks
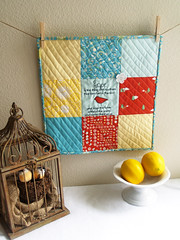
The Story:
Hi!! I'm sally with sally's angelworks and I'm a quiltaholic!!!
Here's the story behind this quilt. When I heard primary colors, I immediately thought of this brand new layer cake I bought (Lauren and Jessi Jung's Hideaway by Moda)!! I can't get enough of the little deer in the red fabric, or the birdies in the patterned block...those little birdies reminded me of one of my fave quotes by Emily Dickinson..."Hope is the thing with feathers that perches in the soul-and sings the tunes without the words and never stops at all!" Ohhhh what a world we would live in if everyone was filled to the brim with HOPE!! :)
The quote and the birdie blanket stitch is all hand embroidered. I am a huge lover of straight line quilting (while I learn free motion quilting in private! teehee!!). I also adore the simplicity of a mega nine patch with the focus on the quote,
Thanks for looking and for all of your comments!! ♥
Quilter: UniquelyNancy
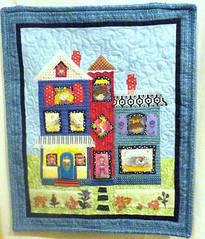 The Story:
 I am Nancy Tanguay of Uniquelynancy and live in the northwest corner of Ct. I was immediately drawn to he primary colors of this challenge and had to give it a try. Bright colors remind me of happy, laughing children so I dug through my stash to find some whimsical fabrics. When I found the one with smiling kids framed by black and white borders I knew I had to make a house with their cute faces in the windows. I cut the three 6" blocks and decided to use the blue one whole while cutting the yellow by 1/3. The piece I cut off made the first two windows on the blue. The Red I cut in half and sewed them back together as the tower. Then I felt I still needed another room so I added the turquoise addition. Then the fun began with choosing curtains,gingerbread,roofs flowers and the fence. I have a large collection of vintage laces that I felt would be perfect. I quilted the sky and grassy areas with stippling and then added siding to the house. I used a satin stitch around appliquéd windows and doors. Then I wanted to try new idea for the border. I added piping to the outer border before binding to give it a picture frame look.
the quilt measures 18" by 22"
Quilter: AllthingsBelle
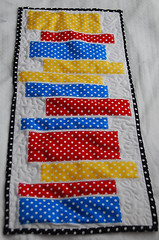 The Story Behind ‘Color Code’:
For this challenge we were limited to the 3 primary colors, each one had to be at least 6" square, and cut in no more than 4 pieces.
I was stuck on the idea that the primary colors is the "code" for all colors. That got me thinking to color recipes. I quilted with the idea that this was a code or recipe for a certain final color; that each appliqué was a value.
I free motioned only in the white area as I wanted the color values to be complicated by topstitching.
Final size 9" x 20.5"
Jennifer Rodriguez - quilting in West Jordan, UT
Quilter: Kathleen’s Quilts
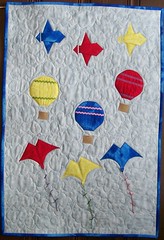
The Story Behind ‘Flights of Fancy’:
As soon as I saw primary colors I wanted to do hot air balloons. Aside from the background, I elected to use ONLY the three six inches pieces of red, yellow and blue. Figuring out how to use the rest of the square after cutting a balloon shape meant lots of paper squares were cut experimenting with the extra pieces. I finally found a use for each piece. Triangles became planes... the planes wings were sewn down close together and the body of the plane was folded down. Little triangles cut from the bottom of the balloon shape became propellers. The balloons were quilted with batting before being appliquéd down and an additional layer of batting helps make them puff out. Ric rac and embroidery stitching add detail to the balloons. The baskets are burlap and are open at the top.The odd shaped piece from between the large triangle and the balloon piece made a kite by pulling the long edge to meet itself side by side. Kite strings are floss. Quilted with lots of big puffy clouds.
22.5" x 33" Created in Cissna Park, IL
Quilter: ForQuiltsSake
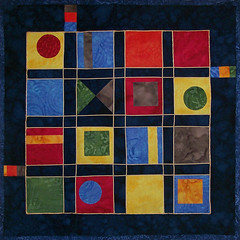 The Story behind ‘Carnival of Colors’:
 Made by Pam Geisel of For Quilts Sake in Yellow Springs, Ohio, Jan. 2011 for Project Quilting Season 2, Challenge 1, Primary Colors.
19.5” x 19.5”
My creative process and how I made it:
I selected my three primary color fabrics from my batik fabrics. I contemplated the many ways to cut a 6” square into two, three and four pieces and decided to go with four equal-sized 3” squares.
Once I had the idea of squares stuck in my brain, I started noticing items around me that were square. As soon as I saw my fused-glass nightlight (from an Etsy seller) I wanted to try something like that. The nightlight has square color blocks with space between them, and a few of the blocks have other colors fused on top of them.
To add to my primary color fabrics, I picked out an orange, green and brownish-gray fabric and cut one 3” square from each. I considered using white for the background but since I went with my first instinct to use squares as my shape I decided to audition some other fabrics and found a really deep blue batik that really made the colors pop.
I played around with the arrangement of the squares, making sure that I didn’t have a row or column with a duplicate color. With the four-by-four arrangement, there was one spot left over. I thought about piecing a square with four different colored triangles but I liked that spot didn’t have as much color so I cut two quarter-square triangle pieces from the green and the brownish-gray fabric as they were less contrast than the color fabric, and I placed them on the fabric leaving two triangle shapes of deep blue background fabric.
I cut three 2” squares, three 2” circles and three 3”x.75” rectangles and arranged them off-center on top of several of the 3” primary color squares. Once I was happy with the arrangements, I fused these shapes and sewed along the raw edges using the same color thread.
I decided that to fuse the 3” squares to the backing fabric but I also wanted to piece some smaller 1” squares into the binding so I pieced the 2” borders and attached them to the backing fabric before I fused the squares 1” apart on the background (otherwise part of the 3” squares along the border would have become smaller because of the seam allowance).
I wanted to do some embellishing so I got a piece of thin gold cording and tried some different arrangements with it and decided I liked how it made the edges look really crisp so I layered the quilt sandwich then quilted the cord on top of the raw edges, which also created smaller squares where the cornerstones would be it the quilt had pieced with sashing. I also quilted the cord where the backing meets the borders, then I stitch-in-the-ditch quilted inside the squares using the same color fabric as the square that I was in.
Made using cotton batik fabrics, polyester batting; raw edge appliqué, machine pieced borders, couched cord and stitch-in-the-ditch quilting; all supplies were taken from my stash.
Quilter: TerryAskeArtQuilts
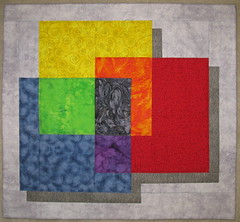 The Story:
 My name is Terry Aske, and I create in New Westminster, BC, Canada. This is my first ever entry to Project Quilting.
When I saw the subject of this challenge was Primary Colors, I immediately thought of the sketch I made several years ago in my idea book. I had never gotten around to making this quilt, and this seemed like a perfect opportunity. It illustrates how secondary colors are created when two primary colors are mixed (or in this case “overlapped”).
I started with a 6 inch square of each of the primary colors, then added more of each of those colors, plus the secondary colors. I used a light grey background, with a darker grey to indicate shadows and give a 3-dimensional effect.
I tried a new technique for binding - turning it entirely to the back, like a facing, to give the quilt a cleaner more modern look. I like this technique and will definitely use it again.
The finished size of the quilt is 22.25” x 20.75”.
----
Quilter: KimsCraftyApple
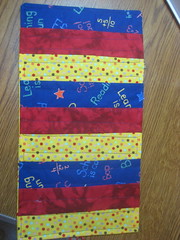
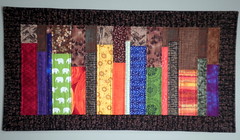 The Story behind ‘Bookshelf Quilt’:
 I had been seeing quilts made out of strips offset in the middle with fabric on each side to create a look that reminds me of a stack of books. It looked simple but I loved the linear effect of the technique. I had been wanting to try it for some time.
When I saw the primary color challenge, I almost immediately knew that I would be cutting my squares in half to make three of the "books". I went a slightly different route and instead of going with a stack of books I went for a bookshelf. I took random scraps of fabric from different parts of the rainbow, mixed it all up and here you go! (I also think it looks a cool skyline if you’re into that more than books…)
Also, instead of using all the same brown fabric for the other portion of the quilt I also took scraps and made a more scrappy/textured look.
This quilt will look great as either a wall hanging or a table runner.
Approximate Dimensions: 36" x 18.5"
Created by Kim Lapacek (aka KimsCraftyApple) in Poynette, WI
Quilter: Heather Lair Designs
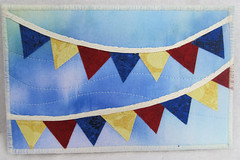
The Story:
I made a fabric postcard for the challenge. I just realized that my pieces are too small to qualify for the challenge....Rats! Oh well, enjoy any ways!
Size: 4” x 6”
I am quilting in Gimli, Manitoba, Canada.
Even though Heather will not qualify for any prizes, I will still send her entry to the judges for a ‘critique’.
Now for the PUBLIC Comment PRIZE!
This weeks randomly drawn public prize will win $20 to my jewelry shop theApple. This is redeemable for items that are listed in my store – no custom orders please.

EIGHT Chances to WIN!
Entry 1: REQUIRED! Leave a comment on your favorite entry (or at least that you voted) and vote for your favorite on the poll on the upper left hand side of the blog. - ***MUST DO***
Optional/Additional Entries – please note – if you want to qualify for these additional entries you must leave a SEPERATE comment for each – if you already follow or are a fan, etc just leave comments saying each. If you write everything in ONE comment you only will have ONE entry…
Entry 2: Follow my blog.
Entry 3: Follow me on twitter: www.twitter.com/kimscraftyapple
Entry 4: Tweet about this fantastic contest with hashtag #PQprimary (important or I won’t know you did it)
Entry 5: Become a Fan of Project QUILTING on Facebook: http://www.facebook.com/ProjectQUILTING
Entry 6: add my Project Quilting ‘Grab my Blinkie’ to your blog or blog about my giveaway (link your blog or post in your comment, please)
Entry 7: Head on over to theApple and let me know your favorite item in the store!
Entry 8: Sign up for my newsletter in the upper right corner of this page!
***Participants in project quilting ARE allowed to enter in the public poll/contest as well.***
This means you have EIGHT chances to win! I need you to write each of these entries as different comments in order to qualify you for all seven entries and include your email address. If you don’t include your email address I won’t be able to contact you when you win and I will have to choose a new winner. I will be picking the winner on Saturday, January 22nd.
Sign Up for my Newsletter!
Project QUILTING on Facebook
PersimonDreams on Facebook
Blog Archive
-
▼
2011
(225)
-
▼
January
(28)
- Names, Names, It’s all about the Name!
- Time to VOTE for Project QUILTING’s – What’s in a ...
- Orientation Advice!
- Quilter’s Block A-Palooza: Block #2: Word Search
- Be Inspired!
- Iron Craft Challenge #4 – Get Cozy
- My Ruffler Foot!
- Bloggers’ Block-A-Palooza…waiting for spring
- Project QUILTING – Guest Judge QUILTDAD!
- Project QUILTING Season 2 – Challenge 2 – What’s i...
- Helpful Links for Quilters
- Project QUILTING Random Winners and Public Comment...
- Project QUILTING Primary Color Winners – Public an...
- Project QUILTING – my Bookshelf Quilt - Primary Co...
- Challenge from the Storque – Challenge 1
- Iron Craft Challenge #3 – Time to BUNT – A Valenti...
- Project QULITING – Sometimes Flu Happens…
- TIME TO VOTE for Project QUILTING’s Primary Color’...
- Treasury Wednesday
- Front Page - Etsy
- Project QUILTING Season 2, Challenge 1 – Primary C...
- Project QUILTING – Amazing SPONSORS!
- KimsCraftyApple on Etsy’s Front Page
- Project QUILTING – An Interview with SarahB
- Iron Craft Challenge 1
- A Spoonflower New Year’s Resolution
- Project QUILTING – An Interview with Diane Lapacek...
- Happy Twenty Eleven!
-
▼
January
(28)
Popular Posts
-
I’m really excited to be a part of the Quilting Gallery’s big St. Patty’s Day Blog Hop Party. If this is your first time here I just want t...
-
I just have to say you all are so TALENTED! I'm in awe with ALL the projects submitted for this challenge! If it weren't for you (th...
-
Here’s my Block 16: Pinwheel Parade designed by V and Co. I wanted to try to grab some of the fabrics that I didn’t use as much in the oth...
-
Hi Everybody, There have been a few questions, so I thought I'd address them here. (Sorry I didn't jump in sooner here, but it's...
-
WOW! WOW! WOW! I was absolutely blown away by the number of amazing entries that were submitted for the first challenge! You all made a ...









75 comments:
The quilt by Terry Aske appeals to me in the way she explained using two colors blended to make a third color. The simple, modern design is fresh and the use of shadows is interesting.
All of the quilts are very finely done and too bad can't all be voted as the best!
(at gmail)
I love all the entries! It was hard to decide who to vote for, but in the end I chose MoranArt because her piece included the primary colors on many different levels that worked very well together. I would love to have her entry hanging in my sewing area. :D
Tracy
TracyDesigns
These are all very interesting in their own way, but I vote for Colors by Emma because I like the way she used the primary colors with primary shapes.
Voted for Sally. Loved the quote and the quilt!
That was tough. I fell in love with several of them and came back to them several times. I finally made a decision and voted.
I am now a follower.
I already follow your blog! Great chellenge, I might try the next one!
Folling you on twitter now.
I am a fan on facebook too! :)
I love AuntCindy's sweet flowers - and I voted for them, too :)
ByTheWay.etsy.com
I followed your blog :)
Jaci
ByTheWay.etsy.com
I already follow you on twitter :)
ByTheWay.etsy.com
I tweeted!
Jaci
ByTheWAy.etsy.com
I'm already a fan/friend on FB :)
Jaci
ByTheWay.etsy.com
It was hard to pick just one thing from your shop, but I like:
Drop the Silver Wire Ball
Jaci
ByTheWayside.etsy.com
I love Sally's quilt. Her quilts are always so artistic.
I'm a fan on FB already!
I'm following you on twitter. I'm @serastoff.
My favourite piece from your shop is: http://www.etsy.com/listing/64978587/earrings-crackled-hollow-glass-heart
Wow, This is my first visit to this project and I'm impressed by the diverse interpretations of the rules. Look forward to the next installment!
I voted. My 2 favs are Christine Hampton's and Sally's. It was a hard decision because they were all fabulous!
Sandie
zaftig2k at yahoo dot com
http://zaftigdelights.blogpost.com
I follow your blog.
Sandie
zaftig2k at yahoo dot com
http://zaftigdelights.blogpost.com
I follow you on twitter.
Sandie
zaftig2k at yahoo dot com
http://zaftigdelights.blogpost.com
I'm a fan of PQ on facebook.
Sandie
zaftig2k at yahoo dot com
http://zaftigdelights.blogpost.com
I have your PQ blinkie on my blog:
Sandie
zaftig2k at yahoo dot com
http://zaftigdelights.blogpost.com
A harder time voting already this season! I was not able to complete my challenge...and my blogging friends gave me sympathy. I am having a years run of bad luck with machines lately. This week it was the iron. Oh well.
Anyway, all were super entries! Great job people!
PS...I don't wear earrings so if I win, re draw. Just wanted to let you know that I voted..and I hope to get in on the next challenge!
I vote for Quilter: Sally of Sally’s Angelworks. Love the color and quilting along with a great message!
My favorite was Quilter: Sally of Sally’s Angelworks. I voted for her.
My vote is for Sally!!!! :-)
I love the playful quality in the quilt by MoranArtandQuilts.It's colorful with lots of movement and interest!
I Love love love Sally of Sally’s Angelworks' Quilt!
Well done to all those who participated!
I finally chose to vote for
Springwater designs. I love the clean lines and it's cheeriness.
i voted for Sew Savvy because her design is different from the others, and i love how it really appeals to a child as well as adults. Cute one!
yuri.kristi at gmail.com
my favorite item in your shop is the large turquoise swarovski earring!
yuri.kristi at gmail.com
i follow u on twitter (id @2thousandthings)
yuri.kristi at gmail.com
I like Sally’s Angelworks the best.
yuetong27 at hotmail dot com
I liked Project QUILTING's facebook page.
yuetong27 at hotmail dot com
my favourite item in your shop is the blue stacked in oval earrings.
yuetong27 at hotmail dot com
These are wonderful, and voting was difficult. I won't say who I voted for, but I LOVE UniquelyNancy's entry and SpringWater's Pillow. Great job everyone! --Gail from QuiltSewPieceful
I am now following your blog! Can't believe I wasn't already following!
--Gail at QuiltSewPieceful
LOVE Terry Askes quilt. hard to find just the right fabrics to show the mixed colors. simple looking, but i am sure more work than shows.
Great entries! Voted for Karen's Crafty World.
following your blog!
Following you on twitter (@Craftyfusion)!
I love these earrings from your store: http://www.etsy.com/listing/42272456/stacked-rectangles-candy-drop-hoop
They are simple, elegant and very modern.
Also tweeted about your giveaway!
I love the one by Quilter: MoranArtandQuilts
aikychien at yahoo dot com
Follow you on twitter: @aikchien
aikychien at yahoo dot com
I'm a Fan of Project QUILTING on Facebook: Aik Chien
aikychien at yahoo dot com
I love the Earrings - Fall In Love - Silver Puffed Hearts on Hoops
aikychien at yahoo dot com
Terry's quilt is great because of the mixing of the overlapped colors - brilliant!
I follow this blog
I am a facebook fan also...
I love the Terry Aske Quilt. the use of gray to create the illusion of depth looks wonderful, love the colour blending as well.
I love the all the vintage typewriter key jewellery in your Etsy shop. The A ring with the bronze floral design is my favorite.
I voted!
I love the Earring Drops - Twisted Swarovski Pearl Drops - Pale Taupe.
I receive you email newsletter.
voted for marcia
deannalw47 AT hotmail DOT com
xoxoxo
new GFC follower
deannalw47 AT hotmail DOT com
xoxoxo
follow on twitter - dlw447
deannalw47 AT hotmail DOT com
xoxoxo
tweet
http://twitter.com/#!/dlw447/status/27988971850047488
deannalw47 AT hotmail DOT com
xoxoxo
fave item in store: vintage typewriter key ring
deannalw47 AT hotmail DOT com
xoxoxo
This was a difficult choice. All of them are so different with so much creativity. But Karen's Crafty world really jumped out at me. Maybe it was the bold lines...or that swinging red dress.... Very fun!
just signed up to follow and for the newsletter!
oops, here's my email dancingapronfarmer(at)gmail.com
Just blogged and included a mention about project quilting along with a link for folks to vote!
dancingapronfarmer(at)gmail.com
Sew many beautiful quilts and only one vote! It was hard to choose but I kept going back to the quilted pillow, "It'll be Awesome". The pillow looks so crisp and is so colorful. I'd love to have one of my very own and may have to have my version of it.
I was already glad that I followed your blog but now I'm double glad. LOL
cynmar10@bellsouth.net
I'm new to Twitter but I'm 99.9% sure that I'm now following you. :-)
cynmar10(at)bellsouth(dot)com
I just tweeted about the contest!
cynmar10(at)bellsouth(dot)com
I'm already a fan on Facebook!
cynmar10(at)bellsouth(dot)com
I added the Project Quilting ‘Grab my Blinkie’ to my blog and blogged about the giveaway.
http://applecreekcove.blogspot.com
cynmar10@bellsouth.net
Wow! What a hard decision but I finally made one. My favorite piece in your shop is the cute Kawaii cupcake ring. It is so bright and cheery I bet it would put a smile on the face of everyone who sees it.
Cynmar10@bellsouth.net
I already receive your wonderful newsletter.
cynmar10@bellsouth.net
Post a Comment