Grab My Button!

Grab My Button





Fabric Fascination Quilt Along


another Quilt Along!

May For Me - BINGO!



My Blog List
-
-
DIY Mesh Thread Zipper Pouch1 day ago
-
A Great Big Hexie Cushion2 months ago
-
Glacé Garden6 months ago
-
49 Unique DIY Valentines Gift Ideas8 months ago
-
2nd Annual Garver Pumpkin Party3 years ago
-
End of blog4 years ago
-
-
A Japanese Stash Buster Quilt6 years ago
-
Quilted Tassel Pouch Tutorial7 years ago
-
H2H Quilt Challenge 20197 years ago
-
Shuffling7 years ago
-
Quiltsy Cares 3/31/197 years ago
-
Eco-living On A Budget7 years ago
-
a new day dawns7 years ago
-
-
-
-
-
Hand Maker Blog Tour9 years ago
-
-
The San Salvador Sails By ...10 years ago
-
-
Gift of love10 years ago
-
-
New Updates Coming Soon10 years ago
-
Sweet Jenny Belle10 years ago
-
-
-
Winning Treasury #22011 years ago
-
Dianabol11 years ago
-
Dandelions12 years ago
-
A Quilty Finish13 years ago
-
A walk in the snow13 years ago
-
-
the harvest begins~14 years ago
-
-
My Blog Has Moved!14 years ago
-
Polka Dotted Dress Envy14 years ago
-
Come visit our new blog!14 years ago
-
Handmade Christmas Recap 214 years ago
-
-
-
-
-
-
-
-
-


Time to VOTE – Project QUILTING Flying Geese Challenge
 1:59 PM
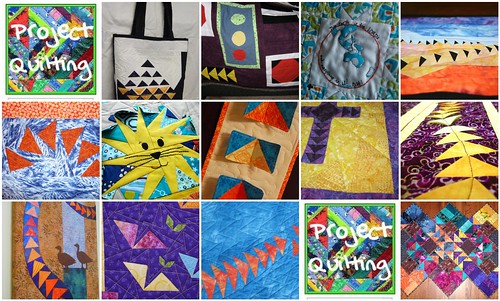
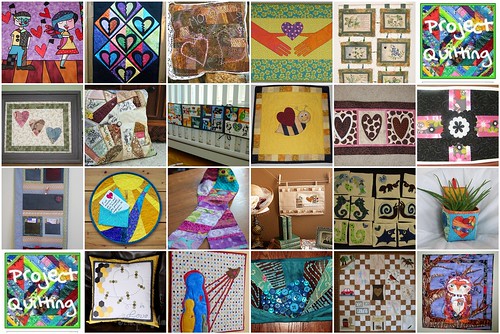
1. projectquilting, 2. 14 cMarch 11 to 12 2011 039 (Medium), 3. Under Construction, quilting detail, 4. The Earth is the Lord's - Organic Quilt, 5. Geese at Sunset - close up, 6. Drunken Geese 2, 7. That's not my lion (close up of head), 8. Sky Specimen, 9. If You Want to Make God Laugh, Tell Him Your Plans - Corner, 10. Dancing Geese: sideview, 11. Left Side Stretched over the Canvas, 12. flying geese 2, 13. Project QUILTING - This is my entry for the "Flying Geese Challenge", 14. projectquilting, 15. Project QUILTING - Flying Geese Challenge Entry - Three Geese
Created with fd's Flickr Toys
It’s been one of those weeks in Project QUITLING. Entries didn’t start coming in until Saturday so of course I sit and worry that no one will enter – my worst fear! But of course…I shouldn’t have worried – we have 13 amazing entries once again!
For those of you just tuning in you can read more about Project Quilting Here: http://kimscraftyapple.blogspot.com/2010/04/project-quilting.html
and about the fifth challenge of Season 2 here:
http://kimscraftyapple.blogspot.com/2011/03/project-quilting-challenge-5-flying.html
CHALLENGE WINNERS:
***See the bottom of this post for two minor changes made to this years prize/voting process
This week’s PRIZES!
The winner of the Public vote will take home $10 to SpiceBerryCottage and Downloadable Quilter's Cookbook 2009 from the QuiltingGallery
The winner of the Judges Choice will take home $10 to FabricsNQuilts and $10 to Dye Candy.
TWO randomly drawn (by my two beauties) participants in this weeks challenge will take home either $20 for Machine Quilting Services from QuiltsbyBarb OR a pdf of 2 maze quilt patterns from Lisa Penny!
Everyone that enters a piece for this challenge can decide if they want their name entered in a drawing for $50 off the 2011 Quilts by Barb Quilt Retreat Getaway Weekend.
Voting closes at 7pm CST on Friday, March 18th
This weeks’ JUDGES!
Guest Judge: Ryan Walsh of I’m Just a Guy Who Quilts
OTHER BONUSES:
Don't forget! Everyone that entered a piece for this challenge can decide if they want their name entered in a drawing for $50 off the 2011 Quilts by Barb Quilt Retreat Getaway Weekend.
I will also be sending everyone their rank (somewhere between 1 and 10 – be sure you’ve emailed me (lapaceksorchard {at} gmail {dot} com) your email address) and any critique’s the judges have about your creation. The top 3 scoring projects will be posted on my blog next weekend.
PUBLIC WINNERS: YES, you can win a prize too! You’ll find out how to WIN at the bottom of this post after you’ve checked out each of our challengers entries.
And now here are all the entries – in no particular order…
***Please note – I have left the images smaller to help the blog load a bit faster. I strongly URGE you to take closer looks at the projects before voting by checking out their submittals on the flickr group:http://www.flickr.com/groups/1401824@N21/
THE ENTRIES:
Quilter: UpStateLisa
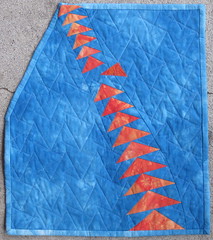
The Story:
This is the first time that I have entered project quilting so here it goes...
I designed my own geese on freezer paper and paper pieced the geese, leaving a gap so that I could machine appliqué one geese breaking away and going out on her own (yeah, maybe I am hoping it is me!). The goose that is breaking away is made with a commercially produced fabric which has metallic swirls, just to be unique as well. I apologize about the quality of the photo, but there has not been much light in the skies of upstate NY lately.
I used some of my left over hand dyed fabrics and took my older daughter's advice and used the orange and blue as the complementary colors. The geese, you may notice are slightly wonky in their direction, as I like to be wonky!!!
I also decided to create a quilt that wasn't entirely rectangular so as to have the geese fly off the quilt. In fact, the top geese is essentially a prairie point type triangle that stands up above the quilt!
I took a class recently (on a cruise ship, no less!) with Charlotte Warr Andersen and used one of her machine quilting techniques! I used a 40 wt sulky rayon for the quilting thread.
This "quiltie" measures about 13"x14.5".
Created by "upstatelisa", Lisa B. Filion, Queensbury NY
QUILTER: ForQuiltsSake
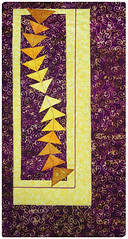
“Dancing Geese”
Made by Pam Geisel of For Quilts Sake in Yellow Springs, Ohio, Mar. 2011 for Project Quilting Season 2, Challenge 5, Flying Geese.
10” x 18.5”
My creative process and how I made it:
I actually spent a lot of time coming up with the layout for this quilt. Using my computer, I played with many, many different arrangements. One of the things I love about using traditional quilt blocks is the way different parts of the block are emphasized or de-emphasized depending on color and fabric placement. I knew I wanted the background fabric to be all the same so the triangle parts of the geese would be the focal point.
Once I finally came up with a layout I wanted to do, it was time to start playing with complimentary color schemes. I went to my stash to see what fabrics I had that I thought would work with and I wanted the fabrics for the triangles to be the same color but to range from light to dark. The color that provided me with the most range from my stash was yellow, although yellow is a light color so it doesn’t have a large range of shades. And if the geese were going to be yellow, then the background would have to be purple. I found a wonderful purple-y batik that had cream and yellow colored swirls, so it was time to get started.
I knew that I could fuse the triangles to the background but I was a little concerned about the background showing through the yellow fabric and I also didn’t want the geese to be so flat. I played around with some origami-like folds, kind of like making prairie points, only I didn’t realize that until later. The triangles are pretty small, only 2” on the longest point. (The 3-D quality of the triangles is more noticeable in the “Side View” photo.)
A few false starts on figuring out how to piece the background led to cutting the background fabric for each “stripe” and drawing the shape on the wrong side, much like using a template only I traced by placing the fabric over my full-sized diagram on my lightbox. Still using the lightbox, I placed the triangle in its proper place then sewed adjoining pieces and attaching the bottoms of the triangles at the same time. The points of the triangles were sewn into place during the quilting.
I made the top and left borders the same width as each other and made the right and bottom borders the same as each other but larger than the left and top borders and I added a light purple cord in the larger yellow borders to contain the triangle that extended beyond the background.
I decided to do some of the quilting with the opposite color, which is something I don’t do a lot, but I think it helped the design. I did some echo quilting around the triangles with a yellow thread and also stitched in the ditch on the yellow inner border and more echo quilting in the purple background with purple thread.
For the binding I used the same strip- facing technique that I used on the last challenge quilt “After the Rain” because I liked how well it worked.
Quilter: MoranArtandQuilts
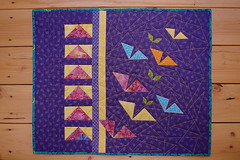
"Homeward Bound"
It measures 21" x 26"I'm disappointed in how the colors turned out in my photographs so they're not a very good depiction of the work. The purple actually looked blue at first so in trying to fix it, the thread colors look off.
I love purple so decided to use that and yellow as the dominant colors. Starting out with the traditional flying geese on the left I debated on what to do with the right side since my main goal in any work is to have a good composition. After playing around with the triangles as flowers, shapes and then birds, I decided on the birds that appear to be flying away from the traditional method. They were applied using raw edge appliqué.
I decided to follow through with this composition by quilting with yellow thread on the right and mimicking the triangle shapes. I then used a light aqua thread on the left with straight lines to carry over the aqua birds on the right tying everything together yet maintaining two distinct styles.
The binding is an aqua fabric with bits of the other colors in it, too, to also tie things together.
Catherine
Columbus, Ohio
Quilter: SpringWaterDesigns
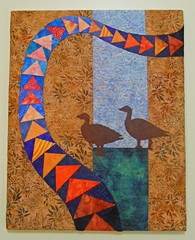
Geese of Gettysburg
For this Project Quilting Challenge my piece is inspired by the many geese that would gather at my daughter's college campus at Gettysburg College. I chose Blue and Orange (Gettysburg College school colors, and complimentary colors on the color wheel) for the curved Flying Geese. The silhouette of the geese in the smoky brown color represents the geese that could be seen walking all around her dorms near the lake.
I went pretty far out of my box on this one. I've made many a traditional Flying Geese unit, but never made the curved flying geese which I drafted on paper, and paper pieced. Batiks were used to piece the background, and the flying geese are made from 13 different graduated colors of cotton prints and hand dyes, going from dark to light to dark again (The colors are very rich in person, my photography doesn't do it justice). I heavily machine quilted the background to make the flying geese pop. To complete the art piece, I stretched it over and mounted it to a 16" x 20" Artist Canvas.
Created in Jessup, MD USA. I'll have a blog post about my design process Monday on my blog:
springwaterdesigns.blogspot.com
~ Dawn Stewart
Spring Water Designs
Quilter: Aunt Cindy’s Attic
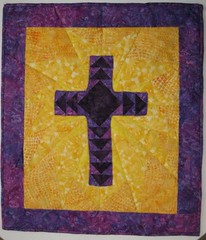
If You Want to Make God Laugh, Tell Him Your Plans
I had an idea for the challenge within minutes of reading it. I had it fairly well planned in my head, until I tried to envision the color combos. None of the complimentary color schemes worked out well for my thoughts. Plan one was scrapped.
I printed out some geese units, cut them out and started playing with them. I quickly came up with the cross scheme. I drew it out on giant graph paper and started in on the background. I liked the concept of something radiating from the center of the cross, but just adding yellow wedges seemed too simple. I also thought that going lighter in the center and darker towards the edges would work out well. I ended up drawing triangles in the middle of the wedges to give the background a flying geese feel.
I scanned the upper right and lower right quadrants of my drawing to create a paper pieced pattern for the background. I printed the reverse image of each scan to get the patterns for the two left quadrants.
The geese were traditionally pieced. My plan was to inset the cross into the background. I've not sewn set-in seams before. So I spent a good bit of time researching it and watching videos about inset seams. I set in the first corner and it looked awesome. Things took a turn for the worse after that. A lot worse. I ended up taking the entire cross out.
I went with my initial instinct and appliqued the cross on. Luckily I'd wanted to try a method using a fusible web with no paper backing and I had my chance to try it. The web is sewn to the applique on the front (right sides together). You cut a hole in the webbing, turn it inside out, straighten the edges out and fuse to your background. Voila! Instant turned edge applique.
I chose the colors because the yellow is so bright - I'm REALLY looking forward to spring. Also Lent started this week & purple is the color of Lent (also a color for mourning).
The quilt is approximately 17" x 20".
Created by Aunt Cindy of Aunt Cindy's Attic, Crawfordsville, IN
Quilter: AllThingsBelle
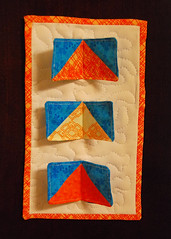
Sky Specimen
I'm Jennifer Rodriguez, art quilting in West Jordan, UT.
My piece is "Sky Specimen" and is approximately 9.5"x6".
This piece is inspired my love for specimen art and of course our theme, flying geese.
My father is a scientist and I grew up with specimen art in our home.
I love the mix of nature and art. It was my hope that this quilt captured scenes of geese flying in the sky.
Each "flying geese" was individually quilted and sewn down the middle to give the piece motion. The Kona white backing and free motion quilting was done to resemble puffy white clouds.
Quilter: Marcia's Crafty Sewing & Quilting
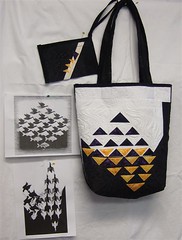
Come Fly With Me
For Challenge 5-Flying Geese I based my Project for Project Quilting on the art work of graphic artist MC Escher (Maurits Cornelis Escher). I found the two pieces of artwork on Google images and decided I could place triangles in a similar pattern to create a cool design on the front of the quilted bag. I used orange and purple for my complimentary colors. Then I decided I needed extra borders to make it larger and added the strips in a log cabin fashion creating a step like design element to the sides of the bag. Then I repeated the V on the back of the bag - upside down. My original plan was to make a small passport bag for myself, but I was having so much fun with the triangles, I decided I had to make a larger bag. So when I quilted my large bag fabric piece, I also quilted a little flying geese design of on black and white fabric to use to create my small passport bag. My Fly Bag is about 14" wide by 15" deep. I used a poly batting to make it a little lighter as I will pack it full for flying. I don't have a passport yet as that is another long story... I plan to eventually apply for one, but it seems I never do it! Maybe next week!
Marcia Wachuta Boscobel, Wisconsin
Quilter: Dashasel
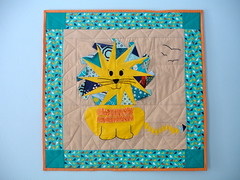
That's not my lion...
...its mane is too blue!
The title of this piece is "That's not my lion" in reference to the series of "That's not my..." baby books that my son loves.
I was excited that this week's challenge was to use flying geese! I had not yet made this more traditional block and thought it would be fun to use more traditional quilting elements overall. As I thought about what to create, I was (as I often am) inspired by my son. He loves all things related to cats, especially big cats, and I knew that I wanted to make him a lion. I went with blue and gold as my main colors (they were complimentary colors on the color wheel I looked at).
I decided to use one of my favorite patterns in flying geese-- that of the circle of geese-- as the lion's head. I had also seen some curved flying geese and wanted to give this a shot too, so I used this for the lion's tail. With both these blocks, I got to try my hand at foundation paper piecing (addicting!). In addition to the flying geese, the other more traditional quilting elements I used were prairie points (to "fluff" out the lion's mane and make the piece three dimensional) and a border for the quilt. I used simple embroidery to make the face and legs and ruffled some fabric to make its furry chest. I left the edges of that fabric raw so that it would fray and hopefully contribute to that furry look. I also embroidered three flying geese in the distance as another fun reference to this challenge.
I wish that I had had the skills and forethought to draft my quilt pattern out before starting, but instead, I improvised as I went along. The head was created first, then the body, and then the tail. It was a fun challenge to figure out how to connect them all and I'll admit that some (well, a lot) of seam ripping may have been involved :). Because of the numerous seams that go in so many directions, I decided to use random and wonky zigzags when doing my quilting. I also thought the zigzags created the illusion of the flying geese blocks, and at the risk of overkill, also used it in my binding.
This quilt is 21.5" square and was made in Milwaukee, WI
Quilter: Christine Hampton
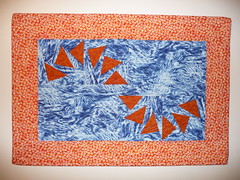
Drunken Geese 1
Drunken Geese 15” x 22”
Made in Oregon, WI by Christine Hampton
I used a free paper piecing pattern from PieceByNumber (http://piecebynumber.com/pastbom/colorwheelpatt.htm) for my flying geese. The curved path of the geese reminded me of the drunkard’s path blocks, so I named this project Drunken Geese. The geese appear to be flying tipsy with a bit of a swerve on. I quilted it with freehand wavy lines across the center with blue variegated and around the border with orange variegated thread. This piece would look good hung either horizontally or vertically.
Quilter: Kathleen P
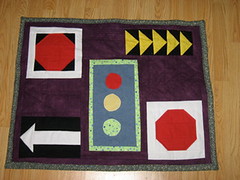
Under Construction
This is the story of a quilt back that became the front in a week I had no time for quilting. I was sitting around perusing some of my many (many) quilt books for flying geese ideas, and my sweetie glanced over my shoulder and said one of them looked like a detour sign. And from there I went to some of the nifty play mats I've seen on the Celebrate the Boy month going on elsewhere in craft-blog-land, and figured I'd make the kiddo a little construction site mappy thing-o, despite sealing my fate as the lady who only quilts for a 2 year old.
So I whipped up a few flying geese in construction colors, and a one way sign... and a few stop signs... and a stop light... and there was no room for a construction site. So I put it on the back. Which was now the front. I let the complimentary colors guide my choice of the negative space around the blocks: there's a lot of purple in here that I wouldn't have used if I wasn't trying to bring out the yellow geese arrows.
If this quilt had a middle name it would be Short Cut. I didn't have much time, and I knew I couldn't make it to a store this week, so I made do (hey, did you know you can brush your teeth and machine piece at the same time?). It's all flannel because I have a weirdly large flannel scrap collection, and lemme tell y'all I am DONE with the flannel! It's so annoying! And my scraps are all different qualities! Such the aaargh. There are so many things I didn't have time for: there wasn't much black, and I wanted roads but didn't have time to finish a middle line. Maybe I'll add it in embroidery. The quilting is minimal, and I got a little silly last night with some free-form arrows. With flannel that makes for some weird puffiness. I can add some more and I think it'll go down to a nice kind of puffiness. I would have liked to add letters to the signs and made some more yellow and black ones. I didn't love the black stop sign, but didn't really have time for anything else. (Actually I think a properly planned out traffic sign quilt would be a real hit for people looking for a boyish quilt design for a toddler--maybe we'll call this a prototype?) The binding is just the edges folded over. The photographs are extra haphazard today: it was either in the light or lying flat but not both.
But the short person for whom it was made *loves* it. The thing about making a quilt for a kid, or anyone, is that you think about that person. Turns out I don't want my kid to be a perfectionist. I love that he grabbed the top and curled up in it on the couch. He wanted the one way sign to be put up on the wall ("Use Duck Tape!"). He counted the stop signs. He proclaimed the construction side a farm and brought it stuffed pigs. Even though we want to raise our kids to have high standards about some things, creative play isn't one of those things. So even though the quilting isn't perfect and I would have redesigned some of it if I had time, it is successful, and it's a good lesson for a quilter too, since quilts have always been gifts: standards only take you so far. Sometimes you need to just pick up your tractor and pretend. And next time I'll make something pretty, I swear.
This is 25" by 32" and I made it in Oneida County, NY.
Quilter: Sarah B
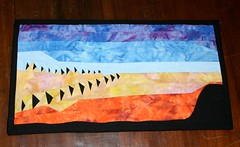
Geese at Sunset
This piece measures approximately 17" x 9 1/2". I used foundation piecing (geese), traditional piecing (sky) and fusible applique (for the lower landscape).
The challenge combination of flying geese and contrasting colors immediately made me think of geese flying in the sky at sunset!
I always try something new for each Project Quilting Challenge! This was my first time using batiks or a true black. Even though I knew just what I wanted to do as soon as I read the challenge, time got away from me, so this also became the first time I think I've ever completed a full project in less than 24 hours, as I finally started sketching this one after noon Central Saturday (yesterday) and we lost an hour to daylight savings overnight.
I create in Colorado.
Quilter: Sally’s Angelworks
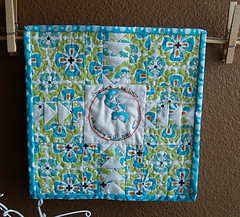
The Earth is the Lord's - Organic Quilt
Here is my Project Quilting entry for this week's challenge. It is also a piece of a collab effort to raise funds for New Zealand's devastating earthquake several weeks ago. Even in the aftermath of Japan's devastation, for those of us who feel helpless, this is my little part. I hope to have a whole line of quilts for charity in my Etsy store soon!
For our challenge we were to be inspired by flying geese. Lately I have been making block after block with flying geese...so at first, no inspiration! LOL!! But I remembered a block I did for the Blogger's Block-a-palooza designed by Monica Solorio-Snow (the Happy Zombie) and the way the geese looked to me like arrows. I loved that! For this quilt, I knew I wanted to have an earth in the middle, and the geese could point right to it! For me, that God is over all the earth and that everything is His is my comfort. I will probably pontificate about my religious philosophies more on my blog where it is more appropriate, but suffice it to say that He is what I want to focus on, to point to!!
I also love the colors!! I chose aqua and orange as my complimentary colors!!
This quilt is made from 95% organic cotton (Monaluna fabrics) and cotton muslin. I used Bamboo batting (so yummmy!) and embroidery thread for the earth, quilting thread for the outlines of the continents! I used a pigment pen for the Bible verse: Ps 24:1 "The earth is the Lord's...and everything in it." I quilted the flying geese in an arrow shape and free motion quilted the corners. (I'm sooo loving FMQ now!!)
I appreciate all of your comments and look forward to hearing what the judges have to say...
sally from sally's angelworks in Texas
this quilt is 9 5/8" x 9 5/8".
----------------------------------------------------------------------------------------------------
Quilter: KimsCraftyApple
Not eligible for Public Voting Prize
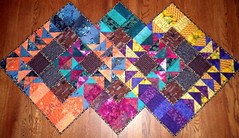
Three Geese
Here's my entry for this weeks challenge. The hardest part of quilting for me is definitely piecing so this challenge was one of the more difficult to me. To get started I browsed flickr to see what flying geese projects are out there. From what I found, I was able to draw up a sketch for a fun table runner full of movement in color and pattern.
I did have a lot of fun putting together my complimentary color combinations. I wanted to add some 'dimension' so I choose three fabrics for each color - mixing batiks, commercial and hand dyed all together - so much fun! It took time and many different design wall layouts to create the flow of color you see in my final entry. I found my design wall and camera very useful for this part as it allowed me to step back and really look at what was happening.
I also had a few different thoughts for the spaces between the entwining squares but finally decided on this gorgeous brown print. I felt that it helped to mellow the piece just enough. To add a bit of a twist I added a lip of a brown mini olive branch-like striped fabric around each of the brown pieces. This was a bit bulky to sew but with a little water and the weight of my vintage iron I was able to flatten them down nicely. I used that same olive branch fabric to bind the quilt. One thing I learned was the proper way to bind and inside corner - it was a bit intimidating at first but the method worked really well and I think the result looks fabulous.
I used brown thread for quilting. I had thought of quilting each color with it's compliment but realized I already have a lot of different thing going on so I went with the brown to sort of tone things down a bit. I quilted in a fun wavy wrap around pattern in all the main portions of the geese and inside the brown squares.
I'm really happy with how it turned out and I really wish the snow would melt outside so I could taken a decently lit picture but this will just have to do.
Created by Kim Lapacek in Poynette, WI
Approximate Size: 50" x 28"
Now for the PUBLIC Comment PRIZE!


Everyone is eligible to win a Pattern & Notecards from Marcia's Crafty Sewing & Quilting for this weeks Public Comment Prize!
TWELVE Chances to WIN!
Entry 1: REQUIRED! Leave a comment on your favorite entry at the bottom of this blog post (you can also comment on twitter/flickr/facebook but that won’t get you an entry) (or at least that you voted) and vote for your favorite on the poll on the upper left hand side of the blog. -***MUST DO***
Optional/Additional Entries – please note – if you want to qualify for these additional entries you must leave a SEPERATE comment for each with your email address– if you already follow or are a fan, etc just leave comments saying each. If you write everything in ONE comment you only will have ONE entry…
Entry 2: Follow my blog.
Entry 3: Follow me on twitter: www.twitter.com/kimscraftyapple
Entry 4: Tweet about this fantastic contest with hashtag #PQGeese (important or I won’t know you did it)
Entry 5: Like Project QUILTING on facebook
Entry 6: add my Project Quilting ‘Grab my Blinkie’ to your blog or blog about my giveaway (link your blog or post in your comment, please)
Entry 7: Head on over to CraftySewing on etsy and let me know your favorite item in the store!
Entry 8: Sign up for my newsletter in the upper right corner of this page!
Entry 9: Blog about Project QUILTING and leave a link here to what you wrote.
Entry 10: Like Marcia's Crafty Sewing and Quilting of Facebook.
Entry 11: Follow Crafty Sewing’s blog.
Entry 12: Follow Crafty Sewing on twitter.
***Participants, Judges, and Sponsors in project quilting ARE allowed to enter in the public poll/contest as well.***
This means you have TWELVE chances to win! I need you to write each of these entries as different comments in order to qualify you for all twelve entries and include your email address. If you don’t include your email address I won’t be able to contact you when you win and I will have to choose a new winner. I will be picking the winner on Saturday, March 19th.
***Changes to Prizes/Voting this season***
- One person can no longer win both prizes. If this does happen (as it has), they will take home the ‘JUDGES Choice’ prize and the person in 2nd in the PUBLIC vote will take home the ‘PUBLIC’ prize. As before, each of these winners will not qualify for the random prizes. I’m doing this just to spread around all the amazing goodies so many great sponsors donated!
- The second is, I will not be listing myself (KimsCraftyApple) on the Public Vote. Since this is my ‘creation’ I will never win any of the prizes – I don’t want to seem like this is biased towards me at all. I’m doing this merely for the fun, the challenge, and the camaraderie. I will still, however, be showing off my entry AND sending it to the judges for their score and critique.
Challenge 6 (WOW – the last challenge) will be posted on Sunday, March 20th at NOON!
Project QUILTING – It’s Time to Vote for Your Favorite ‘Be My Valentine’ Piece!
Woo Hoo! We’re back up to TWENTY-TWO particpants! TONS and TONS of fabulous projects. Lots of our regulars and I’m happy to welcome some newbies! I have to say that I’m glad that I get to be a ‘participant’ and not a judge – they definitely have their work cut out for them again this week!
For those of you just tuning in you can read more about Project Quilting Here: http://kimscraftyapple.blogspot.com/2010/04/project-quilting.html
and about the third challenge of Season 2 here:
http://kimscraftyapple.blogspot.com/2011/02/project-quilting-season-2-challenge-3.html
CHALLENGE WINNERS:
***See the bottom of this post for two minor changes made to this years prize/voting process
This week’s PRIZES!
The winner of the JUDGES vote will receive $10 to FabricsNQuilts AND a Pattern & Notecards from Marcia's Crafty Sewing & Quilting
The winner of the PUBLIC Choice will receive $10 to SpiceBerryCottage AND a Novelty Square Set from QuiltingDiva
FOUR, nope - now FIVE - randomly drawn participant will receive either In the Studio with Judy Murrah by Judy Murrah from UniquelyNancy OR $20 for Machine Quilting Services from QuiltsbyBarb. OR Downloadable Quilter's Cookbook 2009 from the QuiltingGallery OR $10 to Dye Candy OR a pdf of 2 maze quilt patterns from Lisa Penny!
Voting closes at 7pm CDT on Friday, February 18th.
This week’s Judges!
Amy Ellis of Amy’s Creative Side founder of the Bloggers Quilt Festival
OTHER BONUSES:
Don't forget! Everyone that entered a piece for this challenge can decide if they want their name entered in a drawing for $50 off the 2011 Quilts by Barb Quilt Retreat Getaway Weekend.
I will also be sending everyone their rank (somewhere between 1 and 10 – be sure you’ve emailed me (lapaceksorchard {at} gmail {dot} com) your email address) and any critique’s the judges have about your creation. The top 3 scoring projects will be posted on my blog next weekend.
PUBLIC WINNERS: YES, you can win a prize too! You’ll find out how to WIN at the bottom of this post after you’ve checked out each of our challengers entries.
And now here are all the entries – in no particular order…
***Please note – I have left the images smaller to help the blog load a bit faster. I strongly URGE you to take closer looks at the projects before voting by checking out their submittals on the flickr group:http://www.flickr.com/groups/1401824@N21/
Quilter: MoranArtandQuilts
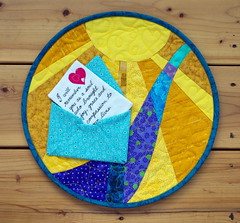
The Story Behind ‘I’ll Remember You’:
This little quilt named "I'll Remember You" measures 18" in diameter.
I thought about this for quite awhile and the thing that kept coming to mind were all the people and pets in my life that I have lost. I wanted this to be a Valentine to them. I kept it general so it could relate to anyone else who has ever lost someone they love.
I drew out the design with the sun rays signifying the rays to heaven and the path is for the path in life I have walked with all these people and all the walks I've been on with my little dog that passed away last April. I decided to paper piece the background and what a challenge that was! I struggled for two days sewing all those pieces in place and getting the path to line up and finally succeeded.
Then I attached the Valentine envelope made from fabric and found the perfect verse to write on the Valentine itself. The little heart adds the perfect final touch. The little note which measures 3x4 is removable and also made from fabric.
The quilting was done in free motion in a whimsical heart and loop design.
Catherine from Columbus, OH
Quilter: Pastor Katie Bishop
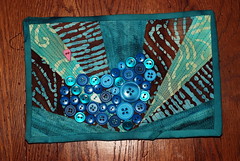 The Story Behind ‘Be Mine’:
This past week, the scripture passage of 1 John 4:7-12 has been on my mind. It was the text we used for last Sunday as we began a new sermon series, “Love is a verb.” When I think of love, I can’t help but think of the great love that our God has for us. And the “God shaped hole” in my heart that has been filled now that I know that love.
So for my piece, I made a heart. Blue because of the way I felt before I knew the love of God… cold, empty, sad. And I left a “God shaped hole” (symbolized by the white heart) in it. The only pink I used was the little pink button that symbolizes the love of God moving to my heart.
For me, there is no greater valentine then God, who is always calling out, “Be Mine.”
I paper pieced the background out of a jelly roll I had been saving. I quilted the background with brown and teal thread. I then used blue buttons and the two heart buttons on top.
Made in Brunswick, Maryland, this piece is 6.5 inches by 9.5 inches.
Quilter: Shape Moth
 The Story behind ‘Bee in love’:
Blogged:
shape-moth.blogspot.com/2011/02/hexie-bee-in-love-yellow-...
My entry for Project QUILTING Season 2 – Challenge 3 – 'Be My Valentine'. The pillow measures 42cm x 42cm and has been made in Germany :)
Quilter: Besty H
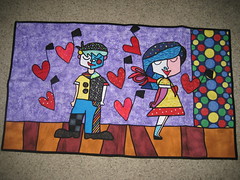
The Story Behind ‘New Beginnings’
I love the Miami artist Britto so I adapted my quilt to his style. I call it New Beginings & the idea came from my daughter and her boyfriend. Second time around for her and she is so happy. The approx. size is 28" x 34". This is my own design and I really like it.
Created in South Florida
Quilter: Gock’s Frocks
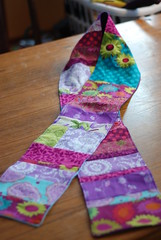 The Story:
 this is my entry for week 3 of project quilting :)
Kristen from Rochester NY
Some Bunny Loves Me
size = 6.5" wide x 6.5'long
no red...no pink was the challenge so I went with my favorite color - PURPLE!
I love making functional wearable art and decided to make a scarf for this weeks challenge.
Ideally this would make a great valentines day present or illustrates the kind of gift I love to receive - HANDMADE
the back side is a cotton interlock - purple with 1 foot of aqua interlock and a purple heart appliqué.
Quilter: Sally’s Angelworks
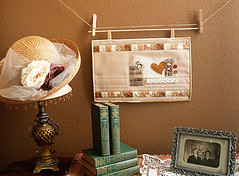 The Story Behind ‘His Love is Everything’
Ohhhh I loved this challenge. The first thing I thought of when hearing the inspiration "Be my Valentine" was a "LOVE" collage. And when I think collage, I think linen and lace and gorgeous neutral fabrics. I have had these fabrics laying around my craft cutting table waiting for me to make something out of them for about four weeks now! (I'm going to make a scrap wreath out of the rest of the 1.5" strips! fun!). I recently saw on Joanna Figueroa's blog (Fig .Tree & Co) a pillow using squares across like this and totally wanted to use that design idea as a frame for my collage. The quilting was purposefully random straight lines horizontally across the bottom of the quilt to mimic the straight line of the little squares.
I absolutely LOVE using paper scraps in my quilt collages, and here I've used a page out of a shorthand textbook, several random pictures (from Artchix...love that art site!!), and words cut out of pages from old novels. (I got those from a vintage supplier on Etsy...very addictive!!).
The words I chose to highlight on the quilt started out with just "Love is everything". But today while I was driving, I couldn't get this song out of my head (Christie Nockels - Song of the Beautiful) that says "He loves me...the broken and the beautiful...He loves me". It made me think that really for me, HIS love is everything. So I added that word today! :)
The transparency with music printed on it is also from ArtChix. And of course, I added lace and buttons. For the fabric heart, I ironed on interfacing then sent the fabric through my Big Shot and cut out the cool heart. I sewed around it slowly using my machine. I'm learning...it's good for me, for sure!! LOL!!
I just want to mention that the folds in the heavy linen were a problem for me and frustrated me. I tried every technique to get them out (yep, I froze my quilt!! LOL!), but alas, this heavy duty linen had been folded up in my craft studio closet for a long, long time! (years...*sigh*) and the folds will just have to add to the collage/art effect. Not an excuse...just an explanation. :)
Thanks for taking time to look and comment!! :) Still loving this process!! (btw, don't you love the picture of my great-grandparents in the silver frame below??? {adore}!!)
Sally's Angelworks
this quilt measures 9.5"x15" and was made in Texas! :)
Quilter: TerryAskeArtQuilts
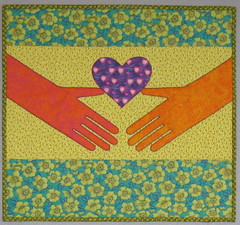 The Story behind ‘I Give You Heart’:
I didn’t think I would enter this week’s challenge. Then on Wednesday afternoon, inspiration struck! I came across a cardboard glove insert that I had been saving, and the words from the Elton John / Kiki Dee duet “Don’t Go Breaking My Heart” popped into my head. The words to the chorus are actually “I gave you my heart”, but in my head I was singing “I give you my heart” – the title of my quilt.
I decided to use the glove insert as a template for two hands, with a heart between them. I spaced the heart in the middle, so it is not obvious which hand is giving and which is receiving, because in a good relationship, each person should give their heart to the other.
I purposely ignored my pink and red fabrics, and pulled bright and cheerful fabrics from my other colors. I thought the purple fabric with the pink hearts was perfect for the heart, and I used a heart print on the back.
I fused the heart and hands to the yellow background, then added the top and bottom borders. I used a narrow zigzag stitch to outline the heart and hands, then stippled the yellow background, and outlined the flowers in the borders with free-motion stitching. I really like how that turned out.
I decided to try something new (to me), machine sewing the binding by stitching in the ditch from the front. There were a couple of spots on the back that required some hand-stitching, but overall it worked very well.
The finished size is 19" wide by 17" high.
I create in New Westminster BC Canada.
Quilter: Kathleen P.
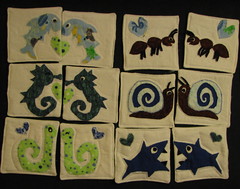
The Story Behind ‘Be my creepy crawly slimy valentine!’
We're very into puzzles over here. And I've never been so into the hearts and flowers cheesy valentine's day stuff. And I have an unseemly amount of flannel scraps. So I appliquéd and quilted a matching game of those animals usually ignored on February 14th.
There are 7 pairs: snails, snakes, fish, seahorses, ants, sharks and iguanas (one iguana went AWOL before photos: lover's spat?). I can continue to add to it whenever the whim hits (or the scraps threaten to take over). A few of them have matching hearts, most of them make kissy-face if you put them together, and some of them have 3D felt detail. Each is 5" square. I used whatever was around in the way of batting and interfacing, but the ones with the higher quality batting or the heavy interfacing are really better. They're all flannel with some felt so they're washable and will get even softer.
This can be used a lot of ways. Right now it'll be a matching game. Later, since the backing is all the same, it can be a memory game. But really, who knows? I mean, who am I to say that a shark can't fall in love with a snail? You can't stop love.
I made this in Central NY (Oneida County). And seriously, I'm a terrible photographer in the winter. In the summer I do OK, but in the winter every thing's either too white or blurry. These aren't dingy, I swear (though there is the stray dog hair).
Quilter: QuiltingDiva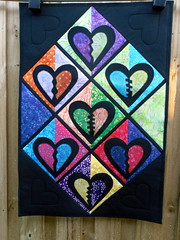
The Story Behind ‘Mend My Broken Heart’:
I love this style of quilt and have made it with turtles before but thought it would be fun with another design. The second I read the challenge I just knew that I would have to do this in hearts! I used the same template as my turtle quilt but changed it up. I used solid black fabric and cut 8" squares from my batik collection to create the colorful hearts.
Approximate Size: 32"x22"
Tampa, Fl
Stacy Edell
Quilter: Kathy Kreig
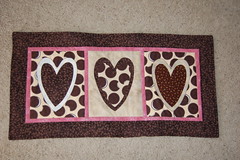 The Story:
When I read about this challenge I started thinking about what colors mean Valentine's day to me. Chocolate brown came to mind. Santa gave me this great Oreo fabric in my stocking so I thought I would put it to use. This was such a fun quilt to make!
Quilter: AllThingsBelle
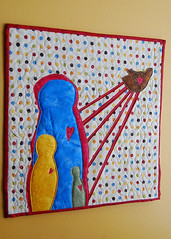
The Story Behind ‘A Mother Never Forgets’
My name is Jennifer Rodriguez and I'm art quilting in West Jordan, Utah.
This was quite the emotional quilt for me. It is dedicated to the baby I lost a few months before I conceived Juliette.
It is approximately 16x16. I choose rough edge appliqué to symbolize my raw emotion. It is free motion quilted on my sewing machine. I free motion embroidered "A Mother Never Forgets" in between the blood lines that link the image of myself with my 2 daughters and our angel baby.
What a therapeutic journey!
Blogged here:
allthingsbelle.blogspot.com/2011/02/mother-never-forgets....
Quilter: SpringWaterDesigns
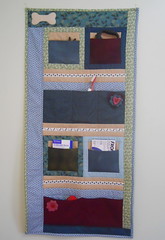 The Story Behind ‘Puppy Love’:
The first thing that came to my mind for this challenge was “Puppy Love”. I wanted to do something that showed love without being too obvious. This took me in the direction of something functional for taking care of the beloved family pet. So I made a quilt that can hang on a door, or the wall in a mud room, that has plenty of pockets for holding all of those dog supplies that need to be kept together and handy, but up and out of the way. The four square pockets are made of wool for great texture and sturdiness. The other two long pockets are made of cotton with multiple reinforced seams to section it into several pockets.
I used a color block style to give the overall piece a fun and contemporary look. For a little whimsy, the borders on two sides are a different size than the other two, and the binding is done using two of the border colors used on opposite sides. For those subtle Valentine touches, I added a layered heart and flower embellishment that I made from scraps of the wool to one of the pockets - Directions on how I made this can be found in this blog post: springwaterdesigns.blogspot.com/2011/02/happy-heart-pin.html, and another wool flower topped with a button to another pocket. Three horizontal border strips are embellished with twill ribbon with paw prints and dog bones. The large dog bone shape at the top is also made of wool, and would be the perfect place to add the pup’s name.
The finished quilt measures 21 ½” wide x 44” long. Designed and made in Jessup MD USA.
~ Dawn Stewart
Spring Water Designs
Quilter: Miranda’s Place
 The Story Behind ‘A Gift of Love’:
To me, love is like a beautifully wrapped gift that everyone hopes they have the opportunity to open. The outside packaging is so appealing that people will do ANYTHING to open Love.
It is my hope that if you have already opened love you continue to bask in its beauty and if you haven't opened love yet, don't worry.... Your Gift of Love is on the way.
Miranda Dozier, Atl. GA
Quilter: LibraryLynn
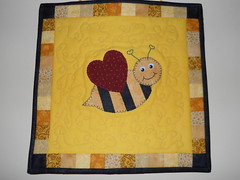 The Story Behind ‘Be Mine’:
Hi! This is my first challenge to enter. I've only been quilting for about three years and I usually follow patterns. This is one of the first quilts that I've designed myself.
When I saw the challenge, I thought I could make something for my husband. His prize possession is his bright yellow Mustang Saleen convertible. I decided I could do something in black and yellow and immediately an image of a bee came to mind. I know it's not incredibly creative, but I knew he would like it. This is my second attempt at free motion quilting. I still have a ways to go, but it's better than my first attempt. The little bee has googly eyes because googly eyes always make my husband laugh. I blind hem stitched the appliqué because I like the way blind stitching looks on appliqué. The antennae and mouth are hand embroidered. This is his Valentine's Day card, and it is 12x12 inches square. I am quilting in Conroe, Texas.
Quilter: Marcia’s Crafty Sewing and Quilting
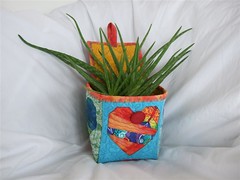 The Story behind ‘My Little Sweatheart Box’:
Marcia Wachuta - Marcia's Crafty Sewing & Quilting
Boscobel, Wisconsin
Measures 5 1/2 inches across by 5 1/2 inches deep.
I designed the crazee patch paper pieced heart for a heart quilt we made for a Breast Cancer fundraiser a couple years ago. When you said Valentine - that was it! I had to use my paper pieced heart! I started combining blues and greens and then added the oranges and printed butterfly fabric. I decided I wanted to make a 3 D quilted box . I took pictures of the whole process. See my blog posts at www.craftysewing.com
My little Sweetheart Box can be used as a catch all for just about anything from a plant to sewing supplies to a Kleenex box.
What a fun challenge!
Quilter: For Quilts Sake
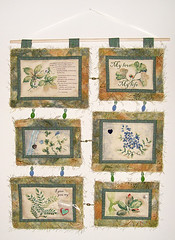
The Story Behind ‘not even the rain: a love poem’:
Made by Pam Geisel of For Quilts Sake in Yellow Springs, Ohio, Feb. 2011 for Project Quilting Season 2, Challenge 3, Be My Valentine.
19” x 26”
My creative process and how I made it:
First I started thinking about Valentines and ways people express their love to another person. I thought about love letters, and specifically classic love poems. I decided to include part of the poem “somewhere I have never travelled” by e.e. cummings, which my husband wrote in a love letter to me when we were dating.
somewhere i have never travelled, gladly beyond
any experience, your eyes have their silence:
in your most frail gesture are things which enclose me,
or which i cannot touch because they are too near
your slightest look easily will unclose me
though i have closed myself as fingers,
you open always petal by petal myself as Spring opens
(touching skilfully, misteriously) her first rose
or if your wish be to close me, i and
my life will shut very beautifully, suddenly,
as when the heart of this flower imagines
the snow carefully everywhere descending;
nothing we are to perceive in this world equals
the power of your intense fragility: whose texture
compels me with the colour of its countries,
rendering death and forever with each breathing
(i do not know what it is about you that closes
and opens; only something in me understands
the voice of your eyes is deeper than all roses)
nobody, not even the rain, has such small hands
Next I came up with a few design ideas then went into my fabric stash to see what I had in green, blue and purple that made me think of romance. I found a piece of fabric that had 7 different floral and leaf images, so I decided to make a quilt that incorporated items that someone would keep to remind them of their love including the second and final stanza of the poem, some ribbons, heart-shaped beads and charms, a little key and a small bag with a pair of hearts inside.
I fussy-cut the floral and leaf fabric (number 7 is the label), printed the text that I wanted to add (the poem and text in two other places. I pieced a thin grayish-green inner border and a yellow/green/blue/tan batik for the outer borders.
The six pieces were sewn with a pillowcase binding and then top stitched around the edges. I did quilting stitch-in-the-ditch on both sides of the inner border then quilted around the flowers and leaves. I even added some hand quilting some of the leaves to give them definition. I wanted to use some fun fur to soften the edges and I wanted it along the outside and not on top of the quilt so I used a zigzag stitch to attach it. Then I added my embellishments. The final step was to use beads to connect the quilts both vertically and horizontally. (The heart-shaped bead on the second quilt on the right side is actually a navy blue, although it looks black in the photos). Rod hangs from a cream colored ribbon.
More closeup photos at:
www.flickr.com/photos/forquiltssake/
Quilter: Quilties
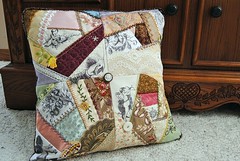
The Story Behind ‘Be Mine Pillow’:
My entry for Project Quilting 2:3 "Be My Valentine" Challenge...
I decided to give my project the look of vintage Valentines, with romantic clip art images made into Victorian-style crazy quilt blocks. I used fancy fabrics and flowery cottons in a vintage color scheme of taupe, cream, brown, light green, a little rose and pink, and lavender. All the embroidery and beading was done by hand. There's also an assortment of buttons, appliqués, vintage lace and tatting that I also did by hand. The back is a beautiful shimmery upholstery fabric and I gave it a brown flowered piping edge.
15" square pillow cover with an envelope back.
Made in Urbandale, IA by Emma Thomas-McGinnis
Quilter: Dashasel
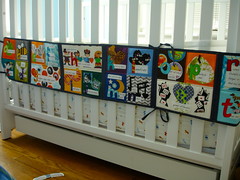
The Story Behind ‘Valentine ABC’s’:
For this challenge, I decided to make a little valentine for my baby. However, being a baby, he isn't into cards, but he sure does love books! So I decided to make him a Valentine book, using the alphabet and having each letter exemplified by something related to Valentine's day (surprisingly, that in an of itself was a challenge!). He also loves texture, so I tried to use a variety of textures; you will see linen, cotton, flannel and even googly eyes! I also tried to mix up making my own shapes versus using patterns that had the elements I was looking for. "K" also has a little key that can be put into the heart. The other fun thing is that this book also serves as a crib bumper.
In terms of quilting techniques, I used a lot of applique and I tried to do some very basic free-motion quilting, which was something I had never tried before. I also did a teeny bit of embroidery. My quilting ended up being a two step process where I first appliqued and did the free motion quilting for the blocks onto interfacing. After all the blocks were assembled, I then quilted through batting, keeping the lines really simple and just following the blocks since the blocks were pretty busy already! I'm not sure if people tend to do this (this is only my second time trying applique), but I didn't want to see all the applique and free motion stitching on the back of the book. This was also my first time using printable fabric, and wow, that was fun!
I can't wait for tomorrow so baby can have his Valentine!
This quilt measures 9.5" x 76" (as a bumper) or 9.5" square (as a book) and was made in Milwaukee, Wisconsin.
Quilter: Sarah B
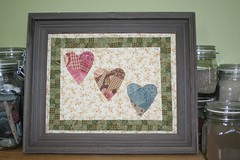 The Story Behind ‘Our Family Valentine’:
I made this special little framed quilt as a keepsake for my husband and myself as a reminder of our family. Each heart represents our kids, the rosy heart is our oldest who adores pink, the middle is our second purple-loving daughter, and the third is our little boy. The green border made up of half-inch squares represents me and my husband.
All the fabrics used for patchwork are either from the kids' baby quilts or from my latest quilt that I made for my husband and I, so it's neat to pick each little piece out and see where it came from!
The hearts were crazy pieced then raw-edged appliquéd on to the pieced background.
I free-motion quilted loops and hearts on to the background.
As I did last season in Project Quilting, I gave myself an additional challenge for each one I completed to try something new! This is the first quilt I've completed with raw edge appliqué and the first quilt I've placed in a frame.
I create in Colorado.
Quilter: Kathleen Quilts
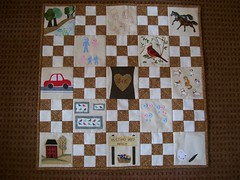 The Story Behind ‘Our Love…Our Life’:
I first thought I would do an intertwined block to represent two lives together but settled on the nine patch for simplicity and time and the room to express myself in the alternate blocks. I like how the nine patch pulls it all together. I took our wedding invitation, enlarged the graphic and traced it onto fabric with a brown pigma pen. The other blocks include part of our life together.... we met on horseback and had horses for several years. Our family grew to five quickly. The other button blocks represents our family now, with an additional son and daughter that came to us through marraige and five grandchildren. The house is for the country homes we had as weekend getaways. Car rides were entertainment for us and were walks in the woods. We birdwatched and raised birds. Our future is a blank canvas... I can't wait to see what our Lord paints for us next!
Most blocks are fusible applique. The bird cages have netting for bars. The paint on the artist's whatever-you-call-it are floss french knots.
22.5" x 22.5" created in Cissna Park, IL
Quilter: Ilsa B
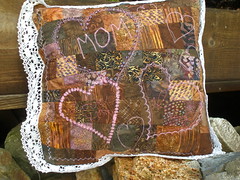 The Story Behind ‘Chocolates on Your Pillow’
I made a queen sized quilt for my mom when I first started quilting, 5 yrs ago. She now has a twin bed, and has put the quilt on her guest bed. Time for a new one for the woman I love more than life! A) I'd been collecting brown batiks for a long time, B) my best friend and quilting buddy couldn't sew with me yesterday cuz she works as a chocolatier, and BINGO! c) Idea for a quickish project in one day! This will go with Mom's new quilt.
Oh, Ilsa Birmingham, Lake Forest Park, WA, 18 inches square. My mom has an envelope with ALL the valentines my brother and sister and I, and two grandsons, have made for her. I love the paper lace doileys (sp?), and always trim mine with them.
-------------------------- ------------------------------ ----------------------
Quilter: KimsCraftyApple
Not eligible for Public Voting Prize
The Story Behind ‘Owl be Yours’:
When I first read this challenge my mind started turning. I'll be honest, I think 'Be My Valentine' is a cheesy challenge BUT I did love the fact that we couldn't use much red or pink with it.
I initially had one idea that would involve a lot of handwork but as I thought about it more I realized it would also need red or pink to make it truly what it deserved. So...I changed my train of thought. I then realized that the class I had taken the previous day - 'How to Paint an Owl' with Juliette Crane was the perfect inspiration! And it was.
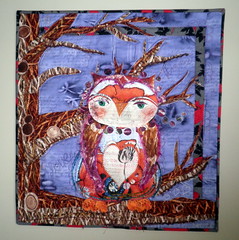
My piece is called 'Owl Be Yours'.
-Pieced the main background fabric AND the border strips.
-Fusing, Fusing Fusing! I fused all the branches and each separate piece of the owl onto the fabric.
- I then took a piece of fusible fleece and did the outline quilting of the owl. I cut it out for the 'trapunto' technique.
- Free Motion Quilting. I did LOTS and LOTS of free motion quilting on this piece. To create more texture in the branches, throughout the owl, I did an awkward, not perfect outline of the branches with variegated purple thread to create a 'windy' look, fun whimsical half circles all around the owl, feathers on the owls head and wings, hearts, the word's 'Love' and 'Amore' in the wind...the more you look...the more details you would see.
- What's a project without a little fiber? I appliquéd fun fiber onto the branches and the owl. The owl fiber was meant to give you the feeling of feathers and to create some distinction between the tree and the owl.
-Oil Pastels, I used some of my oil pastels to create some shine on the beak and the feathers. I also used some bronzer to give the owl some flushed cheeks.
- Paint - three small white dots were painted in each pupil - to help make them look more realistic.
Did I mention - of course my owl is pregnant!
Approximate Dimensions: 22.5" x 24"
Created in Poynette, WI
~Kim Lapacek, KimsCraftyApple
Now for the PUBLIC Comment PRIZE!
Quilted Perpetual Calendar from TheCountyFair
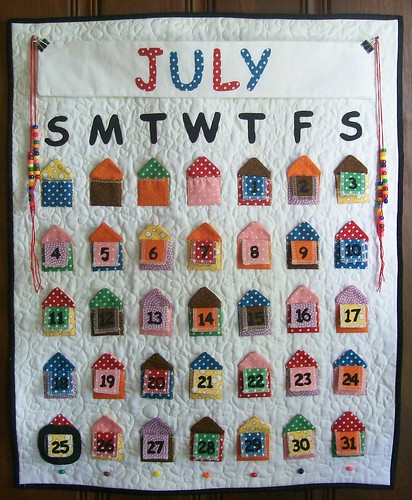
I’m having one of those moments (which seems to be happening more and more frequently) when I really wish I was eligible to win the public comment prize. Luckily, for all of you – you are all eligible! Kathleen of Kathleen Quilts and The County Fair has generously donated a Quilted Perpetual Calendar for this weeks Public Comment Prize. WOW! WOW! WOW! I can’t wait to find out who the lucky winner is!
NINE Chances to WIN!
Entry 1: REQUIRED! Leave a comment on your favorite entry at the bottom of this blog post (you can also comment on twitter/flickr/facebook but that won’t get you an entry) (or at least that you voted) and vote for your favorite on the poll on the upper left hand side of the blog. - ***MUST DO***
Optional/Additional Entries – please note – if you want to qualify for these additional entries you must leave a SEPERATE comment for each with your email address– if you already follow or are a fan, etc just leave comments saying each. If you write everything in ONE comment you only will have ONE entry…
Entry 2: Follow my blog.
Entry 3: Follow me on twitter: www.twitter.com/kimscraftyapple
Entry 4: Tweet about this fantastic contest with hashtag #PQValentine (important or I won’t know you did it)
Entry 5: Like Project QUILTING on facebook
Entry 6: add my Project Quilting ‘Grab my Blinkie’ to your blog or blog about my giveaway (link your blog or post in your comment, please)
Entry 7: Head on over to The County Fair and let me know your favorite item in the store!
Entry 8: Follow Kathleen’s Blog: Welcome to My World
Entry 9: Sign up for my newsletter in the upper right corner of this page!
***Participants, Judges, and Sponsors in project quilting ARE allowed to enter in the public poll/contest as well.***
This means you have NINE chances to win! I need you to write each of these entries as different comments in order to qualify you for all seven entries and include your email address. If you don’t include your email address I won’t be able to contact you when you win and I will have to choose a new winner. I will be picking the winner on Saturday, February 19th.
***Changes to Prizes/Voting this season***
- One person can no longer win both prizes. If this does happen (as it has), they will take home the ‘JUDGES Choice’ prize and the person in 2nd in the PUBLIC vote will take home the ‘PUBLIC’ prize. As before, each of these winners will not qualify for the random prizes. I’m doing this just to spread around all the amazing goodies so many great sponsors donated!
- The second is, I will not even be listing myself (KimsCraftyApple) on the Public Vote. Since this is my ‘creation’ I will never win any of the prizes – I don’t want to seem like this is biased towards me at all. I’m doing this merely for the fun, the challenge, and the camaraderie. I will still, however, be showing off my entry AND sending it to the judges
 Labels:
challenge,
craft challenge,
prize,
project Quilting,
quilt challenge,
quilts,
voting
|
Labels:
challenge,
craft challenge,
prize,
project Quilting,
quilt challenge,
quilts,
voting
|
 73
comments
73
comments
Stars Over America – Time to VOTE

You all made me hold my breath again! Only four entries uploaded to flickr by seven am this morning. Again many have come through in time for the deadline – we have TEN fantastic entries this week!
For those of you just tuning in you can read more about Project Quilting Here: http://kimscraftyapple.blogspot.com/2010/04/project-quilting.html
and about the fifth challenge of Season 1 Here:
http://kimscraftyapple.blogspot.com/2010/07/season-1-challenge-5-stars-over-america.html
CHALLENGE WINNERS: There will be two winners for this challenge – one for the public vote and one for the ‘judged vote’ – Diane, Barb, guest judge Nancy, and guest judge Sara.
The winner of the JUDGES Vote will receive 4 fat quarters (their choice) from FabricAlaCarte AND a $10 gift certificate from the FatQuarterShop!
 The winner of the PUBLIC Vote will receive a pattern with instructions for the complete 'Maggie' doll, hair and clothing from Carolee Creations - SewSweet Dolls AND a $10 gift certificate from the FatQuarterShop!
Voting closes at 7pm CDT on Friday, July 16th.
OTHER BONUSES:
A RANDOMLY Drawn Participant will win a pattern for Barb's Where's the Point Quilt and second drawn participant will win the pattern for Diane's Prairie Star Quilt.
Don't forget! Everyone that enters can decide if they want their name entered in a drawing for $50 off the 2010 Quilts by Barb Quilt - Papercraft - Scrapbooking Getaway Weekend!
I will also be sending everyone their rank (somewhere between 1 and 10 – be sure you’ve emailed me {lapaceksorchard@gmail.com} your email address) and any critique’s the judges have about your creation. The top 3 scoring projects will be posted on my blog this weekend.
PUBLIC WINNERS: I will also be giving out a prize to the public. You’ll find out how to WIN at the bottom of this post after you’ve checked out each of our challengers entries.
And now here are all the entries – in no particular order…
***Please note – I have left the images smaller than I normally do as I’ve received some feedback that my blog was loading slowly – hopefully this will help that issue. I strongly URGE you to take closer looks at the project by checking out their submittals on the flickr group:http://www.flickr.com/groups/1401824@N21/
Quilter: MoranArtandQuilts
 The story of Dreams and Remembrance
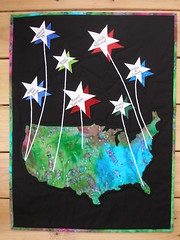
 19.5" x 26"
I decided to do a literal interpretation of this week's challenge. I found a fabulous piece of batik for the country and at this point cut out the stars, too. I then decided to give the stars some punch with the shadow colors behind them. I appliquéd all those down and thought it would be neat to write on the stars places I've been and places I'd like to see someday; hence the name.
So I chose several places and marked them on the map by sewing down some thin ribbon. I knew this quilt needed more but because I have to leave today on a short trip I wouldn't be able to get anymore done. My thought was to put a word or two along the bottom; maybe the title. This quilt really turned into a more personal thing for me with the destinations. It's amazing how these projects can change as we work on them.
Catherine from Columbus, OH
Quilter: Quilties
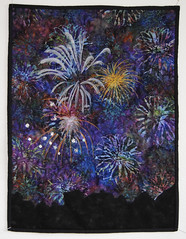
The story of ‘Fireworks’:
My interpretation of stars over America is the fireworks that were blazing over America everywhere on July 4th (or 5th in Urbandale due to rain!) My boys had the best time with the fireworks this year and I am giving this to my three year old, Brennan, who saw fireworks for this first time this year. The background is a deep blueish, rainbow batik that looked just like the night sky to me, and has big flower bursts that look like fireworks. Then I used metallic silver and pink paint sticks to do some of the fireworks and thread play to do the rest. I used shiny rayon threads, that really sparkle and added a little more sparkle with beads and sequins. The silhouette on the bottom symbolizes with America with its trees and houses.
Oops, the size is 16" x 22".
- Emma Thomas-McGinnis, Urbandale IA
Quilter: LoveBugStudios
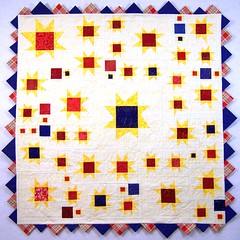
The Story:
This quilt is named "United Concensus", and is intentionally misspelled because I intend to update this quilt with 2010 census data as soon as it is released.
I knew I wanted to represent each state with a star on my quilt, so I designed this layout with 50 nesting stars. The smallest block is 2" finished, and the largest is 12". California is represented by the large focal blue block in the center, and Texas is the red block in the upper left, but don't infer any political references in the red state/blue state representations! Those were determined purely for aesthetic purposes. Each state will be assigned to a star based on their 2010 census population, and a label will be added to the back with a legend showing where each state is positioned in the quilt. (I guessed at CA & TX because of a 2009 population estimate that suggests CA will continue to be most populous.)
Each of the 50 star blocks were pieced using the liberated quilt method made popular by Gwen Marston.
For the quilting, I decided to free-motion quilt the words to the National Anthem, "The Star Spangled Banner." It was really fun figuring out how to get all the words on there without running out of room, and ultimately I decided to just run the sentences together. I didn't want the quilting to be a distraction, so it's done in yellow, but there are some additional photo closeups to show some of the detail.
To finish off this quilt, I took the finished top to my local quilt shop (Quilt Play in Grayslake, IL) and auditioned a few fabrics. I loved the blue polka dot that one of the ladies showed me, but then I found a red, white, blue, and yellow plaid that I couldn't resist. So they both came home. Of course, with a liberated quilt such as this, a straight binding would not do, so I did wonky prairie points to finish it off.
The Kona Snow (white) & the block centers are from my stash; the yellow was purchased along with the fabric for the prairie points. This quilt was made in Hainesville, IL and measures 43" square (from the tips of the largest prairie points.)
Quilter: QuiltingDiva
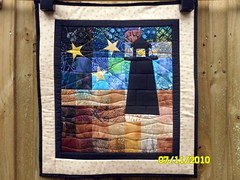 The Story:
When I thought about the challenge, I was trying to think about what is "America" to me... Growing up in Maine, I thought about the lighthouse. I also knew I wanted to incorporate fun, colorful, beachy fabrics. It is machine pieced, machine appliqué and machine quilted. I used my vast array of batik fabrics to imitate a nighttime sky and sandy beach. I quilted wet sand and star rays. It features 3 bright stars and a lighthouse with an embellished button light. The border is a soft beige star print to complete the theme. This quilt is being held by 2 oversized clothes pins I purchased at Joann Fabrics. These clothespins measure 7 1/2" long. This quilt measures approximately 22" x 20" and was made in Tampa, Florida.
Quilter: Karen’s Crafty World
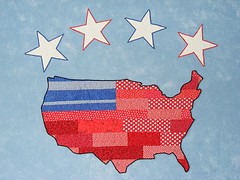
The Story:
Well, as you can see, I took the theme quite literally. I thought of this idea as soon as I saw the challenge. All the fabric came from my scrap bag...which is really getting workout with these PQ challenges!
I started out by finding a template of the US on line and then printed it out in poster size I cut it out to make a pattern. I then sewed a bunch of scraps together to emulate the flag.( I didn't have a lot of royal blue fabric, so I used what was in the scrap bag instead of cutting into a new piece.) Once I had all the strips sewn together, I quilted it with a large stipple. I then traced my US pattern onto the piece. Before I cut it out, though, I taught myself a new technique called 'couching'. I took skinny black ribbon (which is the other color I used for this quilt) and zigzagged (twice around) over it to make a nice outlined border. It 's a fun technique and I'll definitely be using it a lot!. I also used this technique with the stars. After outlining the US and the stars, I then cut them out. I'll have a posting on my blog (karenscraftyworld.blogspot.com) in the next day or two of the process pics.
My nephew, Jack, who is 6, was over yesterday and saw the almost finished wall hanging and said, "Oh Auntie, I love it, can I have it?" I said, "Maybe...." ....knowing for sure now where this piece was going to hang (in his room, of course!)
After I finished it the next day, I snuck over to my sister's house while they were at the pool and hung it up in his room. He was thrilled to have it, and I think I was even more thrilled to give it to him!
The US measures approx. 30x19 and the stars are approx. 8x8. All supplies came from my stash. I spent 0 dollars. I love that!!!
This project was made in Elgin, IL
Quilter: Sarah b
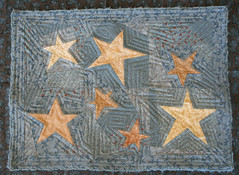 The Story Behind ‘Twinkle Twinkle’
I created paper foundation patterns for the stars. I have been wanting to paper piece stars for years and this challenge finally gave me the opportunity!
As an additional challenge to myself, I drew all the stars freehand and let them all be a little wonky. Then to add to the out-of-my-normal I crazy pieced the stars into blocks.
I chose fabric scraps from the stash I collected for all my kid's baby quilts. The blues are all my son's though. :) Some of the blues contains touches of a dark red and while. As my additional color I chose creamy tans.
The "Stars Above America" theme lead me to the song, "Twinkle, Twinkle Little Star," one of my son's favorites. This will be a wall hanging in his room.
I finished this quilt using the pillowcase method and then couched tea-stained fuzzy yarn to the edge. I machine quilted every 1/4" or so, echoing the stars.
I create in Colorado.
Quilter: PennyFabricArt
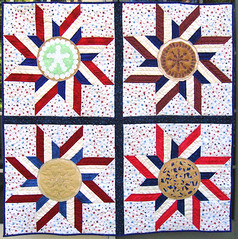
The Story:
I started this by thinking about what's classic American, and thought "apple pie." Putting star patterns in pie crusts is pretty common, so I thought I'd make some placemats or trivets with starry pies on them - a set of Apple, Blueberry, Key Lime, and Pecan.
I had a lot of that red, white & blue star fabric in my stash (that I had failed to sell in my destash shop!), so I was just going to use that for the background under the pies. But that ended up looking really boring.
Since I had so much of that fabric, I decided to make a picnic blanket, with pies ready-made for the picnic! I used big easy star patterns from the Stars by Magic book, then appliquéd the pies to the finished quilt.
There's a layer of batting in each pie, which I quilted separately from the quilt, plus an extra layer of batting under each pie when I appliquéd them to the quilt, so they have a little 3-d effect. I whip-stitched some yarn around the edge of each pie to offset them a little like a pie pan edge.
Apple: My Nana used to fold the pie crust in half and cut stars out like making paper snowflakes. I did that with this flannel pie crust to make the holes, then put a brown marbled fabric underneath to look like the apples.
Key Lime: For the key lime pie I used a flannel print for the graham cracker crust, then appliquéd on little whipped cream puffs.
Pecan: I couldn't find a good fabric for the pecans, so I bought a bag of them, photographed them and laser printed them onto cotton sheets. Then cut them out and fused them onto a gold fabric with metallic flecks.
Blueberry: The blueberry pie is a cool Kaffe Fassett print with stars cut out like pie dough and appliquéd on top.
All the fabrics were from stash. I spent just under $10 on pecans (to photograph!) and the gray yarn. Made in CT, USA
Measures 48" square.
Quilter: Kathleen’s Quilts
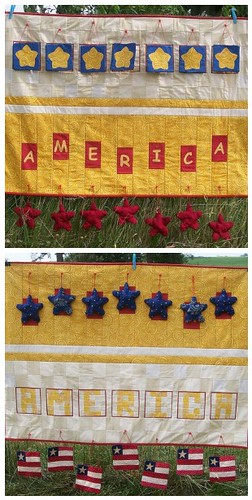 The Story behind ‘God’s Grace’:
 My interpretation was very literal - I made stars over the word America.
The first step was to piece the word 'America' using 1.5" squares of creams and gold/yellows. To add some color and to create a frame for the letters (and for the stars) I added 1/8" border of red around each letter block. Seven flag blocks of red, white and blue hang below the word. I didn't care for the look of the white stripes in the flags - too stark against the creams and golds - so I brewed some tea and steeped the blocks... no more white! For the stars to hang over America I made a gold background with staggered blocks of red. The stars are blue and filled with several layers of batting to make them puffy. To join the upper and lower pieces I added a strip of cream to the bottom of the gold and a strip of gold to the top of the cream.
Now for the fun part. The red blocks have letters appliquéd in them, upside down. The blue stars are backed with red stars. The flag blocks are backed with gold stars on a blue background. Turn the entire quilt upside down so the top is the bottom and the bottom is the top, and you again have "Stars Over America"! Or you can hang the quilt over a fence or railing and have a quilt on each side!
Quilting is in the ditch on the gold half and along the dividing stripes. The cream half is quilted with random little stars.
The stars and flags are hung with several strands of embroidery floss wound over red beads
And the name...as I worked I found myself singing just one line from "America The Beautiful" over and over. 'America, America, God shed His Grace on thee'
43" x 47" Created in Cissna Park, IL
Quilter: SpringWaterDesigns
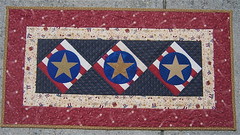 The Story of Americana Celebration:
I love traditional patriotic quilts so for the Project Quilting theme Stars over America I used scraps of reds, whites, and blues, and added gold to make this cute Americana style table runner and named it Americana Celebration in honor of the 4th of July. I had to make a quick project this week because of other deadlines that I had to meet, so I used some quick cutting and piecing methods to put this one together. It measures 18" x 36" and is quilted in the ditch, and with free motion stars and loops in the borders. I used the same great patriotic fabric for the backing that I used for the inner border. I made this project in Jessup, Maryland USA
~ Dawn, Spring Water Designs
Quilter: KimsCraftyApple
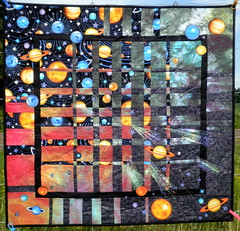 The Story of ‘Galaxies Converge’:
I took the 'Stars over America' Challenge to a more literal meaning - the actual stars over America - or the Galaxy. I started with one square of galaxy printed fabric, one of a glittery navy blue that reminded me of stars and then two separate squares from my hand-dyed fabric and converged them using Ricky Timm's Method.
Once the main part was converged I bordered it with a strip of black and then some more of the same fabric I used in the main portion. I cut out planets and stars from the galaxy print and appliquéd it into different portions of the quilt.
I then fused three different colors of Angelina Fiber together to create sort of shooting stars or comets in the lower right quadrant of the quilt. I free motion quilted this piece with rays and swirls.
Approximate Dimension: 36" x 36"
Created in Poynette, WI
Public Prize!
This weeks randomly drawn (www.random.org) public prize will win this beautiful Rustic Wood Needle Case from midnightcoiler. Read below on how you have seven chances to win!

SEVEN Chances to WIN!
Entry 1: REQUIRED! Leave a comment on your favorite entry (or at least that you voted) and vote for your favorite on the poll on the upper left hand side of the blog. - ***MUST DO***
Optional/Additional Entries – please note – if you want to qualify for these additional entries you must leave a SEPERATE comment for each – if you already follow or are a fan, etc just leave comments saying each. If you write everything in ONE comment you only will have ONE entry…
Entry 2: Follow my blog.
Entry 3: Tweet about this fantastic contest with hashtag #PQstars(important or I won’t know you did it)
Entry 4: Become a Fan of Project QUILTING on Facebook: http://www.facebook.com/ProjectQUILTING
Entry 5: add my Project Quilting ‘Grab my Blinkie’ to your blog or blog about my giveaway (link your blog or post in your comment, please)
Entry 6: Head on over to midnightcoiler and let me know your favorite item in the store!
Entry 7: Sign up for my newsletter in the upper right corner of this page!
*prizes can only be one by those in the US*
***Participants in project quilting ARE allowed to enter in the public poll/contest as well.***
This means you have SEVEN chances to win! I need you to write each of these entries as different comments in order to qualify you for all seven entries and include your email address. If you don’t include your email address I won’t be able to contact you when you win and I will have to choose a new winner. I will be picking the winner on Saturday, July 17th.
Good luck to everyone and fantastic job!


My Wonderful Sponsors!

Fat Quarter Shop
Spice Berry Cottage

10% OFF all fabrics!

use coupon code KIMSCRAFTY

Generation Q Magazine

Etsy Treasury Team


Popular Posts
-
Now that I’m off to the farmer’s market on Tuesday’s and Saturday’s it’s on my mind a lot and seemed like a fun theme for this week. One ...
-
Before I get into this Sunday’s gift guide I want to give a big congratulations to my etsy and quiltsy friend MountainHomeQuilts who had a...
-
Yes! I am having the Handcrafted Hoedown for the Holiday’s again this year. I’m excited to be able to share with you some familiar faces and...
-
Check it out! My T-shirt made a treasury... be sure to click on the link below and click on all the images to get us on the front page! http...
-
I just got back home from going to the quilt retreat in the Wisconsin Dells hosted by Barb Raisbeck from http://www.quiltsbybarb.com/ . It a...


