Grab My Button!

Grab My Button


Fabric Fascination Quilt Along


another Quilt Along!

May For Me - BINGO!


My Blog List
-
-
Finished: Waypoint Quilt3 weeks ago
-
Glacé Garden1 month ago
-
49 Unique DIY Valentines Gift Ideas3 months ago
-
Catch Up (2nd half of 2025)3 months ago
-
2nd Annual Garver Pumpkin Party2 years ago
-
End of blog3 years ago
-
-
A Japanese Stash Buster Quilt6 years ago
-
Quilted Tassel Pouch Tutorial6 years ago
-
H2H Quilt Challenge 20197 years ago
-
Shuffling7 years ago
-
Quiltsy Cares 3/31/197 years ago
-
Eco-living On A Budget7 years ago
-
a new day dawns7 years ago
-
-
-
-
-
Hand Maker Blog Tour9 years ago
-
-
The San Salvador Sails By ...9 years ago
-
-
Gift of love9 years ago
-
-
New Updates Coming Soon10 years ago
-
Sweet Jenny Belle10 years ago
-
-
-
Winning Treasury #22011 years ago
-
Dianabol11 years ago
-
Dandelions11 years ago
-
A Quilty Finish13 years ago
-
A walk in the snow13 years ago
-
-
the harvest begins~13 years ago
-
-
My Blog Has Moved!14 years ago
-
Polka Dotted Dress Envy14 years ago
-
Come visit our new blog!14 years ago
-
Handmade Christmas Recap 214 years ago
-
-
-
-
-
-
-
-
-
WIP Wednesday – Round 6
My parents came last Thursday and took my girls to their house for 4 days – lots was accomplished so hang on!
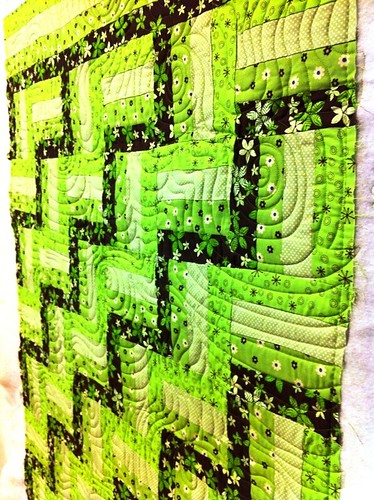
Boxed In Quilt
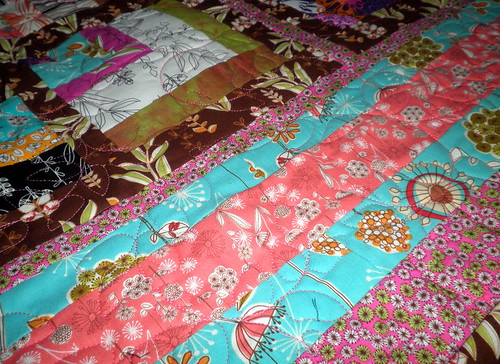 Barb did quilt my quilts before she came back into town. This one is quilted with a leafy/berry design that mimics some of the fabric on the quilt. It really is a perfect accent.
 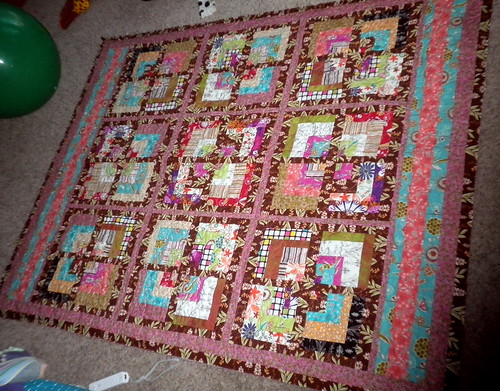 I also have the binding machine stitched on – now I just have to do the handwork. I think the brown binding will really help to ‘close’ this quilt and be the perfect last touch.
 the Mystery Quilt:
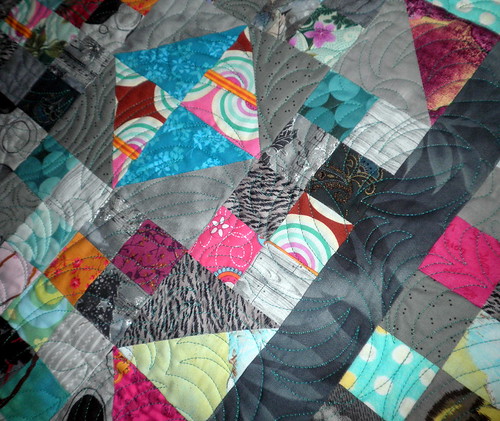 Barb also quilted the mystery quilt before her return. This one has sort of an angular feathery type design with a teal thread – again – the perfect complement to what I was doing. I still have to add the binding – hope to finish that up this week.
 Block-A-Palooza Quilt

This was going to be my project for today. BUT baby decided differently. She woke me up at 3:30 and made me finish HER quilt. I spent the rest of the day exhausted and still not able to sleep. All that’s really been accomplished on this one is pondering how exactly I’m going to finish it off…
the Bloom Quilt:
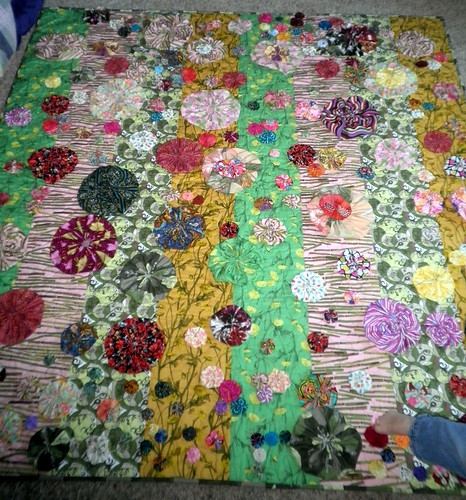
Progress made – the binding is all hand stitched on – I haven’t done non-wall hanging size quilts in awhile so this took longer than I remembered – but it was still fun and relaxing (I really do like the hand stitching portion).
A look at my chart:
| Size of yo-yo's | Quanity Made | Goal | % Complete |
| 1 (largest) | 16 | 18 | 89% |
| 2 | 14 | 54 | 26% |
| 3 | 38 | 48 | 79% |
| 4 | 56 | 48 | 117% |
| 5 | 44 | 64 | 69% |
| 6 (smallest) | 45 | 40 | 113% |
| TOTAL | 213 | 272 | 78% |
If you look at last week’s you’ll see that I’ve added 42 more yoyo’s to the list and I’m 78% complete! You’ll also see that some places I’ve made more of one size than my ‘goal’. Well – that’s just going to happen. I don’t have to follow EXACTLY the pattern – I’m just going to make what works and keep an eye on what has worked in the past. I want to finish up as many of the large yoyo’s this week as I can so I can start sewing them onto the quilt. I think I’ll start with those and then add the smaller ones where needed.
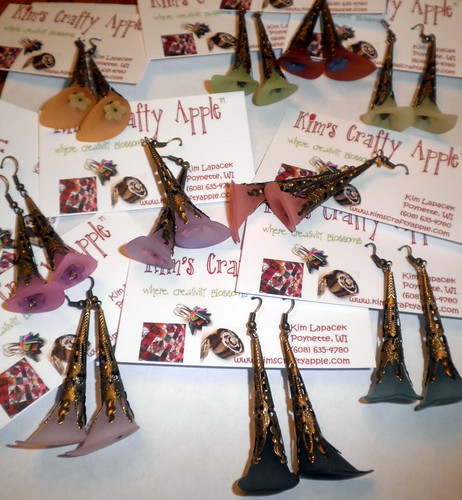
The Matryoshka Project
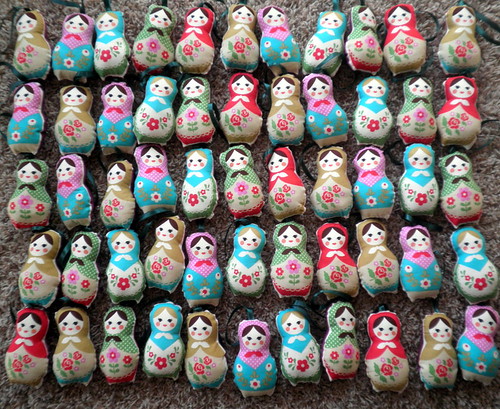 COMPLETE! The hand stitching part went together way quicker than I thought it would and these cuties are heading to the bride to be later this afternoon.
Project QUILTING – Large Scale Print
I’m going to give you a quick and dirty look at how ‘Spring Convergence’ came to be…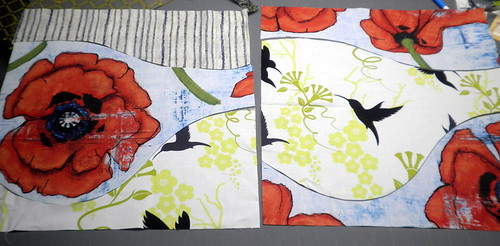 The cuts have been made above. As you can see I swapped some of the hummingbird fabric out for a piece of wavey blue stripe.
 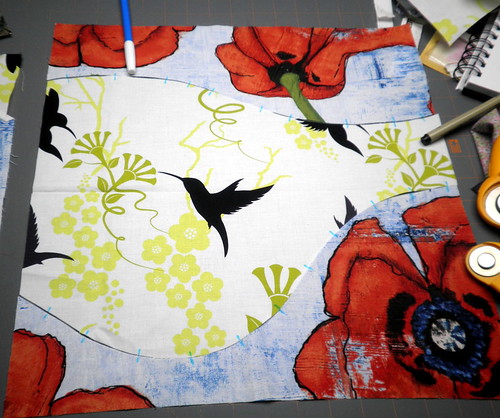 My match lines are drawn to make the curved sewing easier.
 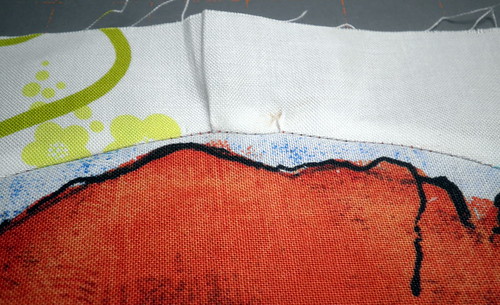 I did have a fairly curvy area that was not so ‘easy’ as you can see above. Later on – you’ll never even see this little oops :)
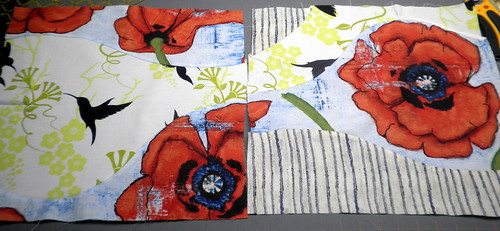 I added one more little curved edge of the blue stripe into the top of the right piece…it just needed to happen… And you can see I rotated the orientation of one of the fabric pieces before I started the convergence.
 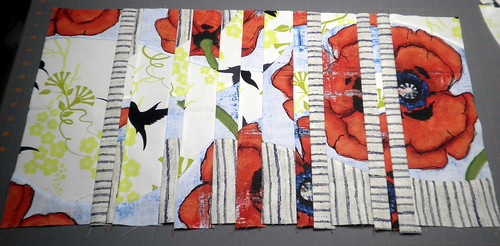 The first convergence is complete. I added a few more strips of stripes into here as well.
 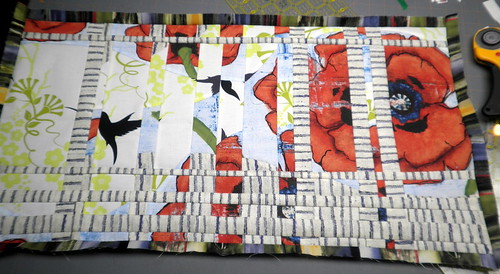 This photo shows the stripes I added into the piece horizontally and the skinny little striped boarder to break things up a bit.
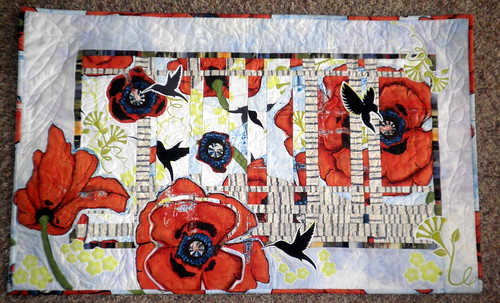 I appliquéd some of the large scale flowers and birds onto the quilt and then did some free motion quilting with my Janome. It still wasn’t right.
 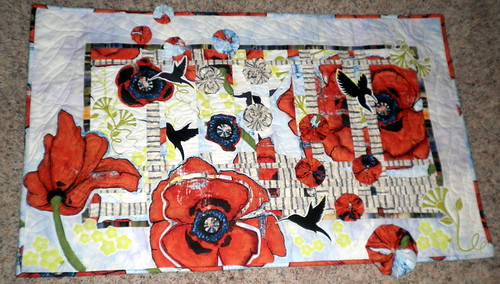 So, I made some yoyo’s (you know I’ve been into yoyo’s lately). With the way that I had put my appliques on, the yoyo’s had to cascade through the center of the quilt. I really like how it looked and its’ something you don’t see too often in pieces.
 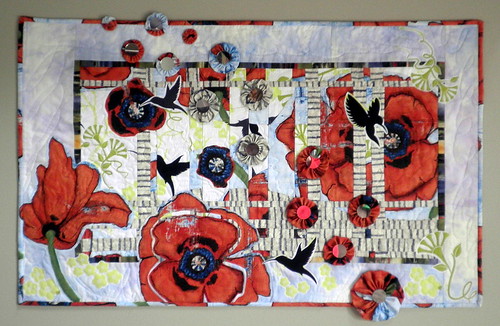 More was still needed (of course!). I found some fun little circle mirrors and glued them to the center of the flower yoyo’s. This quilt is still hanging on my wall and I really love it. It’s not even my typical colors but when a quilt tends to ‘create itself’ it always makes me happy!
 Please don’t forget to VOTE for your favorite entry and comment on this post: http://kimscraftyapple.blogspot.com/2011/03/time-to-vote-for-project-quilting-large.html
OWLS

A friend of mine made a request for an owl in blue and green for her two adorable little boys’ Easter baskets. I wasn’t sure if I’d get to them but my ‘free’ weekend made it easy peasy to complete. They’ll be heading in the mail to her today.
The Glitter Workshop
I managed to complete my goal of stocking up The Glitter Workshop with some fun spring-time jewelry and even a couple of patchwork kites.
I delivered the goodies on Friday and had a really nice chat with the owner and my friend, Naomi. If you haven’t seen her shop yet – when you’re on the West Side of Madison it truly is a must! There are just too many adorable handmade and vintage goodies to adore (and buy!). This Friday and Saturday she’s holding ‘The Spring Vintage Fair’. Madison’s best in vintage come together for an extravanganza of kitsch! April 1, 5-9 preview night with wine & treats and April 2, 105 pm with cupcakes and more vintage galore!
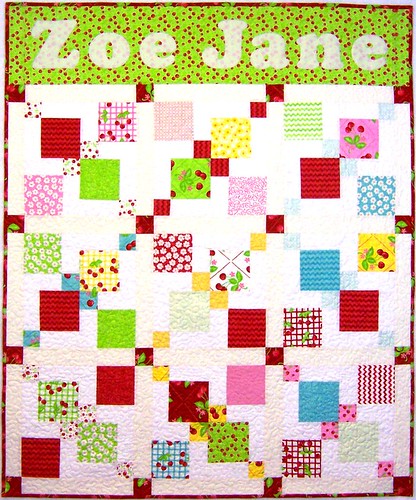
Rag Quilt for Baby
My babies are born into a family of quilters and tend to have a quilt collection before they even arrive. I like to make them cozy and warm rag quilts.
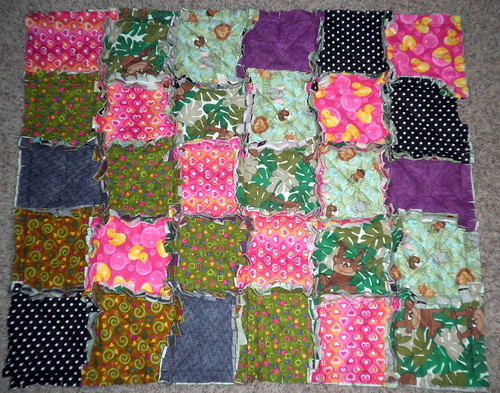 This one is extremely simple. I think once baby is born and we know what her name is I’m going to appliqué it onto the quilt blocks. For now, all that’s left is the first wash. I discovered the hard way to not do this in my front loader so I just need my hubby to hook up are old top loader in the basement and we’ll get this one finished off.
 Patchwork Squared Modern Solids Quilt Along
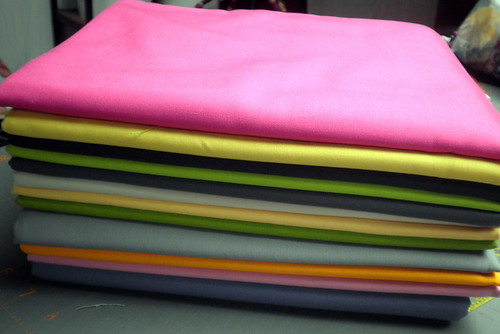
I have my fabrics picked out and ready to start the Modern Solids Quilt Along. This is the first time I’ve EVER even owned solid prints (even the black fabric I use isn’t technically ‘solid’) so this is going to be a challenge. Mistakes are not easily hidden with solids (pretty much impossible to hide actually…) so precision is truly going to be my challenge with this one.
I do have another challenge – this baby of mine should be joining us sometime in the next four weeks – we’ll see how that works this project. I’m thinking this will be my excuse to get at least still a little bit of sewing in even after the baby.
To read more about what’s going on with this quilt along check out this blog: http://www.patchworksquared.com/2011/03/modern-solids-quilt-along-week-1-intro.html
Fabric Block
One of my favorite Local Quilt Shops (LQS), Mill House Quilts offers grab bags of scrap fabric. I just love these bags – you never truly know what you’re going to get and it’s a great way to add to your stash. Well, one of my latest bags had this really fun large scale floral print on black flannel. I decided that I wanted to make a block for the baby to play with. This is what I came up with.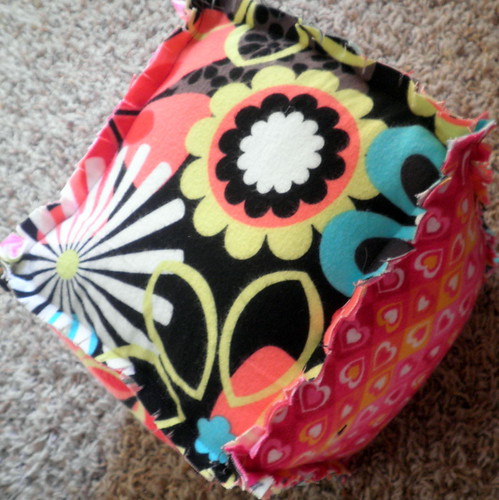
It was really fun to make and my two older girls (and their papa) have already had good times with it. I definitely want to make more – maybe in some different shapes….
Ginormous Bag
A friend of mine made these bags at the last QuiltsbyBarb Quilt Retreat. I LOVED them and she was nice enough to share the pattern with me.
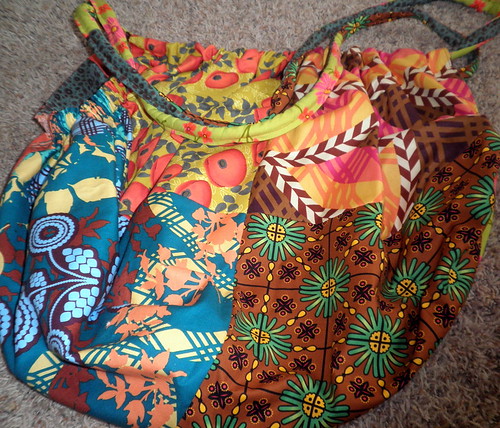 This is one BIG HUGE bag! It took six fat quarters for the exterior and another yard and a half for the interior – but I LOVE it! It’s going to be great for hauling things around – I probably could even carry my baby in it…if that were a safe thing to do.
I rarely make myself things but this bag is for me.
Goals from last week:
- make a patchwork kite (or two) for theGlitterWorkshop COMPLETE (sort of…I gave her two that weren’t getting much attention in my etsy shop)
- make some spring jewelry for theGlitterWorkshop COMPLETE
- stay on track with my yoyo goal COMPLETE
- finish up my Project QUILTING Challenge piece COMPLETE
- start work on two custom ordered owls COMPLETE
- finish up matryoshka ornaments COMPLETE
- make a quilt for baby #3 COMPLETE
WOW! What an amazing week of accomplishments!
Goals for this Week:
- Finish piecing the Block-A-Palooza Quilt
- Finish binding the Mystery Quilt and the Boxed in Quilt
- Make some more fabric blocks
- Wash the baby quilt to make it ‘rag’
- Start sewing some of the yoyo’s on the Blossom Quilt
***I’m loving that my ‘goal’ list is becoming less and less ‘urgent’***
A look back:
Project QUILTING – Meet Guest Judge Ebony Love of LoveBugStudios and Quilt Possible!
Normally I try to post these ‘Guest Judge’ blogs the week of the challenge but you’ll soon see that this week’s guest judge has just a tiny bit on her plate. Ebony was the Grand Prize Winner of Season 1 and since then has taken on a few new projects of her own. Be sure to read on and learn more about her quilting history and future!
I’ve been sewing and quilting for quite a while, and back in 2004 I made the decision to launch LoveBug Studios, a quilting business. I specialized in making custom quilts, finishing quilts for other people, and I eventually started making & selling handbags.
Pretty soon, I was making all sorts of different things, doing local shows, and even had items carried in local retail shops. I was operating about 5 online stores, writing 6 blogs, managing my own website, until one day I turned around, and realized… CREATOR I was no more. MANUFACTURER is what I had become. There were no lazy days in the studio; all my spare time was spent in service to producing INVENTORY. And I decided that was wrong for me; the path that I had initially set out for myself had morphed into a giant monster that had to constantly be fed with more quilts, more handbags, more STUFF.

So Quilt Possible! is a return to a simpler time – a time when being in my studio meant puzzling something out, finding joy in discovering something new, and being able to act on an idea the moment it hits, instead of after I finish making a dozen XXX for YYY store. I actually created QP back in 2009, but I had to put it on the back burner to focus on making STUFF. A visit to a quilt shop in San Diego convinced me that it was time for me to take this next step. I have launched an online store and have just started releasing patterns (they are geared toward owners of AccuQuilt Fabric Die Cutters.) Recently I had the honor of having a pattern available for download directly on the AccuQuilt website, which is really increasing my exposure as a pattern designer for this product.
I am loving this new direction which returns me to my love of designing, of creating, of being in the moment. But most of all, it’s an opportunity for me to share my passion with so many more people, and spread the love of quilting and sewing around the world.
As part of this new direction, I also added a new long arm quilting machine to my studio, in order to finish my own projects faster, and I occasionally take in quilting jobs for other people as time permits.

Last year, I won 6 of the 8 challenges (as either Public or Judges’ Pick) in Project Quilting Season One, in addition to being the Grand Prize winner, but realized that if I was going to be able to focus on my pattern business and hone my long arm skills, that I would not have time to undertake any of the weekly challenges – so serving as judge for the last challenge seemed like a great way to participate & contribute to the fun in some way!
I’ve only made one art quilt this year which was submitted to House Beautiful Magazine and I have also been pursuing publication in a quilt magazine for patterns and projects.

I’m also in the midst of hosting two Quilt Alongs for AccuQuilt owners – one for the GO! cutter and the other for the Studio.
All of that keeps me pretty busy, but I’m having lots of fun!
ebony
I have to thank Ebony for taking time out of all her projects to be a guest judge. On top of all the fun Ebony has in the quilting world she also holds down a regular job too! I think that her past experience will make her critiques and thoughts very helpful to us all.
Still plenty of time to vote and comment for the last challenge – Large Scale Prints: http://kimscraftyapple.blogspot.com/2010/09/project-quilting-season-1-and-grand.html
36 weeks – 28 days to go

How Far Along: 36 weeks
Size of baby: 6 lbs and more than 18 1/2 inches long
Heart rate at Last Doctor’s Visit (3/17): 150
Measuring at Last Doctor’s Visit (3/17): 35 weeks (about a week ahead)
What to Look Forward to at the Next Doctor Visit (3/30): Strep B Test
Total Weight Gain/Loss: +Maternity Clothes: going to have to up this to 32 pounds…went to the doctor last week. Definitely wearing Maternity Clothes…I have been for pretty much the whole time.
Gender: It’s a GIRL; name will be chosen when we see her!
Please – keep suggesting names…we really don’t decide until we meet her…
Movement: Still crazy but I don’t think I’m noticing it as much since I’ve been much more active now that I’m feeling better.
Sleep: decent – lots of potty breaks
What I miss: champagne, beer, being able to walk without pain, sleeping on my back
Cravings: canned pears, whipped cream, bacon, mayonnaise, chocolate, pineapple
Symptoms: heartburn, terrible hips, swollen ankles, emotional, an enlarged stomach,
Best Moment of the Week: Having my girls home with me again after they were with Grandma and Grandpa Van. I really appreciated the break but it was so good to be with them again!
PS. Don’t forget to vote for your favorite Large Scale Print PQ Challenge piece!
Time to VOTE for Project QUILTING – Large Scale Print Challenge
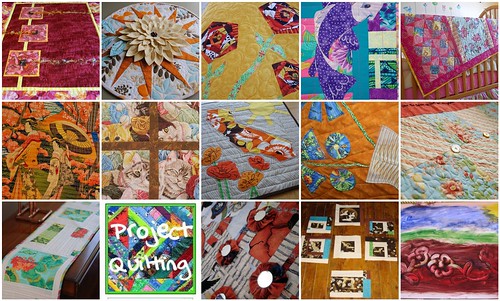
1. Let a Hundred Flowers Bloom: detail, angle, 2. Mum-burst Medallion, 3. 6March 26 2011 085 (Medium), 4. koi 4, 5. Sugary Sweet Baby Quilt, 6. Piecing History Together, 7. Close up Kitty Window 2, 8. Miss California Poppy close up, 9. Funky Froggy Flowers - close up, 10. Spring is Here, 11. 024, 12. projectquilting, 13. Project QUILTING - Large Scale Print - Spring Converges, 14. crane improv quilt blocks, 15. Ready to Break Through - Finger Paint Depiction of My Project Quilting Week 6 Concept Created with fd's Flickr Toys
I am loving the pieces created for the final challenge of the season! Great job to everyone and thanks to all for your support and creativeness during the last 11 weeks! I hope everyone is happy with what they’ve created – I know that I’ve added six fabulous new pieces to my portfolia. Thanks again for everything!
With that said…we still have one more week for voting! Prizes to be one for the participants and the public!
Can’t remember last week’s challenge? http://kimscraftyapple.blogspot.com/2011/03/project-quilting-challenge-6-large.html
This week’s PRIZES!
The Public Choice winner will receive $10 to Fabrics N Quilts and $10 to SpiceBerryCottage.
The Judges Choice winner will win $15 to FabricFascination and a pdf of 2 maze quilt patterns from Lisa Penny.
FOUR randomly drawn participants will take home either $20 for Machine Quilting Services from QuiltsbyBarb, $10 to DyeCandy, Downloadable Quilter's Cookbook - Volume 2 from the QuiltingGallery, OR a Pattern & Notecards from Marcia's Crafty Sewing & Quilting
Voting closes at 7pm CST on Friday, April 1st.
This weeks’ JUDGES!
Guest Judge: Ebony of LoveBugStudios (aka Season 1 Grand Prize Winner)
OTHER BONUSES:
Don't forget! Everyone that entered a piece for this challenge can decide if they want their name entered in a drawing for $50 off the 2011 Quilts by Barb Quilt Retreat Getaway Weekend.
I will also be sending everyone their rank (somewhere between 1 and 10 – be sure you’ve emailed me (lapaceksorchard {at} gmail {dot} com) your email address) and any critique’s the judges have about your creation. The top 3 scoring projects will be posted on my blog next weekend.
PUBLIC WINNERS: YES, you can win a prize too! You’ll find out how to WIN at the bottom of this post after you’ve checked out each of the quilt entries.
And now here are all the entries – in no particular order…
***Please note – I have left the images smaller to help the blog load a bit faster. I strongly URGE you to take closer looks at the projects before voting by checking out their submittals on the flickr group:http://www.flickr.com/groups/1401824@N21/
THE ENTRIES:
Quilter: For Quilts Sake
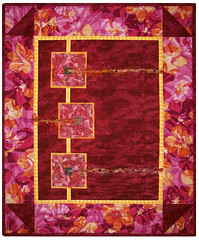
“Let a Hundred Flowers Bloom”
Made by Pam Geisel of For Quilts Sake in Yellow Springs, Ohio, Mar. 2011 for Project Quilting Season 2, Challenge 6, Large Scale Print.
24” x 28.5”
My creative process and how I made it:
I don’t usually use a lot of large scale prints, but I did have half a yard of one with large overlapping yellow, orange, pink and burgundy flowers that I’d bought several years ago for a purpose that I don’t remember now. It’s just been sitting in my stash taunting me.
When this challenge was posted I knew I wanted to finally use that fabric and a layout came to me rather quickly, it was just the stripe that had me concerned. I’ve used striped fabric before (I like to use them for bindings) but when I’ve gone to buy them I usually haven’t liked the selection of striped fabric. Because of that concern I actually came up with a second layout using a different large scale print that went with a striped fabric I already had in my possession.
Off to the fabric store (the only one of the six challenges that I’ve had to buy fabric for). I wanted a stripe fabric with at least one of the colors in the large scale print but not something too formal or straight. The very first striped fabric I found was perfect, and how often does that happen? I did check out all the other options but went back to the first one, a yellow fabric with an orange stripe that looked like it was made with a crayon, so not too formal or straight! And it was a remnant, so I got it for half price.
I also purchased the burgundy background fabric because I wanted something that was mostly solid so it wouldn’t compete with the large scale print or the stripe but it had just enough color variation to provide some visual texture.
I pieced the background fabric to the stripes so the stripes are horizontal on the left and right inner borders and vertical on the top and bottom. Then to be a little different, I cut out one stripe and ran it the other direction going length-wise on the left side of the background (more obvious on the detail photos).
Then I pieced the corner blocks and added the large scale print fabric as borders. (Regarding the first part of this challenge: including the seams I used about one quarter of a yard of my large scale print fabric.)
Before I added the other elements, I quilted the burgundy background at this time with slightly-curved horizontal lines in both a dark burgundy and a pink thread to give it more visual depth (the dark burgundy thread is a little hard to see in the photos). I quilted stitch-in-the-ditch on both sides of the yellow stripe border then did the same slightly-curved horizontal lines in the borders, going all the way across the top and bottom borders and doing shorter waves on the side borders.
I wanted a visual element to go on the burgundy background that had the same energy that the large scale print had but at a smaller scale so I made the three “fabric mosaics.” I fused many small pieces of orange, pink and burgundy fabrics on a square orange background allowing the mosaic pieces to form unusual angles at where they stopped.
I covered them with netting (which provides the sparkle that shows in the photo) and quilted them together with a purple-y thread and also an orange thread. I folded the raw edges under then machine appliquéd the mosaics to the background, aligning the top and bottom blocks so they were centered on the yellow stripe.
To hold the yarn and ribbons in the center of the fabric mosaic blocks I considered at least 10 sets of items including shells, plastic rings and round paper clips but decided to use three square buttons from a blouse I bought about 18 years ago (I probably bought the blouse because I liked the buttons) and when it was time for it to become a rag I saved the buttons…and my husband even recognized that they were from a blouse that I used to have).
I twisted different yarns (including fun fur) horizontally across the quilt and added beads every few inches to hold them in place.
Because there are so many overlapping flower images, I titled this “Let a Hundred Flowers Bloom.”
Quilter: Quilties
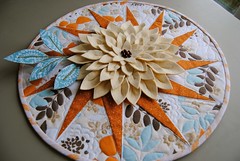
Mum-burst Medallion
This is my entry to Project Quilting 2:6. I recreated the designs from my inspiration fabric in 3-dimensions to make this circular wall quilt. I loved the white mums and elegant leaf sprays in the large scale print!! The mum stands out three dimensionally, but is also dramatically accented with the orange starbust below it, setting it off from the light background fabric. The designs in that background fabric were pretty subtle in color contrast, so I quilted around them in outlines to really make them more visible. The stripe called for in the challenge was also a very subtle contrasting fabric, but cut on the bias added just another little spin around the circle, similar to the spin of the orange star points. The piece was looking very circular and symmetrical, which I really love, but to break that up a little and add some interest, I added the branch of blue leaves.
The room photo shows how happy this piece looks in my studio in Urbandale, IA. It's 17" in diameter and very me!!
- Emma Thomas-McGinnis
Quilter: Marcia’s Crafty Sewing and Quilting
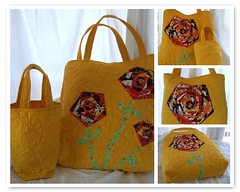
Spinning Spiral Flower Bag and Reflection Bag
Marcia Wachuta Boscobel, Wisconsin of Marcia’s Crafty Sewing and Quilting
I made one large bag and one small bag. I did the mosaic so you can see both sides of the bag. Left side - one side of the bag with the three flowers and the quilted reflection bag. Top Right - the large spinning flower and the quilted refection bag. Middle Right - close up of the large spinning spiral flower. Bottom Right - view of the bottom of the bag, so you can see the connection of the stem from one side of the bag to the other side of the bag.
For challenge six, I used two large scale print fabrics (more than 1/8th of a yard of each one) and some stripes and plaids. I cut them all up into skinny strips and made the four spinning spiral flowers - a large flower on one side and three smaller flowers on the other side.
So I took a large scale print fabric and cut it up and then turned it back into a large scale print fabric by raw edge appliquéing the flowers on the yellow fabric. Then I quilted it with swirls and wiggle lines and constructed a HUGE Bag from the quilted fabric. I also quilted some extra yellow fabric and made a "quilted reflection" of the large bag. There are no raw edges on the inside of the bag. I bound the seams with the yellow binding too.
Quilter: Moran Art and Quilts
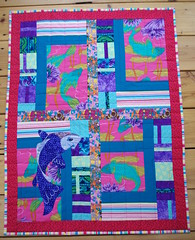
“Koi Transformation”
Measurements: 25”x32”
This quilt gave me some real challenges this week. I found this koi fabric and knew it would be hard to work with considering the pink and turquoise. I cut it in two pieces, added a turquoise border and started to make another border using squares cut in two with strips down the middle of them. I got half way done with the border as the one picture shows and didn’t like it at all. It was just plain boring.
After sleeping on it (not the quilt) I almost scrapped it but decided to just cut it into four pieces and move them around to divide up the colors a little better. I sewed them back together and added borders between and around the whole piece. It still needed more so I drew the koi fish, bonded it on and used raw edge appliqué, marker and paint to finish it off. I really liked the look of the added koi fish and if I had more time I would have added another one in the upper right corner, too. I also would have quilted it a bit more with some free motion quilting on the fish for scales and texture.
I’m happy with how it turned out considering how frustrated I was with it on Thursday! I don’t think I could ever totally scrap a quilt and always find them salvageable in some way.
Catherine
Columbus, OH
Quilter: Springwater Designs

Sugary Sweet Baby Quilt
For my Big Print entry, I made a fun and funky baby quilt featuring a cool big print running slightly off centered across the quilt. The striped print is used on either side of the large scale print. The pink outer border fabric and bright yellow binding are also bigger prints.
To feature large scale prints in different ways I also used one cut up as the blue center of the tilted nine patch blocks, and I used the border fabric cut thin for sashings next to the striped print. The tilted nine patch blocks are something new that I tried and I like the feel of movement that they give to the quilt.
Since it's a quilt that will be washed, It's stabilized quilted in the ditch along all the borders and blocks, and all over quilted with a fun loop - loop in the big print and borders.
Quilt measures 30" x 42" and was made in Jessup MD
Dawn Stewart
Quilter: AllThingsBelle
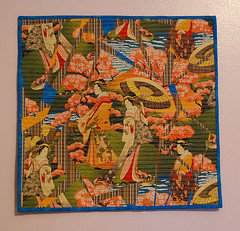
Piecing History Together
I'm Jennifer Rodriguez, art quilting in West Jordan, UT.
My mini art quilt is a 18" square.
My final piece for Project Quilting was inspired by the devastation in Japan. Sadly in addition to the immediate loss of loved ones and homes, there is also the loss of historical artifacts and destruction to sacred land. My quilt is about Japan piecing their lives and history back together.
My required large print is a traditional Japanese scene of young women with umbrellas. I cut the print up and removed a few pieces. They were fused on to a striped fabric - the striped fabric included shades orange brown for land and blue for water. I also add irregular shaped pieces of additional orange brown and blue fabric to symbolize the earthquake and tsunami.
The piece was then quilted in numerous horizontal lines. These quilted lines helped create a cohesive look, bringing the pieces of the original print back together. When you stand back from the quilt, it is not immediately obvious that the fabric was cut. It is only when you get closer that you notice the cracks and separations.
It was bound in the same deep blue to symbolize the water surrounding Japan.
Quilter: Virginia Palmisano
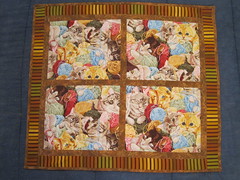
Kitty Window
Here is my entry for this weeks challenge. I am calling it Kitty Window. The large print fabric is a piece full of kitties rolling around in a field of yarn. I got this remnant piece from a fabric store a few years ago. I liked the piece and didn't know when I would use it but had to have it. It reminded me of my sister in law who love cats and I wanted to make something for her with it. The piece measured about 18 inches by 16 inches. I cut it in 4 pieces and put it together with a brown fabric so it would look like a window looking into a room full of cats playing with yarn
Quilter: Dashasel
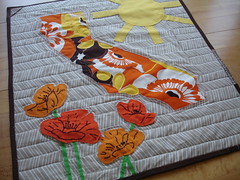
Miss California Poppy close up
The inspiration for my quilt's name comes from the following poem:
Miss California Poppy, gay
Is happy all the live-long day,
And though some poppies grow much taller,
She's brighter, she's brighter even though she's smaller.
(unknown 1930s children's book)
As soon as I saw this week's challenge, I knew I wanted to use some fabric with large poppies. I have also used this fabric for curtains and though bright and bold, I love it because it reminds me of California (poppies are California's state flower), which is where I grew up. With this California theme in mind, for the quilt top, I first cut my poppies so that I could layer them and make them appear abundant (this also ate up more than 1/8 yard, surprisingly!). It also gave me a chance to practice applique again. I also wanted the poppies to take on a framed look (or perhaps I was just itching to try another new technique), so I reverse appliqued my California template. Although I probably had enough poppies at this point, I love them so much that I appliqued a few more and did some light embroidery as well. Finally, since California is known as the Golden State and I typically think of it as being sunny (which it isn't, but I have a rosy view now that I am in the Midwest), I appliqued a sun to the quilt top as well. Since part of the challenge was to also use stripes or plaid, I used a herringbone background and emphasized the stripes by quilting down the horizontal lines.
I normally use plain quilt backs, but having researched California's state symbols, I decided to spice it up a bit. First, I discovered that California has a tartan! Ooh, how I really wanted to use this on the front, but the plaid was a bit too clashing for me. So I printed it onto fabric and decided to use it on the back. Next, California's colors are blue and gold. These colors are also in the tartan so I decided I would create a row using the tartan and blue and gold. Finally, California's state bird is the quail. How could I resist?! I found a quail image online and used that to create a quail applique.
For the quilting, I quilted around the appliqued poppies, California, and the sun. I was careful to avoid quilting on top of the quail because I like it better without the lines going through it. I also quilted following the horizontal lines of the herringbone to play up the stripes part of this challenge. Finally, because I liked the quail, I wanted the quilt to be able to hang from either direction. I like attaching the quilts to the wall directly, so I placed little triangle sleeves on both the front and the back of the quilt. I put them at the top and the bottom so that perhaps they would look a little like the corner tabs used to hold pictures in photo albums. Looking at the quilt now reminds me of a gigantic California postcard!
This quilt was made in Milwaukee, WI and is 18.5" X 22".
Quilter: Kathleen Quilts
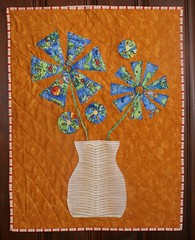
Funky Froggy Flowers
My large scale print had lots of color and some frogs. It's a cute print but I didn't want it to be all about frogs. I wanted to really play with textures and that helped disguise the frogs a bit. One flower had petals that are very bumpy - created with texture magic. Another flower was quitled with batting before being appliqued. The circular flowers are similiar to yo-yos but I used heavy stabilizer in a circle that was a bit to big - this gave a gentle buckling wave to the circles. Buttons are in the center of the circle flowers. The stems for the large flowers are made from a braid of floss of several different shades of green.
The vase is a striped fabric that I pleated and stitched the other edges, then stitched the center the opposite direction to give it more interest and texture.
The quilting is diagonal wavy lines.
I originally intended to do the binding on the bias but with the diagonal quilting I preferred the straight stripes.
31" x 24"
Created in Cissna Park, IL
Quilter: Sally’s Angelworks
Spring is HERE!!!
Ohhh I went totally traditional and true to my simple aesthetic with simple squares and with the focus on the spring quote from Shelley:
"And Spring arose on the garden fair;
Like the Spirit of Love felt everywhere;"
Had to add a bird and buttons to add to the vintagey feel of these Moda fabrics (3 sisters Faded Memories).
The flower petals were glued on with fabric glue in the shape of a bluebonnet (since I'm in TX and we're in that season now! yipeee!!) I free-motion quilted all around on the top and bottom and FMQ the grass/leaves/stem on the bottom of the flower. I know that I tend to not do things perfectly, but the wonderful thing that I've learned through this process is to keep creating with your heart! This always produces something that I love! Which is the point, right?
made in TX...22.5"x26"
Quilter: Gock’s Frocks
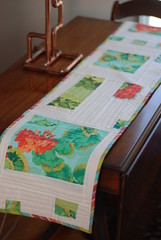
Grandma's Garden - modern table runner
Kristen Hallagan - Rochester NY
For the final challenge I used one of my favorite large prints - geranium from Martha Negley.
I also was inspired by the modern quilting movement and decided to use Kona white to highlight the print.
I started with a 12" block thinking I would use a series of 12" blocks to make the table runner. However, after completing the 2nd block I did not like it next to the 1st - scale was off...so I chopped it in 1/2 and decided to add random sized parts rather than 12" blocks...as I progressed if I thought a section needed more color, I would cut it apart and add another block of print. I added a patchwork wonky strip of greens and had one in shades of orange but cut that out as I decided to stay with the blues/greens.
this challenge also require us to use a stripe or plaid so I used a stripe cut on the bias for the binding and decided to use linear quilting stitched to create the impression of a stripes.
the final size ended up being about 12" x 55"
I added some print to the back and appliquéd one of the geranium blossoms on the back so that if you wanted, the table runner can be used on either side.
it was a lot of fun watching it grow .... rather than following a set pattern - kind of like a garden grows!
----------------------------- -------------------- -------------------------------------
These are not eligible for Public Voting Prize
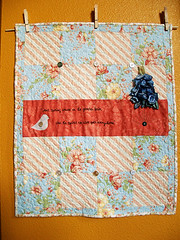
Quilter: KimsCraftyApple

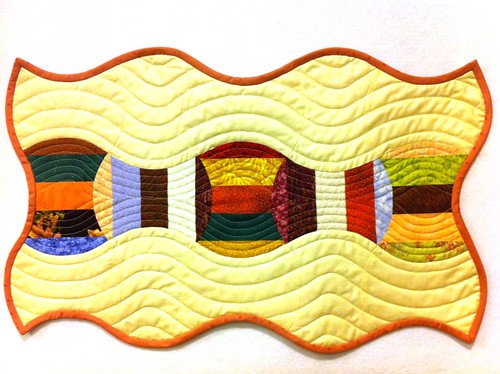
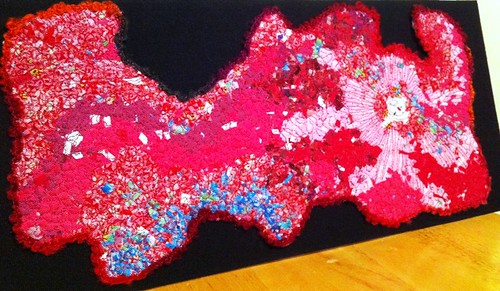
Spring Converges
I used some fun fabrics to create a converged wall hanging for this challenge. I chose to converge 'White Humming Birds' from Michael Miller, Laura Gunn's Big Poppy Spice fabric and a striped fabric.
If you've been watching my pieces through the seasons I've done convergence before - so I knew when I decided that this is what I wanted to do for this challenge I knew it would have to be above and beyond the past. I went with combining a few of Ricky Tim's techniques from his book Ricky Times Convergence Quilts: Mysterious, Magical, Easy and Fun- with Divide and Conquer Convergence with a touch of Grand Convergence. I think the convergence technique really appeals to me because you have to really trust your gut that your fabric choices are going to work. There’s not much ‘laying’ out prior to cutting to be able to ‘see’ what’s going to happen – it’s all about the gut. Once the convergence portion was done - I added the borders and appliquéd some flowers and birds to the quilt. As I stepped back and looked at I decided it wasn't enough yet...
So, made some yo-yo's and had them cascade across the quilt. To add the final touch - I found some tiny circular mirrors in my stash and glued them to the center of the yoyo flowers.
I really like all the movement this quilt creates.
Approximate Size: 34" x 21"
Created by Kim Lapacek
Poynette, WI
***Sometimes ‘life’ happens during the weeks of the Project QUILTING challenge. I love that some are still using these challenges as inspiration for future projects. Here are a couple of WIP quilts inspired by this weeks challenge:
Quilter:
Aunt Cindy’s Attic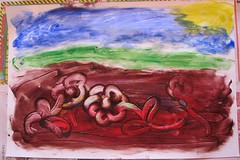
Ready to Break Through - Finger Paint Depiction of My Project Quilting Week 6 Concept
This is as far as my entry got this week. I found some giant floral fabric on a brown background. Alone it was kind of ugly and looked a bit like fabric my mom had in her bedroom in the late 70s. I thought it looked a bit like the flowers were buried. Then I thought, "Sure they are, they just haven't come up yet!". I planned to piece a background of various browns and applique the flowers on top of those.
There is a bit of brown on the top of the piece. My 3 year old son (who has been sick this week) decided to help with my picture as well as paint his own.
It took far less time to create this *fine* piece of artwork than to make the actual quilted piece, though I still have the urge to make it.
Quilter: Kathleen P
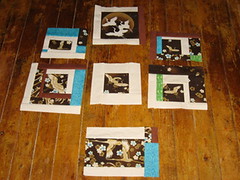
crane improv quilt blocks
I'm sharing my WIP here, just because it's inspired by the challenge. I knew I wouldn't be able to finish this one since the person who makes my sewing possible was out of town taking care of his mother this week (cancer: keeping daughters-in-law from quilting since 1884!).
But I didn't want to do nothing, so I took the opportunity to slice into a Robert Kaufman crane print I've had sitting around. I fussy cut 7 crane images and then went at them improv-style. I started out thinking it was going to be something like a wonky log cabin, but the cranes seemed to want a straight setting and I happily diverged from log cabin.
I don't think I've ever improvised an entire project before! Which is crazy since I improvise pants and stuffed animals and muffins all the time. I'm having a lot of fun with these, not sure where I'll go next, but I thought I'd share since I wouldn't have cut into that piece of fabric at all if it weren't for Project Quilting. Thanks Kim and everyone!
Now for the PUBLIC Comment PRIZE!

Everyone is eligible to win this adorable Blue Striped Embroidered Teddy Bear from Quilties for this weeks Public Comment Prize!
ELEVEN Chances to WIN!
Entry 1: REQUIRED! Leave a comment on your favorite entry at the bottom of this blog post (you can also comment on twitter/flickr/facebook but that won’t get you an entry) (or at least that you voted) and vote for your favorite on the poll on the upper left hand side of the blog. -***MUST DO***
Optional/Additional Entries – please note – if you want to qualify for these additional entries you must leave a SEPERATE comment for each with your email address– if you already follow or are a fan, etc just leave comments saying each. If you write everything in ONE comment you only will have ONE entry…
Entry 2: Follow my blog.
Entry 3: Follow me on twitter: www.twitter.com/kimscraftyapple
Entry 4: Tweet about this fantastic contest with hashtag #PQLarge (important or I won’t know you did it)
Entry 5: Like Project QUILTING on facebook
Entry 6: add my Project Quilting ‘Grab my Blinkie’ to your blog or blog about my giveaway (link your blog or post in your comment, please)
Entry 7: Head on over to Quilties on etsy and let me know your favorite item in the store!
Entry 8: Sign up for my newsletter in the upper right corner of this page!
Entry 9: Blog about Project QUILTING and leave a link here to what you wrote.
Entry 10: Like Quilties of Facebook.
Entry 11: Subscribe to Quilties blog.
***Participants, Judges, and Sponsors in project quilting ARE allowed to enter in the public poll/contest as well.***
This means you have ELEVEN chances to win! I need you to write each of these entries as different comments in order to qualify you for all eleven entries and include your email address. If you don’t include your email address I won’t be able to contact you when you win and I will have to choose a new winner. I will be picking the winner on Saturday, April 2nd.
***Changes to Prizes/Voting this season***
- One person can no longer win both prizes. If this does happen (as it has), they will take home the ‘JUDGES Choice’ prize and the person in 2nd in the PUBLIC vote will take home the ‘PUBLIC’ prize. As before, each of these winners will not qualify for the random prizes. I’m doing this just to spread around all the amazing goodies so many great sponsors donated!
- The second is, I will not be listing myself (KimsCraftyApple) on the Public Vote. Since this is my ‘creation’ I will never win any of the prizes – I don’t want to seem like this is biased towards me at all. I’m doing this merely for the fun, the challenge, and the camaraderie. I will still, however, be showing off my entry AND sending it to the judges for their score and critique.
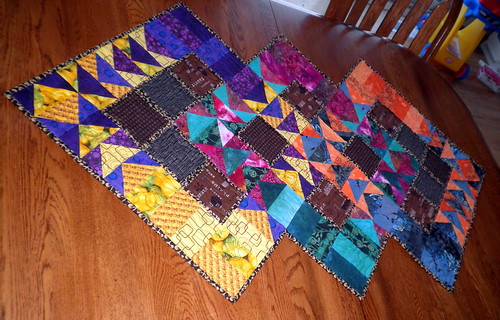
3 Geese – Judges Comments
I just realized that I haven’t shared with you all the Judges Comments on my last Project Quilting Piece – 3 Geese. So, without further adieu…here’s what they had to say:
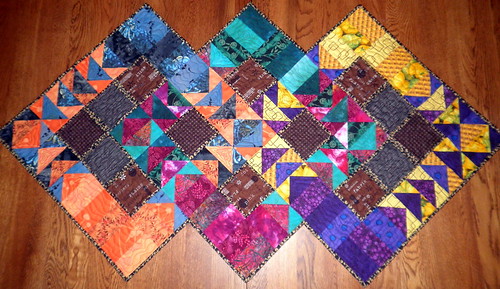
Judge 1: I like this finished table runner. I think it would make a great kit to sell on Etsy!
Good use of the brown to tone done and spark up your compliments. Most would have chosen black so I like the brown.
Good job.
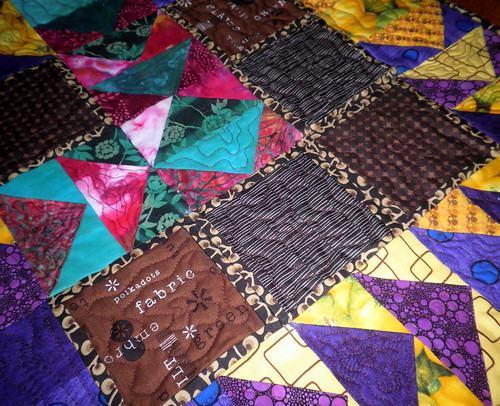
Judge 2: Another beautiful piece, Kim. You used the traditional flying geese, but still made a project that’s very original and modern. Of course, you had to interpret the complementary color scheme differently than anyone else and take it times 3. The whole thing is very effective and fun. The one color corners make it way more special than running the geese all the way around would.
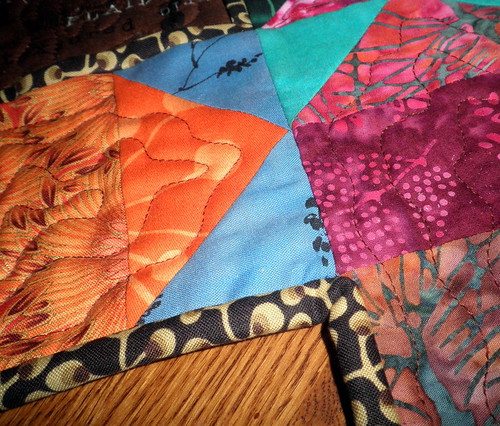
Judge 3: Once again, your eye for color and your design skills really shine. I love that instead of choosing one pair of complementary colors, you broke out and used several pairings. The way you positioned the different tones created a fantastic interweaving effect. Your technique in your alignment of the points is superb. Having done inside corner bindings, I know how tricky they can be, and you did an excellent job of it - all of your binding corner points are perfectly sharp. Excellent work Kim!
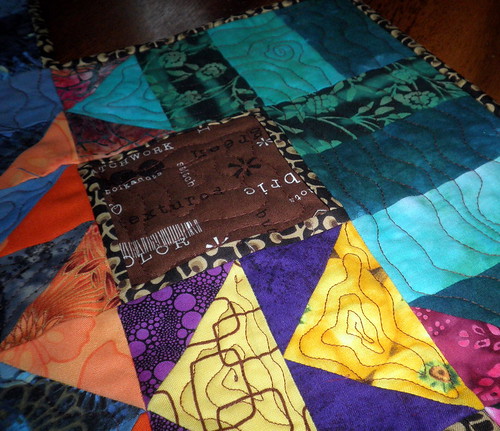
Judge 4: Your quilt was very well thought out and I enjoyed hearing your design process. Each of the diamonds you created have equal representation and the values visually work well with one another within the piece. I agree with your choice not to use complimentary thread for quilting. The fabrics are busy enough and geese are such busy blocks to begin with. Nice construction and binding. I can’t find anything to critique in this one! Thanks for showing it’s OK to mix several different fabric types in one quilt. I like to see batiks mixed with prints.
Thanks to all the judges for their feedback!
My Wonderful Sponsors!

Fat Quarter Shop
Spice Berry Cottage

10% OFF all fabrics!

use coupon code KIMSCRAFTY
Generation Q Magazine

Etsy Treasury Team

Popular Posts
-
I can’t wait to share with you the entries for this weeks challenge – a fantastic, creative job done by everyone! It was a difficult challe...
-
Happy Saturday! I’m starting to type up this post on Friday night after making 415 cider donuts…I’m guessing it may be posted closer to Sat...
-
cannot express just how pleased I am with the amazing entries for this weeks Project Quilting Competition. I would like to say a huge ‘th...
-
That’s right! The poll is now up for you to VOTE for your favorite entry into the Team etsyBABY Halloween Challenge ! LOTS (TWENTY-SEVEN!...
-
I must start off this post with an apology for my delayed posting. I typically post these on Tuesday’s but things were crazy this week and...


