Home Sweet Home Quilt Along
- Schedule
- Block 1 - My Home
- Block 2 - Lapacek's Orchard
- Block 3 - House by the Bay
- Block 4 - My Tilted House
- Block 5 - Two Trees
- Block 6 - Tree of Life
- Block 7 - Under the Moreton Bay Fig
- Block 8 - A Wonky Modern House
- Block 9 - Scrappy Trees
- Block 10 - A Home for the Birds
- Block 11 - The Happy Tree
- Block 12 - the little house
- Block 13 - Three Trees
- Block 14 - Under the Apple Tree
- Block 15 - A Home for Hoot
- Block 16 - Branch Sweet Branch
- BONUS - accuquilt home
- BONUS - Acid Cottage
- BONUS - Marcia's Crazee Patch House
- BONUS Block - Rippling Pond
- Flickr Group - Post your blocks here!
- BONUS - Acid Cottage
Project QUILTING
Feedback & Features
My Fabric is For Sale!
Kim's Crafty Apple
the Apple
Labels
My Flickr Stream!
My Blog List
-
-
49 Unique DIY Valentines Gift Ideas20 hours ago
-
Catch Up (2nd half of 2025)4 days ago
-
2026 Crafty Goals3 weeks ago
-
2nd Annual Garver Pumpkin Party2 years ago
-
End of blog3 years ago
-
-
A Japanese Stash Buster Quilt6 years ago
-
Quilted Tassel Pouch Tutorial6 years ago
-
H2H Quilt Challenge 20196 years ago
-
Shuffling6 years ago
-
Quiltsy Cares 3/31/196 years ago
-
Eco-living On A Budget6 years ago
-
a new day dawns7 years ago
-
-
-
-
-
Hand Maker Blog Tour9 years ago
-
-
The San Salvador Sails By ...9 years ago
-
-
Gift of love9 years ago
-
-
New Updates Coming Soon10 years ago
-
Sweet Jenny Belle10 years ago
-
-
-
Winning Treasury #22011 years ago
-
Dianabol11 years ago
-
Dandelions11 years ago
-
A Quilty Finish12 years ago
-
A walk in the snow13 years ago
-
-
the harvest begins~13 years ago
-
-
My Blog Has Moved!13 years ago
-
Polka Dotted Dress Envy13 years ago
-
Come visit our new blog!13 years ago
-
Handmade Christmas Recap 214 years ago
-
-
Blech18 years ago
-
-
-
-
-
-
-
-
Favorite Websites
Kim's Crafty Apple has MOVED to www.PersimonDreams.com
I’m re-branding myself from Kim’s Crafty Apple into ‘Persimon Dreams.’
You can now find me at:
www.facebook.com/PersimonDreams
www.twitter.com/PersimonDreams
www.pinterest.com/PersimonDreams
(and my jewelry is still at www.theapple.etsy.com)
Time to VOTE for Project QUILTING RECTANGLE Challenge – FANTASTIC PUBLIC PRIZE!
I just have to say you all are so TALENTED! I'm in awe with ALL the projects submitted for this challenge! If it weren't for you (the participants) we wouldn't have over TWO-HUNDRED dollars worth of prizes for the GRAND PRIZE of Season 1 of project Quilting! Thank you!
For those of you just tuning in you can read more about Project Quilting Here: http://kimscraftyapple.blogspot.com/2010/04/project-quilting.html
and about the first challenge of Season 1 Here:
http://kimscraftyapple.blogspot.com/2010/05/season-1-challenge-1.html
CHALLENGE WINNERS: There will be two winners for this challenge – one for the public vote and one for the ‘judged vote’ – Diane, Rose Mary and Kym. This weeks public winner and Judges winner will each receive two yards of fabric (min of 1/2 yard cuts) courtesy of FabricFascination AND a $10 gift certificate to the FatQuarterShop courtesy of the FatQuarterShop! I will also be sending everyone their rank (somewhere between 1 and 10 – be sure you’ve emailed me {lapaceksorchard@gmail.com} your email address) and any critique’s the judges have about your creation. The top 3 will be posted on my blog this weekend.
PUBLIC WINNERS: I will also be giving out a prize to the public. You’ll find out how to WIN at the bottom of this post after you’ve checked out each of our challengers entries. This weeks prize is AMAZING – don’t forget to read below on how to enter!
And now here are all the entries – in no particular order…
***Please note – I have left the images smaller than I normally do as I’ve received some feedback that my blog was loading slowly – hopefully this will help that issue. I strongly URGE you to take closer looks at the project by checking out their submittals on the flickr group: http://www.flickr.com/groups/1401824@N21/
Quilter: Quilties
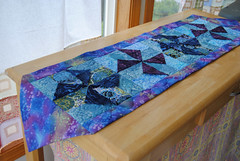
The Story: Table runner measures 48" x 12". I created windmill blocks with 4 rectangles turned into prairie points and 8 rectangles surrounding them. Four blocks used up 48 of my rectangles. Then I made them into a table runner with one half yard as the backing and the other (same fabric) as part of the back and the borders. I sandwiched the quilt without binding, because the borders and points framed the piece well. Finally, I quilted swirly wind to blow those pinwheels around!
Quilter: QuiltSewPieceful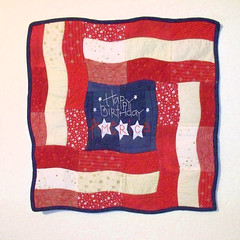 The Story: HAPPY BIRTHDAY, AMERICA!
Forty four 3" x 5" rectangles, some machine embroidery, and a lot of miscalculations, false starts and frustration! But it finally worked. One half yard of fabric was used for the back and it had to be pieced. Binding is cut on the bias from the other 1/2 yd of fabric due to the curved edges. Quilting includes stitch in the ditch, and stars in the red stripes.
Enjoy!
Size 19 inches square
Money Spent: $4.99
Quilter: KimsCraftyApple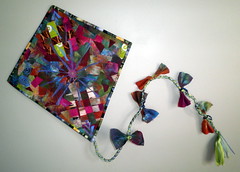 The Story: Using all 50 rectangles, 1/2 yard of pfd fabric (part of which I painted for the back) 1/8 yard (probably even less) for the binding, a strand of woven ribbons and fibers over floral wire using a four strand weaving technique (so the tail is malleable) - this is my entry for Project Quilting's Rectangle Challenge.
I used everything from my stash - no purchases specifically for this project.
Dimension across the kite the long way: 19.5", the shorter way 19" - two short size are 13", the two long sides are 15", the tail is 32"
I almost forgot to mention - when I started this project i had no intention of creating a kite - I didn't know that's what it wanted to be until Thursday morning when it told me in my dreams ;)
Quilter: MoranArtQuilts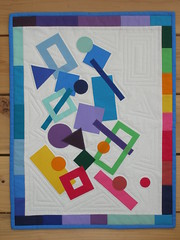 The Story: I started with 50 rainbow colored rectangles and decided to cut them into shapes. I love working with simple everyday shapes and making them into a pleasing design. With the ones I had left I cut them in half lengthwise and used them for the border. The rest of the fabric was used for the backing and binding. The quilting is done in a design to mirror the shapes of the raw edge appliqué.
It measures 15.5” x 20.5”
Quilter: StudioCherie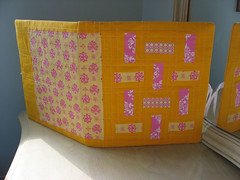 The Story: This is my entry for the project quilting challenge this week. Starting with rectangles made me think of this block which is my favorite way to use rectangles. I wanted to enter a finished product for this week, so I needed to make it into something that fit my agenda. I am working up a pattern for binder covers for back to school, so I used the quilting challenge as a platform for one of my prototypes. I love how it turned out. I only put one pocket on the inside because I needed to finish up. When the pattern comes out, it will have different sizes, different closure options and more pocket options.
Quilter: Emily W
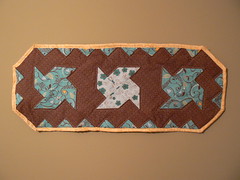
The Story: On Friday, my husband asked what I wanted to do for Mother's Day (a little late, I know, but he had to work on Mother's Day so I'm okay with it). His suggestion, Maybe we can go fishing! I'm thinking, For Mother's Day!?!? My idea, I know it's already Friday and I've only made a few small/simple quilts ever in my life, but I would really like to try to make a quilt for Project Quilting! My wonderful husband was nice enough to babysit our 10-month-old daughter all-day long while I worked on my project. So I got to spend my "Mother's Day" doing something I really enjoy doing, although I don't have very much experience doing it.
I used exactly 50 blocks. It was a close call. I started out with 36 for the main section, and when I filled in the small green triangles around the edges, I found myself having to dig out and use the scraps I had cut off and put in the pile to get rid of. Probably a rookie mistake of mine - to think that I would actually be able to throw any material away.
I ended up finishing the top of my project at 2:00 in the morning on Saturday morning and this is the table runner/wall hanging I came up with. All in all, it was a great Mother's Day!
My finished project is 13" X 32".
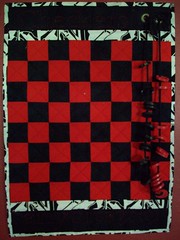 The Story: I used 34 of the rectangles, trimming the rectangle into two 2 1/2" squares, for the checkerboard. I trimmed 8 rectangles to 4 1/2" X 2 1/2", and added them end to end, for the top and bottom border.
 I added about 1/4 yard of the black and white print for the narrow borders and the binding.
I used a piece of leftover oriental print, little less than 1/2 yd for the backing.
finished size 16 1/2" X 23"
This is fully functional checkerboard. I put a piece of interfacing between the batting and the board so the checkers would lie flat when playing the game.
Quilter: Green Couch Designs

The Story: I made a pillow using 47 (of the allowed 50) 3"x5" rectangles, in assorted blues and oranges, and part of a fat quarter size for the solid brown. I designed a block (by accident!) to use 3" square and 2"x3" pieces, so basically cut the 3x5's into those sizes, it magically worked!
For the back I sewed most of the remaining rectangles together.
you can read more here: www.biggirlfeet.ca
Quilter: LoveBugStudios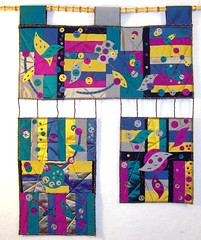
The Story: This piece, entitled "Thailand" uses 44 3"x5" rectangles cut from 5 colors of Thai silk taffeta fabric. The backing fabric & some of the sashing strips are from navy blue Kona cotton (3/8 yard used.) The finished piece measures 18.5" x 24.5".
This piece came about in a very organic way; each day I did something to alter the piece until it came to this finished form. I also used at least 5 new techniques/tools that I had never tried before, so I'm very proud of myself for quilting out of the box! :)
I started by chopping 1/4 yard of the navy blue into 3 pieces of different sizes. Then, I cut up the rectangles into these asymmetrical chunks, and assembled them until they were roughly the same size as the backing (using the navy blue to supplement randomly.)
I quilted in a variegated thread using bright pink felt as the batting, then layered over each piece with some geometrical shapes cut from the leftover rectangles & fused to the top.
Instead of a traditional binding, I opted to do a serged edge in a wooly thread, that added some sparkle and a unique finish.
I finished the piece by hand beading with the very last of my rainbow Czech glass beads over the top; (the beads that attach the quilt together are not the same but they match in color & are a bit larger in size.)
The piece is hung using 3 rectangles and bamboo handles repurposed from a handbag.
Quilter: KarolsVintageArt
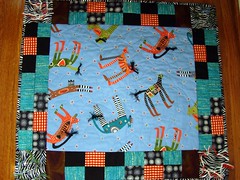 The Story: I loved this folk art cat fabric so much, that i wanted to build my challenge quilt around the large cuts from this print.
 i used 41 of the rectangles, which i originally strip pieced 3 X 5 and then decided that was too over powering for the size of my quilt, so i un-stitched and re-stitched together to make this pieced border design. The corner squares, binding and part of the back were all from the other 1/2 yard cut (zebra print). I had just a few scraps of the rectangles left over.
Quilter: Kathleen’s Quilts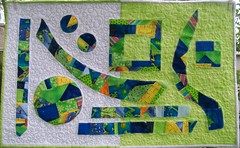
The Story: I sewed all the rectangles into one large square. Then cut the square into uneven strips and sewed those together. Then I randomly cut shapes. Shapes are stitched on with a multi-stich zig-zag... white thread on the green portion and green thread on the white portion. Quilting is random loops again with green on the white background and white on the green background.
Quilter: QuiltingDiva
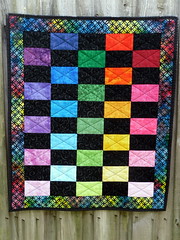
The Story: I used 5 FQ's of bright rainbow colors, cut 25 rainbow rectangles 5" x 3" and 25 black swirly ones :) I cut my 2 half yards of black solid for the border and backing.... well, then I spotted the perfect batik to use in the border instead.
Finished quilt is 29" x 24"
Quilter: PennyFabricArt
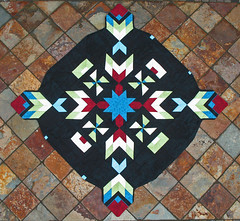 The Story: I originally planned my 3x5 patches at 8 teal, 8 maroon, 4 cyan, 12 cream and 12 green. After doing a bit more math I changed my starting patches to: 7 teal, 7 maroon, 3 cyan, 11 cream, 11 green, and 10 black. So my project used 49 patches, plus 2 half-yard cuts of black (one of which I reserved for the backing).
 I used 3 star piecing methods developed by Nancy Johnson-Srebro in her book Stars by Magic. I ended up with 3 star blocks and lots of little pieced scraps.
I decided to explode the stars and use all the little pieced scraps to make extra pinwheels and accents, so I used all of the blocks and scraps completely. I cut the edges of the outer blocks to let the star sections explode off the base.
Since I didn't have enough fabric left to make a binding, I put the front/back/batting together inside-out, sewed them pillow-case style, then turned them right-side out and finished the gap by hand. The quilting is simple line patterns that follow and enhance the geometry.
It measures 24" square from the outer edges, with the cutouts going in from there.
Quilter: Karens Crafty World
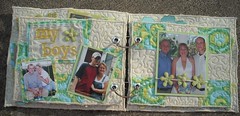
The Story: This project was so much fun! Before I became a quilter 1 1/2 years ago, I was a HUGE scrapbooker. Melding the two together was a great joy. I started with some Amy butler fat 1/4's (that I've had for a long time and didn't know what to do with), some matching solids, a 1/2 yd cut of cream fabric, and a 1/2 yd of light green fabric. I used almost all the 3 by 5's but not all the 1/2 yard cuts.
I started by making 4 tiny 'quilts'. The front and back cover measure 8 1/2 by 7 inches and the inside pages measure 6 by 71/2 inches. I considered binding the pages, but it seemed to add too much bulk so I zig-zagged around the edges instead.
I had to buy thread and the eyelets for a total cost of $5.94. Everything else was from my stash including all the scrapbook embellishments.
I love how it turned out!
Quilter: PamelaQuilts
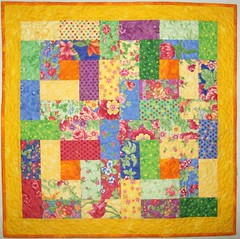 The Story: I decided to start my quilt using mostly pieces from a charm pack, adding a few of my stash fabrics that coordinated with the Charms. I cut them down to 3 x 5, then started brainstorming. I decided to make a quilt using a block that I've make before which involves sewing units around a center square. It's a pretty busy quilt, but the fabrics are so springtime looking that I love it! I added a sunny yellow border and barely had enough of the orange for the binding!
Quilter: Spring Water Designs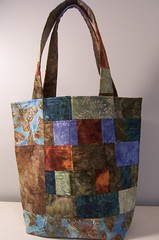 The Story: This is my Project Quilting Rectangles Challenge Project. I started with 48 3 x 5" rectangles (8 each of 6 different colored batiks) and two half yard batik cuts. I left half of the rectangles 3 x 5" and sub cut the other half into 3 x 3" and 2 x 3" pieces. Then I randomly sewed them into 5 rows for the bag body. The remainders were pieced together for the handles. The half yard cuts were used for an outside pocket on each side of the tote that measures 4.5" x 7", one inside pocket that measures 6 x 6", the bottom of the tote, and I pieced the lining of the tote and handles with them. I quilted in a very geometric horizontal and vertical pattern on the rectangles (this helped to hide the lines that sewed in the inside pocket). I outline quilted around the butterflies on the bottom. The overall size of the tote is 14.5" tall x 16" wide, x 6" deep. I literally used all of the material that I started with with only a few snipets and strips left over.
Quilter: DebiDesigns

The Story: After many attempts at trying my hand at traditional quilting, I have decided to go back to crazy quilting. So, using Project Quilting as a restarting board and after cutting out 50 rectangles with the bright batiks and trying to decide how to put them together this is what I saw out of them as I see all fabrics.
whole quilted table topper of crazy quilted blocks.
18" 1/2" x 17 1/2"
Quilter: DownHomeDesigns
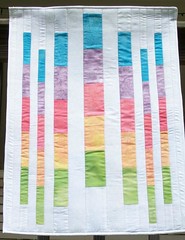 The Story: To begin my project I had to decide what form it would take. I started looking thru my quilting books and came upon Georgia Bonesteel's bargello method. As soon as I saw it, I knew that's what I wanted to do....a bargello wall hanging.
 Then I had to pick some fabrics. I started digging thru my stash and found some fabrics that I had hand painted about 3 years ago. The colors are so pretty and summery looking. I knew these were what I would use.
At first I thought about using black to make those colors pop, but then I decided that white would look so much better and really bring out the tropical feel in the colors.
I wanted to try to use all 50 rectangles (cut from my hand painted fabrics) and both 1/2 yard cuts that we were allowed to use. Boy! Has that been a challenge!
I decided to use a white on white print for the 1/2 yard cuts. I liked the back side of this better, so I turned it over and used the back of it for the right side.
I ended up with both the front and back being pieced and they are both pretty enough to be used for the front. The strip in the middle is the 3x5s, (full size, unfinished measurement). The smallest finished size strip is 7/8".
I used 25 3x5s and about 16" of one 1/2 yard cut on the front. The other 25 3x5s and all but a few small scraps of the rest of the white fabric was used for the back and the binding.
This wall hanging measures 28"x20 1/2"
I only used materials I had in my stash, so no money was spent for this project.
***If you want to see ‘close ups’ many of the entrants posted more pictures to the Flickr Group: http://www.flickr.com/groups/1401824@N21/ Feel free to check them out before making your final vote.
PUBLIC WINNERS: The winner from the Random Generator will receive (yes, I’m crazy excited about this!)

Description of this pincushion:
This is a miniature version of my pillow covers that would be a nice addition to your pincushion collection.
The top of this pincushion/mini pillow is sewn almost completely by hand. It is considered a type of quilting, even though there is not any actual quilting on the pillow. It is a very labor-intensive pattern and the pincushion/pillow top is quite heavy because each white square is four layers thick. I took this traditional pattern and gave it a modern twist using today's modern fabrics. This pincushion features Andover's Global Garden fabric line.
I stuffed it with a high quality poly-fil that is hypo-allergenic.
WarmnFuzzies is a talented and PUBLISHED quilter – her work just stuns me every time I see it. I can’t wait to find out who’s lucky enough to win this gorgeous pincushion…I’ll just be sitting here wishing it were me…
FIVE Chances to WIN!
Entry 1: REQUIRED! Leave a comment on your favorite entry and vote for your favorite on the poll on the upper left hand side of the blog. - ***MUST DO***
Optional/Additional Entries – please note – if you want to qualify for these additional entries you must leave a SEPERATE comment for each – if you already follow or are a fan, etc just leave comments saying each. If you write everything in ONE comment you only will have ONE entry…
Entry 2: Follow my blog.
Entry 3: Must tweet this contest with hashtag #PQRectangles (important or I won’t know you did it)
Entry 4: Become a Fan of Project QUILTING on Facebook: http://www.facebook.com/ProjectQUILTING
Entry 5: add my Project Quilting ‘Grab my Blinkie’ to your blog or blog about my giveaway (link your blog or post in your comment, please)
***Participants in project quilting ARE allowed to enter in the public poll/contest as well.***
This means you have FIVE chances to win! I need you to write each of these entries as different comments in order to qualify you for all five entries and include your email address. If you don’t include your email address I won’t be able to contact you when you win and I will have to choose a new winner. I will be picking the winner at 7pm on Friday, May 21st.
Sign Up for my Newsletter!
Project QUILTING on Facebook
PersimonDreams on Facebook
Blog Archive
-
▼
2010
(276)
-
▼
May
(29)
- Time to VOTE for Project QUILTING Road Trip Challe...
- Blogger Quilt Festival
- Introducing Project QUILTING’s Third Judge – Barb ...
- Themed Thursday – Out of TIME!
- Meet this Weeks Guest Judge – Shannon from Fabrics...
- Introducing ONE of our New Judges…Pam Geisel aka F...
- Season 1, Challenge 2
- Let’s Go Fly A Kite – My Rectangle Challenge Creat...
- Thank You
- Project Quilting – the Judges Winners for the Rect...
- Project QUILTING – RECTANGLE Winners!
- Themed Thursday – A Ride (or 3) on the Carousel
- Photo Shoot
- Barn Quilts
- Time to VOTE for Project QUILTING RECTANGLE Challe...
- More from our Sponsors for the Project QUILTING Gr...
- Themed Thursday – Let’s Go Fly A Kite
- Bling vs. Nature on Etsy’s Front Page!
- Meet this Week’s Project QUILTING Guest Judge – Ky...
- Project QUILTING – A NEW Prize this week!
- Season 1, Challenge 1
- Project Quilting - How I Judge
- Project QUILTING – Season ONE – Sponsors and PRIZES!
- Project QUILTING Apple Blossom Challenge WINNERS!
- Behind the Scenes of Project QUILTING
- THEMED THURSDAY – The Lion King
- It’s Time to VOTE for your FAVORITE – Project QUIL...
- Project Quilting – Season One
- Apple Blossom Days!
-
▼
May
(29)
Popular Posts
-
I just have to say you all are so TALENTED! I'm in awe with ALL the projects submitted for this challenge! If it weren't for you (th...
-
I’m really excited to be a part of the Quilting Gallery’s big St. Patty’s Day Blog Hop Party. If this is your first time here I just want t...
-
Hi Everybody, There have been a few questions, so I thought I'd address them here. (Sorry I didn't jump in sooner here, but it's...
-
Today was Alchemy’s last full day with me. I thought I’d show her how to make a few rings and earrings like the ones I sell at TheApple . ...
-
Happy Monday everyone! I’ve been trying to find some time to sit down and put this post up for well over 24 hours now. The summertime, pr...









72 comments:
So much fun! So hard to choose a favorite. Nice work everyone - great entries!
So much creativity and skill here! My favorite quilt for the challengewas made by DownHomeDesigns.
I follow your blog. : )
I am a Fan of Project QUILTING on Facebook.
Such beautiful works! Great job everyone.
I'm torn..........
I really like three of them. I like the pillow by LoveBug, I like the one made with Thai fabric by Karen's Vintage, and I like the cat quilt by Kathleen's Quilts. So much talent!!!!
I'm so impressed with everyones work! I wanted to enter, but don't have time to work on anything extra right now. Good luck to everyone! You are all winners.
This challenge is so inspiring! The range of interpretation of each challenge is awesome, and the execution is terrific. It was really hard to choose, but I did and I voted. I will try my best to participate in the next challenge.
Such a hard choice (as usual) but I voted for LoveBug.
I already follow your blog.
(For Quilts Sake)
And I'm a fan of your fan page.
(For Quilts Sake)
I absolutely love the variety of projects in this challenge! Such a hard choice when all the entries are so wonderful. This was a fun one to do, and my brain was kept occupied all week thinking of what to do with those rectangles :)
I do follow your blog.
And I'm a fan of your page also!
love karens crafty world scrapbooking in quilts entry--there are more pics on her blog--this project is truly an original!!
I adore the quilt by MoranArtQuilts! The colors are so clear and beautiful and I just love all the geometric shapes!
I tweeted as my twitter alias ByTheWay2 :) #PQRectangles
ByTheWay.etsy.com
I became a fan of the facebook page :)
ByTheWay.etsy.com
I voted! I had a hard time deciding... a table runner, a pillow, and a tote all caught my eye.
~Deb
dke@centurytel.net
I 'follow' your blog. :)
~Deb
dke@centurytel.net
I'm a Fan/Like on Facebook.
~Deb
dke@centurytel.net
I've added your 'blinkie' to my blog.
~Deb
dke@centurytel.net
CAN'T! PICK! ONE! Love the table runner, Happy Birthday America and the quilted bag! Good luck to everyone!
I follow your blog!
I just stunned at the level of craftsmanship and talent here!! My fav is the Quilties table runner, and I voted!
I follow your blog.
I'm a facebook fan of project Quilting!
(Forgot to leave my contact info on previous entries)
Sandie
zaftig2k at yahoo dot com
http://zaftigdelights.blogspot.com
I voted :) So many talented quilters.
I've been following your blog for awhile now, I guess I just never clicked on the little follow button lol.
I'm a fan of Project Quilting on Facebook :O)
So many to choose from and such beautiful and talented work
I am a fan on FB.
I follow your blog.
I voted.
I blogged about the Project Quilting Rectangle Challenge.
http://downhome-designs.blogspot.com/2010/05/my-project-quilting-entry.html
WOW - I love the variety of things here this week!! great imaginations here!
I voted for my favorite, loved the colors, Quilties!:)
I am a happy follower of your blog....
i LOVE them all!
i'm following your blog now!
i'm a fan of project quilting on facebook now too!
Beautiful entries, everyone! Kim, you do such a nice job on all of this for all of us! Thanks sew much.
I don't know if entrants can be considered for the public prize. I am blogging about this and linking. You can bet I am headed to facebook right now to become a fan. What great entries everyone! Kim, thanks for putting this on. Fun, fun, fun! Cherie
My first time voting for a challenge and I am impressed with the variety. What a fun and inspiring idea.
Kim, this is probably one of THE best ideas you ever had! Thank you for all the work you put into it. With your family, the orchard, your 2 Etsy shops and much more, I don't know how you do it all. My hat's off to you. ♥
Love the one by QuiltSewPieceful!! I love how she made the rectangles wavy.
And the pincushion is beautiful!!
It was a tough one, but I chose Quilt So Pieceful, I love flag quilts or anything in that vein.
I voted, and blogged about Project Quilting :) So fun!
http://springwaterdesigns.blogspot.com/2010/05/project-quilting-challenge-rectangles.html
So hard to choose!. My vote is for PennyArtDesign.
Great job everyone!
And I am now following your blog
and I am now following you on facebook .. can you tell I want to win the public prize?!?!
And I just twittered:
http://www.twitter.com/konstantkaos/
Great entries all! But my favorite is that kite; it is just so darn cute!
I am following your fun blog!
I tweeted, with pleasure, as lcscottage on twitter.
I am also a fan on facebook. Thanks for the fun!
I love Karen's Crafty World quilted scrapbook!
So much talent here!!!
I voted for the tote by Spring Water Designs.
I'm a fan on Facebook
I also blogged about this on http://www.quilties.com
I like the pillow from Green Couch Designs. Just stumbled onto your blog from Studio Cherie. Very cute idea! Thanks for the giveaway (I've been wanting to try cathedral windows but I'm still scared!)
They are all so lovely that it is hard to chose a favorite. I tried my hand a quilting and know how much time and work goes into putting together a quilt.
here is my blog post
http://studiocherie.blogspot.com/2010/05/binder-cover-for-kimscraftyapple.html
I also became a facebook fan
I follow your blog!
...and I voted...I think I got four entries this time, wish me luck! :) I don't tweet (yet).
Kim - You are doing a fantastic job. I am already looking forward to the next project. Pat even asks about it!
I am proud of you.
Barb
I'm also looking forward to the next challenge. I loved getting the critiques from the judges. : )
It's fun anticipating what the next challenge will be. Can't wait to see what it is this week! Maybe I can come up with something a little "out of the box" this time.
I'm following your blog.
mom99x@aol.com
I put you rblinkie on my blog.
http://debbiesreflectionsofmyself.blogspot.com/
mom99x@aol.com
I fanned your project quilting on facebook
my favorite is kimscraftyapples kite
I did blog about the project quilting challenge
and started a etsy forum thread on team challenges and etsy community challenges, startign with project quitling
http://debbiesreflectionsofmyself.blogspot.com/
Post a Comment