Grab My Button!

Grab My Button


Fabric Fascination Quilt Along


another Quilt Along!

May For Me - BINGO!


My Blog List
-
Clay Bead Bracelet Ideas1 day ago
-
-
Quilted Tea Towel Pillow Cover2 weeks ago
-
Hemp Leaf Sashiko Table Runner3 months ago
-
2nd Annual Garver Pumpkin Party2 years ago
-
End of blog2 years ago
-
-
A Japanese Stash Buster Quilt5 years ago
-
Quilted Tassel Pouch Tutorial5 years ago
-
H2H Quilt Challenge 20196 years ago
-
Shuffling6 years ago
-
Quiltsy Cares 3/31/196 years ago
-
Eco-living On A Budget6 years ago
-
a new day dawns6 years ago
-
-
-
-
-
Hand Maker Blog Tour8 years ago
-
-
The San Salvador Sails By ...9 years ago
-
-
Gift of love9 years ago
-
-
New Updates Coming Soon9 years ago
-
Sweet Jenny Belle9 years ago
-
-
-
Winning Treasury #22010 years ago
-
Dianabol10 years ago
-
Dandelions11 years ago
-
A Quilty Finish12 years ago
-
A walk in the snow12 years ago
-
-
the harvest begins~13 years ago
-
-
My Blog Has Moved!13 years ago
-
Polka Dotted Dress Envy13 years ago
-
Come visit our new blog!13 years ago
-
Handmade Christmas Recap 213 years ago
-
-
Blech18 years ago
-
-
-
-
-
-
-
-
Mystery Monday – Baffled in Belmont – Steps 18, 19, and 20
Enough excuses…on with the quilt!
- Choosing Your Fabrics
- Steps 1 & 2
- Steps 3 & 4
- Steps 5, 6, 7 & 8
- Step 9
- Steps 10, 11, 12, & 13
- Steps 14 & 15
- Steps 16 & 17


 Here’s my quilt laid out on the floor at the retreat. Man – was that a great feeling to see it there!
Thanks for following along! I would love to see your quilt if you decided to make one too!
Mystery Monday – Baffled in Belmont – Step 14 & 15.
Step 14. Sew a C rectangle from Step 9 to two sides of a 4 patch from Step 4, making sure fabric B is in the corner. Make 6.

Step 15. Using corner 4 patches from Step 4, make:

See you in a week! We’re almost there….
Mystery Monday – Baffled in Belmont – Steps 5, 6, 7 and 8
If you’re just tuning in to the Mystery Monday be sure to take a look a back at


It’s going to be an easy week for you this week even though it looks like 3 big steps. Trust me – it won’t be too bad.


Step 7. Crosscut 4 1/2-inch strips C into 320 rectangles 1-1/2” by 4-1/2” (sorry no picture for this one)

Step 8. Crosscut 1 1/2” strips E into 140 square 1-1/2” x 1-1/2”
See you next Monday!
Baffled In Belmont – Step 1 – Fabric!
A mystery created by Diane Lapacek for the 2011 Quilts by Barb Quilt Retreat Getaway Weekend held in Belmont, WI.
Just days before I planned on heading out to the Quilt Retreat I decided that I would do the Mystery Quilt. Diane was over and she helped me pick out my fabrics!. Lucky for you – you now get to follow along in the fun!
Step 1: Fabric Selection
Fabric A and B: This mystery is designed as a scrap quilt. Choose 2 different colors for A and B. Complimentary colors will created lots of zing.

- CUTTING for A: 44 strips: 2 1/2” x 10 1/2”

- CUTTING FABRIC B: 28 strips – 2 1/2” x 10 1/2”, 43 squares – 4 1/2” x 4 1/2”, 8 squares – 6” x 6”, 2 squares – 4” x 4”
Fabric C. Should be more neutral in tone and medium light in value. Don’t get too wild here. Pick one fabric (1 3/4 yards) or several that are closely related in tone and value and not too busy.

- CUTTING Fabric C: 14 strips: 4 1/2” x 42” (or shorter strips to equal this)
Fabric D. Lights. Mix lots of different ones. Variety is a big plus here.

- CUTTING Fabric D: 16 strips: 2 1/2” x 10 1/2”, 20 squares: 4 1/2” x 4 1/2”
Fabric E. Darks. A darker version of either A or B or pick another color. Use lots of fabrics or just one (1/2 yard)

- CUTTING Fabric E: 6 Strips: 1 1/2” x 42” (Or shorter strips to equal this)

WIP Wednesday – Round 5
After browsing through last weeks post I realized that I actually have accomplished quite a bit in the last seven days. Get ready for it…
Boxed In Quilt
My goal with this quilt for the week was to get the borders on so I could get them to Barb for quilting. I thought I’d have until this Saturday but Barb ended being in town visiting her daughter so I managed to get the borders on two of my quilts last Thursday and delivered them on Friday for her to take home. If she got to them this week I should be able to see them tomorrow (fingers are crossed…). Here’s the first set of borders I added. I really wanted to be elongated so it would be the perfect lap size so I added a few extra strips onto the ends.
 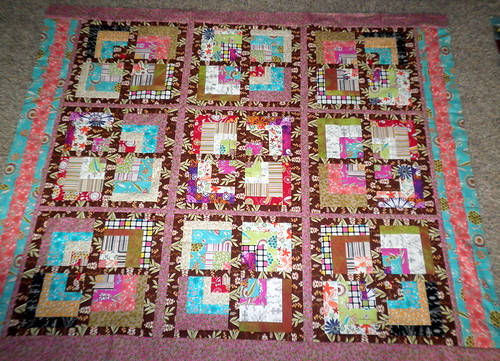 I used the same pink tiny floral patterned fabric that I had used in the interior sashing for my exterior borders.
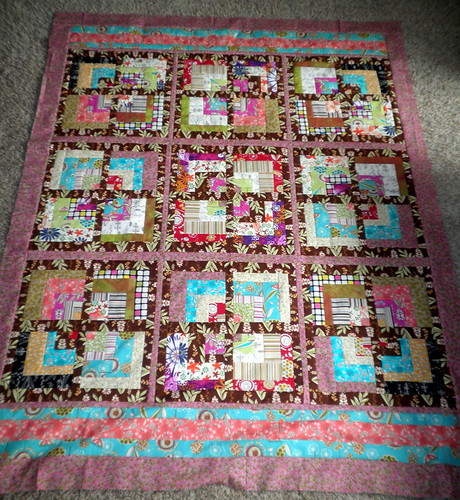 The plan in my mind, as of right now, is to bind the quilt with the brown fabric from the first sashing to sort of ‘close’ the quilt.
 the Mystery Quilt:
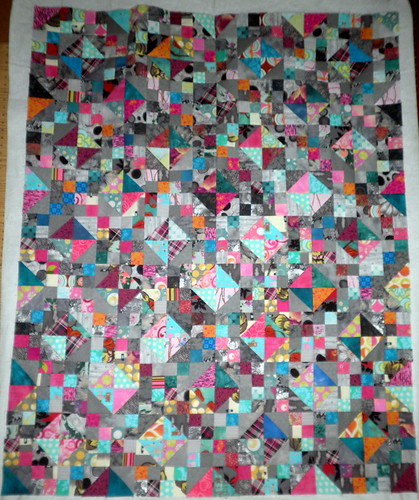
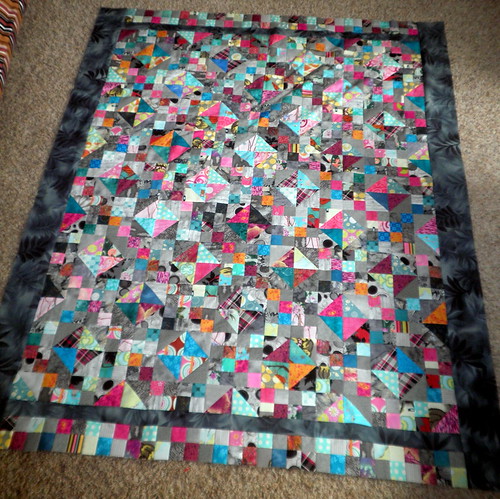 The other quilt I managed to get bordered is this Mystery Quilt. Again, I wanted to elongate it so I added a special detail from some of my square patches I had extra’s off from piecing the middle.
 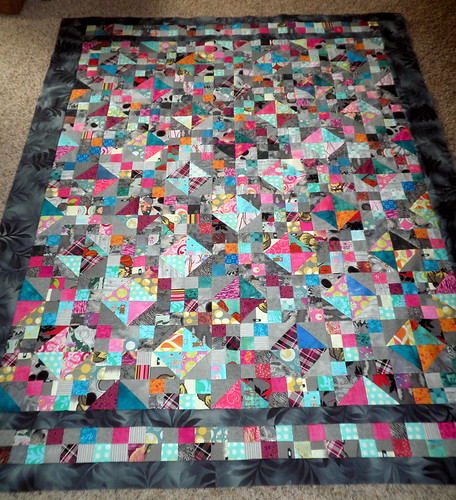 I also managed to snag a great piece of leafy grey fabric from Diane’s stash for the borders. I really love how this changed the entire look of the quilt. The piecing really pops now and the teals/turquoises I used pull out the ‘blue’ in the grey fabric I bordered with. It really is gorgeous – can’t wait to see what Barb decides to do with the quilting!
 Block-A-Palooza Quilt
 I haven’t progressed passed finishing all 16 blocks on this one. A ‘sneak peak’ at the quilt top has been posted but I’m waiting for further instructions on that. I have a feeling I’ll be adding my own twist to the final quilt but I do really want to follow what the quilt-a-long as closely as possible since that’s a challenge for me in itself.
 the Bloom Quilt:
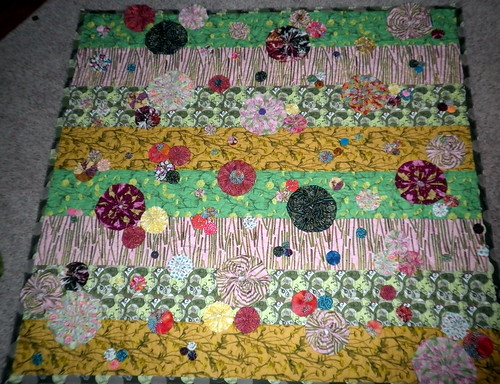
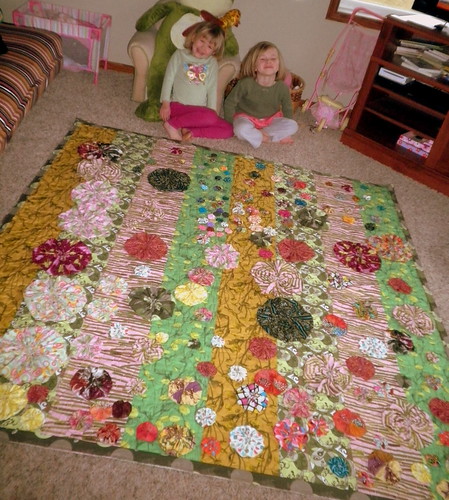 I had my two lovely girls layout the yoyo’s on the quilt for me this morning (and they picked them up too). So, I thought it was only fair to put them in the picture with all their hard work.
Below is a breakdown from the spreadsheet I created on my ‘bloom’ process (yes…I’m a dork)…
| Size of yo-yo's | Quanity Made | Goal | % Complete |
| 1 (largest) | 13 | 18 | 72% |
| 2 | 8 | 54 | 15% |
| 3 | 32 | 48 | 67% |
| 4 | 45 | 48 | 94% |
| 5 | 36 | 64 | 56% |
| 6 (smallest) | 36 | 40 | 90% |
| TOTAL | 170 | 272 | 63% |
The Matryoshka Project
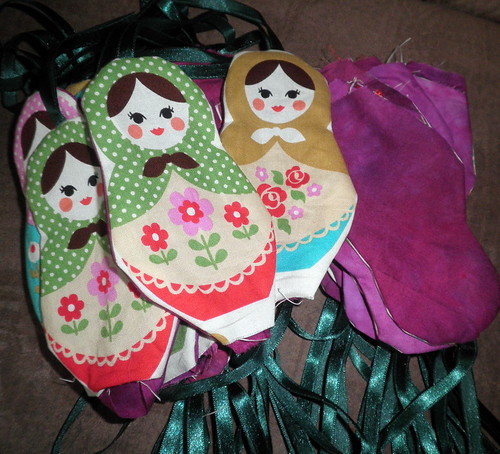 This little matryoshka doll ornament project is going faster than I thought it would. All the machine stitching is done.
 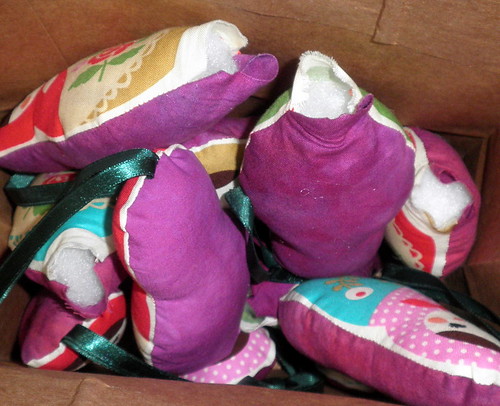 They are stuffed with batting.
 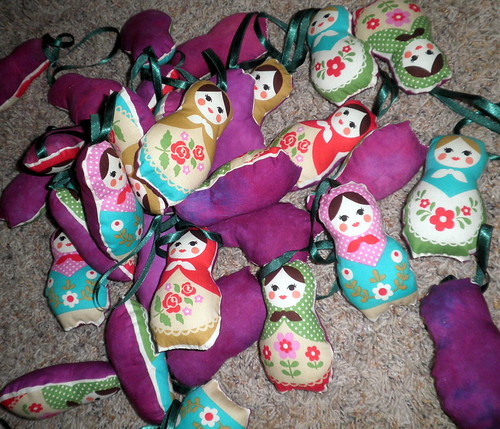 AND I have about 35ish hand stitched shut – way over half done and even a day+ past my 11/day goal for these. If things continue this way I could be done before the end of the week!
 The Secret Project
DONE and will be heading to Barb for quilting on Saturday.
Project QUILTING – Large Scale Print
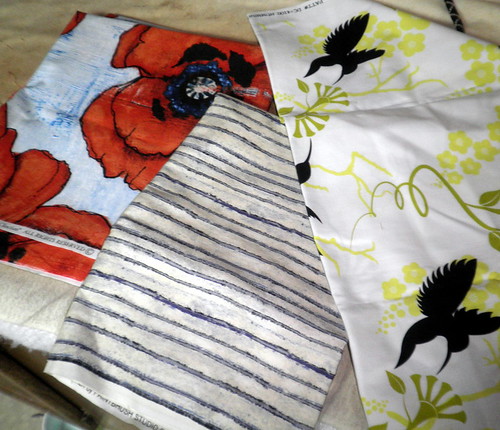 Here are the main fabrics for my ‘Large Scale’ print piece. I think I’m going to wait a little bit before I post more – but I’ll give you a hint – LOVE Ricky Tim’s Convergence Technique!
Project M
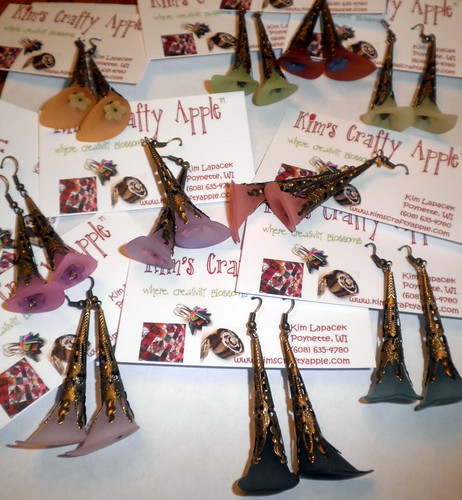
I also really wanted to get my consignment shops stocked up before this baby decides to join us so I sent a nice size box full or earrings, rings, and bracelets off to the Project M Boutique in Riverwest, Milwaukee.
Goals from last week:Project M Boutique
- getting the borders on the three quilts (mystery, boxed in, and surprise quilt) COMPLETED
- finish machine work on the matryoshka ornaments COMPLETED
- make a patchwork kite (or two) for theGlitterWorkshop
- stay on track with my yoyo goal COMPLETED
- get a good start on the final Project QUILTING challenge right away
- start work on two owls I have custom ordered
- finish packing my bag for the hospital COMPLETED
Goals for this week:
- make a patchwork kite (or two) for theGlitterWorkshop
- make some spring jewelry for theGlitterWorkshop
- stay on track with my yoyo goal
- finish up my Project QUILTING Challenge piece
- start work on two custom ordered owls
- finish up matryoshka ornaments
- make a quilt for baby #3
A look back:
WIP Wednesday – Round 4
As usual I don’t have much as I would have liked to show you today. I took a bit of time for myself and some pampering when the girls were being watched (pedicure and new haircut…) – but now that that is all done maybe I’ll accomplish LOTS in the next week!? lol…we’ll just have to see what happens…
Boxed In and the Mystery Quilt:
I have decided to combine these today since very little progress has been made…
 As I’m sure you’ve notice – the borders are still not on the quilts. I don’t have enough room on my basement floors to properly lay the quilt out and measure so I can put the borders on correctly. So, it’s going to involve a lot of up and down my stairs…I’m still mentally preparing for this. Hoping to get it done tomorrow….
One thing I did finally do was measuring so I can at least get the first set of strips ready for pinning. It’s a start at least!
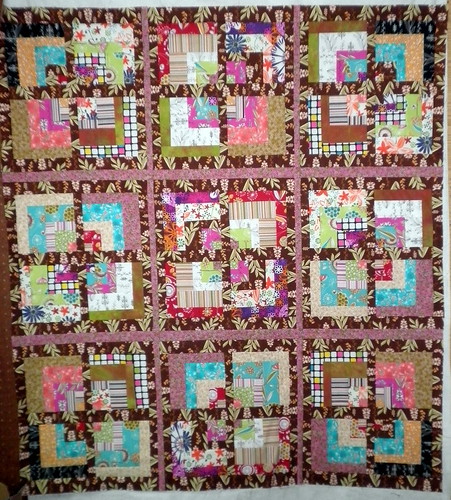
Block-A-Palooza Quilt
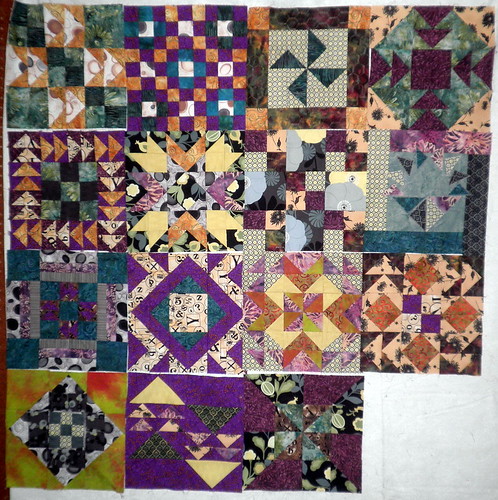 Blocks 1-15 are complete! Block 16, aka the last block, will be posted tomorrow and then next week we find out how they want us to do the layout. I had such a fun time with this quilt along – I hope to start with the Patchwork Squared Modern Solid’s Quilt Along starting on March 28th – but we’ll see what baby thinks about that…
the Bloom Quilt:
Before I talk too much about this I have to apologize for all the terrible pictures. I layout my progress on Tuesday nights after the girls go to bed – I fear if I didn’t wait until they weren’t around my yoyo’s would be scattered all about the house… As I start actually attaching them to the quilt (and the weather gets nicer) I’ll hopefully have some better quality pictures to show you.
 I actually managed to make some progress with this quilt. I did the machine stitching of the binding so now I just have to sit down, relax and hand stitch it to the back of the quilt. I’ve been working really hard to get a lot of hand work ready just in case I have to go on any bed rest of any sort. I’m feeling great and all my levels (ie blood pressure, etc) have been just fine…I just like to be prepared.
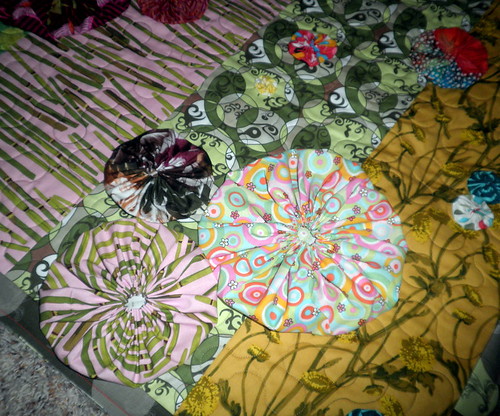
Because I’m a super dork - I have now started a spread sheet to keep track of my progress on the yoyo’s. There are six sizes of yoyo’s which I have ‘1’ being the largest and ‘6’ being the smallest. As of yesterday I have:
- size 1 - 13
- size 2 - 6
- size 3– 28
- size 4 - 32
- size 5 - 20
- size 6 - 29
TOTAL: 128
From the looks of the quilt layout I’m going to need at least double that to really fill it in…still a bit of work to do but it doesn’t feel too bad when you only make it a goal to do 5 yoyo’s a day.
The Matryoshka Project
A few weeks back I was contacted on etsy about possibly making 55 Matryoshka Doll ornaments for someone to use as wedding favors. After checking my fabric to make sure this was a possibility I said yes. Last week, I started to work on them (I have until the middle of June but I’d really like to get these done before baby arrives – just one less thing to worry about).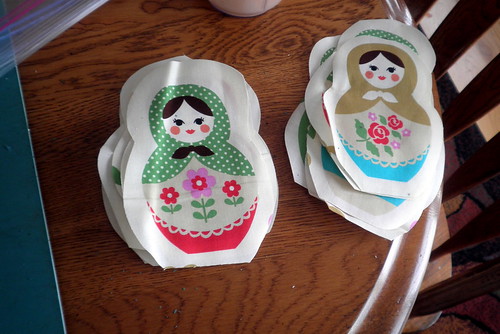 The first step was to cut out all the dolls from the fabric – I used my ‘mini’ rotary cutter for this.
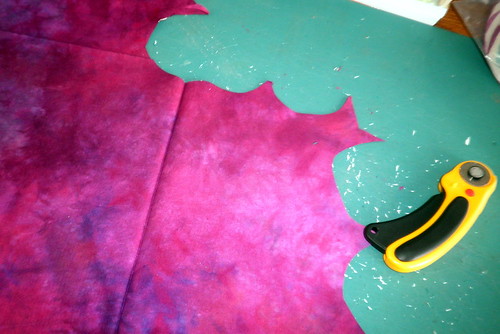 Next, cut out the backing from some hand-dyed fabric. The customer didn’t want much variation on the back so I had to fussy cut around some of the more ‘textured’ portions of the piece I chose. It ended up working out just fine.
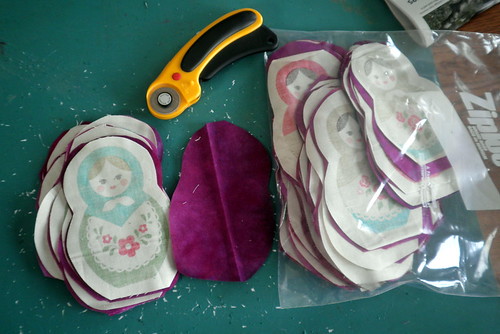 The next step – machine sewing along the outline of the doll, adding in the ribbon as I go. I have 20 done like this so far…just 35 to go. Then, to just snip on the curves, flip, stuff and hand stitch…not too bad right?
The Secret Project
I made a lot of progress on this one this week as well. I just have to add the borders and send it off to Barb for quilting!
Project QUILTING – Flying Geese
Here’s a picture of the Project QUILTING Challenge Piece – 3 Geese. I’ll be blogging more about this once I hear the judges critique. In the meantime, visit the voting post and be sure to caste your vote for your favorite project this week!
Goals for this week:
- getting the borders on the three quilts (mystery, boxed in, and surprise quilt)
- finish machine work on the matryoshka ornaments
- make a patchwork kite (or two) for theGlitterWorkshop
- stay on track with my yoyo goal
- get a good start on the final Project QUILTING challenge right away
- start work on two owls I have custom ordered
- finish packing my bag for the hospital
A look back:
My Wonderful Sponsors!

Fat Quarter Shop
Spice Berry Cottage

10% OFF all fabrics!

use coupon code KIMSCRAFTY
Generation Q Magazine

Etsy Treasury Team

Popular Posts
-
One of my favorite things to do in my ‘free’ time is curate treasuries on etsy. I will start with the saying that I’m no expert and have on...
-
Well – I made a big decision. I’m re-branding myself from Kim’s Crafty Apple into ‘ Persimon Dreams .’ I’ve been contemplating this for qu...
-
photo by Jack – Lloyd (found on flickr) Welcome back to another season of Project QUILTING ! I am super excited to be back hosting m...
-
I saw this quilt by Aneela Hoey over 9 months ago. I haven’t been able to get it out of my mind – I just LOVE it! So – here’s what I ...
-
I just have to say you all are so TALENTED! I'm in awe with ALL the projects submitted for this challenge! If it weren't for you (th...


