Grab My Button!

Grab My Button


Fabric Fascination Quilt Along


another Quilt Along!

May For Me - BINGO!


My Blog List
-
-
A Great Big Hexie Cushion1 day ago
-
-
Glacé Garden3 months ago
-
49 Unique DIY Valentines Gift Ideas5 months ago
-
2nd Annual Garver Pumpkin Party2 years ago
-
End of blog3 years ago
-
-
A Japanese Stash Buster Quilt6 years ago
-
Quilted Tassel Pouch Tutorial6 years ago
-
H2H Quilt Challenge 20197 years ago
-
Shuffling7 years ago
-
Quiltsy Cares 3/31/197 years ago
-
Eco-living On A Budget7 years ago
-
a new day dawns7 years ago
-
-
-
-
-
Hand Maker Blog Tour9 years ago
-
-
The San Salvador Sails By ...9 years ago
-
-
Gift of love10 years ago
-
-
New Updates Coming Soon10 years ago
-
Sweet Jenny Belle10 years ago
-
-
-
Winning Treasury #22011 years ago
-
Dianabol11 years ago
-
Dandelions11 years ago
-
A Quilty Finish13 years ago
-
A walk in the snow13 years ago
-
-
the harvest begins~13 years ago
-
-
My Blog Has Moved!14 years ago
-
Polka Dotted Dress Envy14 years ago
-
Come visit our new blog!14 years ago
-
Handmade Christmas Recap 214 years ago
-
-
-
-
-
-
-
-
-
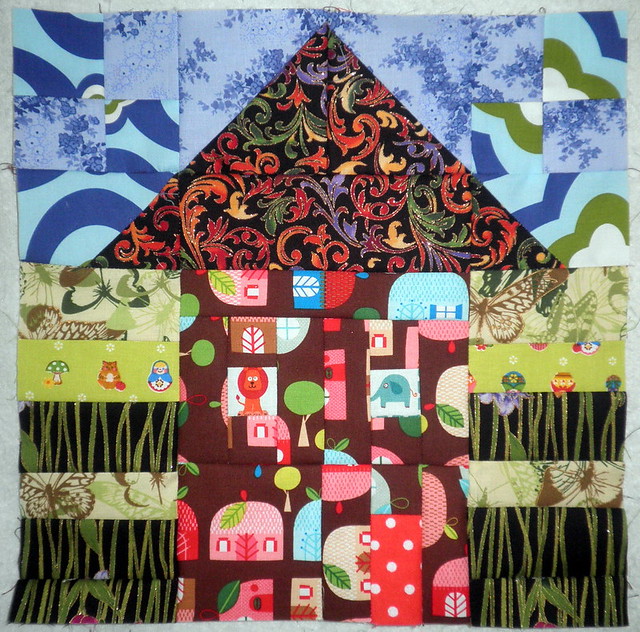
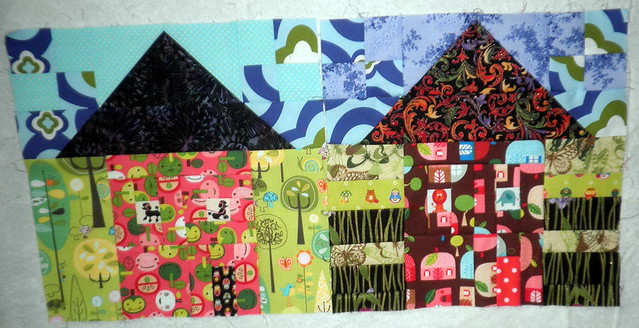
Block 1: ‘Home Sweet Home’ Quilt Along – My Home

‘My Home’
by Kim Lapacek, KimsCraftyApple

Fabric 1: Medium or light for sky (I chose blues) – you should have at least 2 different fabrics for this color (lower left)
· CUT: 4 – 4” squares
Fabric 2: Light/Medium for grass (green) (upper left)
· CUT: 2 – 3.5” x 7.5” rectangles (or strip piece a bunch of fabrics together and cut out 2, 3.5” x 7.5” rectangles from that…your choice)
Fabric 3: Roof (dark batik) (Lower right)
· CUT: 2 – 4” squares
1 – 6.5” x 2.5” rectangle
Fabric 4: House (pink) (upper right)
· CUT: 1 – 6.5” x 1.5” rectangle
1 – 3.5” square
5 – 1.5” squares
6 – 1.5” x 3.5” rectangles
Fabric 5: Scraps for windows/door that contrast with your ‘house’ color (upper right)
· CUT: 2 – 1.5” squares
1 – 1.5” x 2.5” rectangle
4 Patch

Take one of square of each color.
Put right sides together.

Stitch ¼” seam on opposite sides of the square.

Cut square in half (2”) – each piece will measure 4” x 2” before ironing.
Set seam and iron open. – you now have two , 2 patch units

With the 2 patch units right sides together, seams aligned, and the two different fabrics opposite each other,

Stitch ¼” from opposite sides. Be sure stitch crosses the first seam.
Cut the resulting unit in half.

Set seam and iron open – your two corner four patches are done! End block should measure 3.5” square if done correctly. (This is an amazing technique I learned from Pat Speth and Charlene Thode’s Nickel Quilts Book - you can use this method for any four patch you want to create. If you want your end block to be 3.5” square then cut two 4” squares and put together, if you want 4” square – cut your initial squares to 4.5” and so on. LOVE this method for 4 patches!)
Half Square Triangles

Take 2 - 4” squares of Fabric 1 (one of each fabric)
Take 2 - 4” squares of Fabric 3
Put right sides together of Fabric 1 and Fabric 3.

Using a washable marking pen, draw a line from one diagonal to another.
Using the line as a guide – stitch a seam ¼-inch off each side of the line.

Cut along the line you drew and press each triangle open.
Trim square to 3.5”

Take 2 half square triangles and cut a 1.0” off the larger portion of the Fabric 3 triangle as shown in the picture.
Rectangle

Take Fabric 3 & Fabric 4 rectangles and sew together. Press towards the darker fabric.
House


Sew a 1.5” square of fabric 4 onto each side of the Fabric 5 1.5” squares. Iron away from the middle square.

On the opposite sides sew on the 1.5” x 3.5” rectangles of Fabric 4 to create 2 – 3.5” squares. Iron away from the middle square

Sew a 1.5” square onto the short side of the Fabric 5 rectangle. Iron toward the rectangle.

On opposites sides sew on the 1.5” x 3.5” rectangles of Fabric 4 to create a 3.5” square. Iron towards the middle rectangle.
Lawn
In this example I just cut two rectangles 7.5” x 3.5” for the lawn.
In this block – I strip pieced a bunch of different ‘grass’ fabric together first and then cut out the 7.5” x 3.5” rectangles from that. It’s completely up to you with which you like better.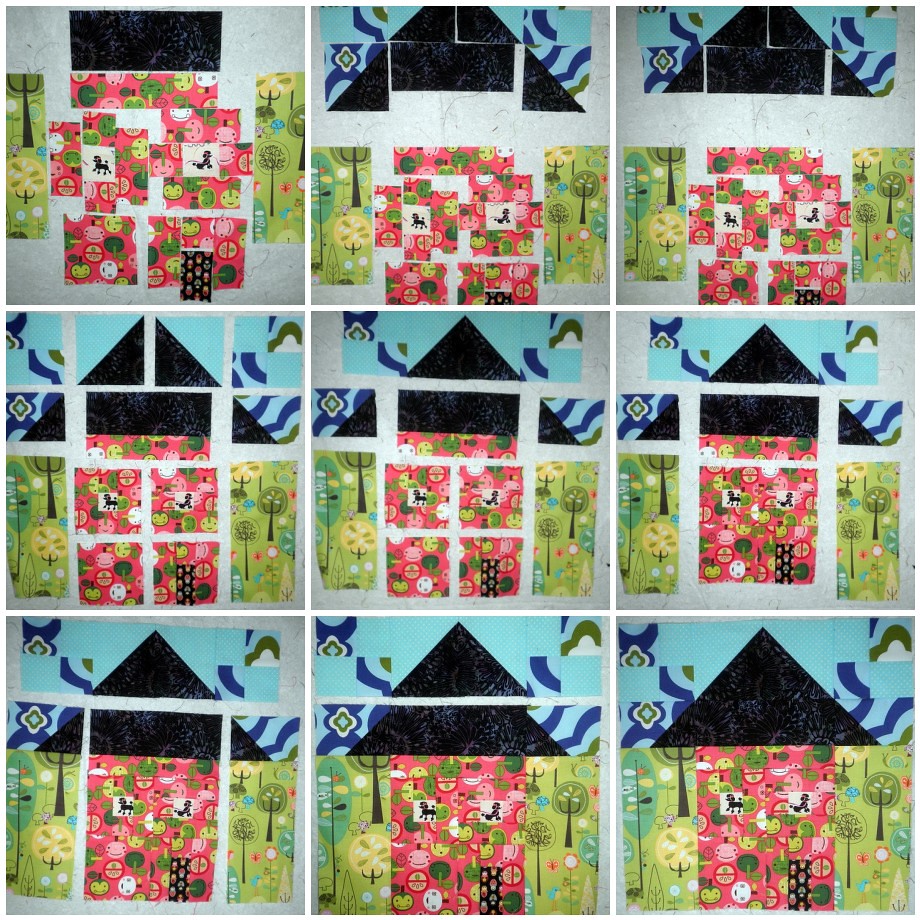
Let’s Build Our House!

Step 1: Sew the 4 patch and the full ½ Triangle Squares together. Iron towards triangles.

Step 2: Sew triangles together so top row looks like the picture above.

HOUSE
Step 3: Sew window panes squares together. Iron towards long rectangle.
Step 4: Sew Door square to 3.5” square so base of the door is at the bottom of the square. Iron towards long rectangle.
Step 5: Sew house pieces together matching seams in the middle. Iron any way.

Step 6: Sew short triangle/rectangle to fabric 2 strips. Iron towards fabric 2.
Step 7: Sew long rectangles to house. Iron towards upper rectangles.

Step 8: Sew left side to house. Iron toward side. (away from the house)
Step 9: Sew right side to house. Iron toward side.

Step 10. Sew roof onto house. Set and Iron.
Now you have a beautiful My Home square – the first of 16 blocks for this ‘Home Sweet Home’ Quilt Along!
Click HERE for a printable PDF of this pattern!
Be sure to join the ‘Home Sweet Home’ Flickr Group: http://www.flickr.com/groups/1850682@N20/
and upload photo’s of your block as you complete them!
To keep up with all my crazy fun ideas – be sure to sign up for my newsletter, follow this blog AND like KimsCraftyApple on Facebook.
Let’s not forget that we have a prize now thanks to Barb Raisbeck!
Anyone that brings a completed 'Home Sweet Home' Quilt to Show and Tell at the 2012 Quilt Retreat Getaway Weekend hosted by QuiltsbyBarb will receive a $10 gift certificate to the quilt shop at the retreat in honor of the 10th anniversary.
One $25 gift certificate to the quilt shop at the retreat will be given to a recipient of the viewer's choice award decided by the retreat attendees.
Additional qualifications for the above prize: The quilt must include on the front at least 12 of the 16 blocks from the Quilt Along. It must also include the blocks designed by Kim Lapacek, Diane Lapacek, and Barb Raisbeck.
Stop back on Thursday, January 19th, for the next block!
My Wonderful Sponsors!

Fat Quarter Shop
Spice Berry Cottage

10% OFF all fabrics!

use coupon code KIMSCRAFTY
Generation Q Magazine

Etsy Treasury Team

Popular Posts
-
 I have a very unique situation with my kids. For 10 months of the year I stay home with them...the other two months is apple season, so I do...
 -
I just have to say you all are so TALENTED! I'm in awe with ALL the projects submitted for this challenge! If it weren't for you (th...
-
1. projectquilting , 2. 14 cMarch 11 to 12 2011 039 (Medium) , 3. Under Construction, quilting detail , 4. The Earth is the Lord's - Org...
-
WOW – If you’re looking for some quilting adventures – be it a quilt along, a swap, or some great challenges – you have to stop over at Quil...
-
I’m really excited to be a part of the Quilting Gallery’s big St. Patty’s Day Blog Hop Party. If this is your first time here I just want t...


6 comments:
Kim! Great job on this tutorial! Block is adorable.
great block! it's very tempting to join in!
Cute! Great tutorial...just what I need another project! LOL! I'll pin this DIY for later.
It`s very cute and the tutorial is awesome!
just posted my completed block 1. Since I designed block 2, I have that done, also/ Guess I'll add it next. This is going to be lots of fun.
Thank you for making the .pdf available. The block is as cute as it can be.
Post a Comment