Home Sweet Home Quilt Along
- Schedule
- Block 1 - My Home
- Block 2 - Lapacek's Orchard
- Block 3 - House by the Bay
- Block 4 - My Tilted House
- Block 5 - Two Trees
- Block 6 - Tree of Life
- Block 7 - Under the Moreton Bay Fig
- Block 8 - A Wonky Modern House
- Block 9 - Scrappy Trees
- Block 10 - A Home for the Birds
- Block 11 - The Happy Tree
- Block 12 - the little house
- Block 13 - Three Trees
- Block 14 - Under the Apple Tree
- Block 15 - A Home for Hoot
- Block 16 - Branch Sweet Branch
- BONUS - accuquilt home
- BONUS - Acid Cottage
- BONUS - Marcia's Crazee Patch House
- BONUS Block - Rippling Pond
- Flickr Group - Post your blocks here!
- BONUS - Acid Cottage
Project QUILTING
Feedback & Features
My Fabric is For Sale!
Kim's Crafty Apple
the Apple
Labels
My Flickr Stream!
My Blog List
-
-
-
Catch Up (2nd half of 2025)6 days ago
-
2026 Crafty Goals4 weeks ago
-
2nd Annual Garver Pumpkin Party2 years ago
-
End of blog3 years ago
-
-
A Japanese Stash Buster Quilt6 years ago
-
Quilted Tassel Pouch Tutorial6 years ago
-
H2H Quilt Challenge 20196 years ago
-
Shuffling6 years ago
-
Quiltsy Cares 3/31/196 years ago
-
Eco-living On A Budget6 years ago
-
a new day dawns7 years ago
-
-
-
-
-
Hand Maker Blog Tour9 years ago
-
-
The San Salvador Sails By ...9 years ago
-
-
Gift of love9 years ago
-
-
New Updates Coming Soon10 years ago
-
Sweet Jenny Belle10 years ago
-
-
-
Winning Treasury #22011 years ago
-
Dianabol11 years ago
-
Dandelions11 years ago
-
A Quilty Finish13 years ago
-
A walk in the snow13 years ago
-
-
the harvest begins~13 years ago
-
-
My Blog Has Moved!13 years ago
-
Polka Dotted Dress Envy13 years ago
-
Come visit our new blog!13 years ago
-
Handmade Christmas Recap 214 years ago
-
-
Blech18 years ago
-
-
-
-
-
-
-
-
Favorite Websites
Kim's Crafty Apple has MOVED to www.PersimonDreams.com
I’m re-branding myself from Kim’s Crafty Apple into ‘Persimon Dreams.’
You can now find me at:
www.facebook.com/PersimonDreams
www.twitter.com/PersimonDreams
www.pinterest.com/PersimonDreams
(and my jewelry is still at www.theapple.etsy.com)
Names, Names, It’s all about the Name!
This really doesn’t have to do with my quilting/crafting life but I need as much advice as I can get. Here’s the story:
So, I’m at 28 weeks today and of course – we still don’t have a name (and as a disclaimer, when we do get a name it won’t be shared until after baby joins us). We have to come up with a name that meets up to the two girls we already have…
Mercedi Rose (nickname: Sadie)
and
Capri Lapacek
I came up with Mercedi’s name because I really liked the name Sadie but it was getting too popular. A few days before I had her, I was on bed rest and watching the Tyra show. One of the models on her show was named Mercedes and I figured…hey, just take of the s and we can call her Cedi!
Capri’s name came from the Colbie Calliat song “Capri” about 3 weeks before she was born. I was in a panic about the fact that we didn’t have the name yet and the song came on. I said to Jared, “Hey, what about Capri.” His response, “Not bad…”
I just opened this up on YouTube to check it out and Capri was immediately over asking, “Is that my song mommy?”
So…I would love to hear some thoughts. I need a great name that is beautiful and unique. It can’t be too common but not too crazy either…let me know if you have any ideas for us!
Time to VOTE for Project QUILTING’s – What’s in a Name Challenge
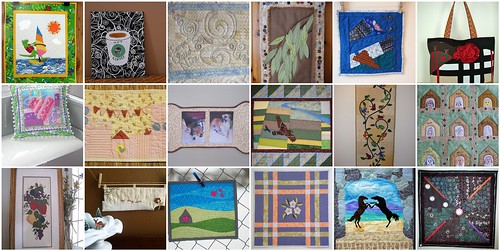
I am so happy to see that the creativity in this challenge didn’t scare many away – and we even added some brand new quilters! I personally had a lot of fun developing and creating an idea from something as simple as ‘a cities name’. Now, us quilters, get a little break but we need YOU to cast your vote and comment to let us know who you’re favorite’s piece is (our judges will have a bit to do with the 18 pieces as well)…
For those of you just tuning in you can read more about Project Quilting Here: http://kimscraftyapple.blogspot.com/2010/04/project-quilting.html
and about the second challenge of Season 2 here:
http://kimscraftyapple.blogspot.com/2011/01/project-quilting-season-2-challenge-2.html
CHALLENGE WINNERS:
***See the bottom of this post for two minor changes made to this years prize/voting process
This week’s PRIZES!
The winner of the JUDGES vote will receive $10 to FabricsNQuilts AND $15 to FabricFascination
The winner of the PUBLIC Choice will receive $10 to SpiceBerryCottage AND A Set of 8 Art Quilt Postcards from HeatherLairDesigns.
THREE randomly drawn participant will receive either a Pattern & Notecards from Marcia's Crafty Sewing & Quilting OR Log Cabin Fever by Evelyn Sloppy from UniquelyNancy OR $20 for Machine Quilting Servicesfrom QuiltsbyBarb.
This week’s Judges!
Guest Judge: QuiltDad
Voting closes at 7pm CDT on Friday, February 4th.
OTHER BONUSES:
Don't forget! Everyone that enters can decide if they want their name entered in a drawing for $50 off the 2011 Quilts by Barb Quilt Retreat Getaway Weekend.
I will also be sending everyone their rank (somewhere between 1 and 10 – be sure you’ve emailed me (lapaceksorchard {at} gmail {dot} com) your email address) and any critique’s the judges have about your creation. The top 3 scoring projects will be posted on my blog next weekend.
PUBLIC WINNERS: YES, you can win a prize too! You’ll find out how to WIN at the bottom of this post after you’ve checked out each of our challengers entries.
And now here are all the entries – in no particular order…
***Please note – I have left the images smaller to help the blog load a bit faster. I strongly URGE you to take closer looks at the projects before voting by checking out their submittals on the flickr group:http://www.flickr.com/groups/1401824@N21/
Quilter: Sally’s Angelworks
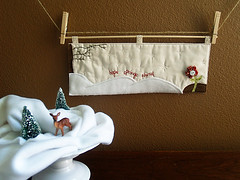
The Story Behind ‘Spring Always Brings NEW HOPE’
This little mini art quilt is, first of all, dedicated to all of my northern COLD friends, especially from Oscraps.com (digital scrapbooking site!!).
My process of creating this quilt for this challenge was quite the journey!!! (pardon the pun!! LOL!) I had a couple of places in mind for this challenge, like Hungerford, TX, but thought that food and a truck maybe didn't fit my quilt shop's aesthetic! LOL!! Then I remembered being in Pennsylvania last August and meeting a dear online friend and her mom and daughter. We met in a little town called New Hope. I thought, ohhh, I've already embroidered a Hope quote!! But I just could NOT get this saying out of my head..."Hope springs eternal..." by Alexander Pope. And the word spring made me think of flowers. We've been having a lot of conversations of the cold all over the nation lately at oscraps and on FB. So I thought that a quilt that depicted winter with a single flower could truly bring hope to someone who couldn't see past the winter snow!
The quilt is a single piece of fabric, with fleece, "dirt" fabric and tree trunk fabric, all appliqued on it. I embroidered bare tree branches using Silk embroidery thread and the quote and snow on the tree branches using DMC floss. The flower was made with those really cool Clover YoYo makers in the flower shape, and I just steam-a-seamed the stem and leaves onto the quilt. For quilting, I quilted the top of the snow banks (fleece) through all three layers. I also ran some machine stitches on the tree trunk and the stem/leaves of the flower. I also added a fun button on the flower. For the all over quilting, I went with snow flakes. I quilted more snowflakes on the left of the quilt on purpose to denote more winter on the left and the coming of spring on the right of the quilt. I also hoped the judges understood that every snowflake is different in the real world, and I carried that idea through on my quilt! (heehee) I specifically chose to leave the quilt unbound because that is one of my favorite ways for a mini art quilt to look, personally. I know it is not traditional, but I think it adds to the starkness of winter in this particular piece!
I am going to post a much more in depth post on my blog (http://sallysangelworks.typepad.com) explaining more of the emotions of this challenge's journey for me on Sunday, Jan 30th.
This quilt is 15.25"x5.5" and was created in SW Houston, TX.
Quilter: GocksFrocks
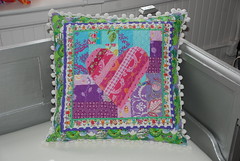
The story behind ‘Inspiring Friendships’:
20"square pillow cover
named for Friendship, NY
Driving through the hills of Allegheny, NY this summer I passed a road sign for Friendship NY and thought that would be a great place to say that you were from ... when I spotted this challenge on your blog I thought it would be the perfect place name from which to draw my inspiration.
So... friendship...my online friendship with you brought me to this challenge, the fabrics I used are from other "friends" I have made both online and in real life while pursuing my creative endeavors...Patty Young and I started out together in the same boutique group on ebay, I met Sandi Henderson there as well, Jennifer Paganelli and I became online friends and later met in real life when I visited her home in CT for one of her fabulous home shows(turns out she also has in-laws in my hometown!), and I snuck a little Valorie Wells in there as I had the good luck to meet her at quilt market!
The nesting dolls fabric represents the friends we made while living in Poland too many years ago! The fabric used for the border came from my stash - the outermost print reminds me of the hills where Friendship, NY is located.
I started with a log cabin block that I cut into quarters, shifted around and sewed back together, made the strip work heart appliqué, added batting & backing and quilted it all free motion (?) ... as I may have mentioned this is one of my first forays into quilting and I don't know all the correct terminology yet! I then added an envelope back to the front so it could be used on a 20" pillow form
thanks for inspiring me!
Quilter: MoranArtandQuilts
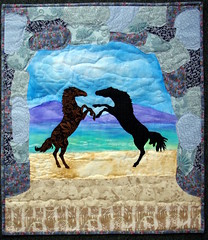 >
> The Story Behind ‘Horse Cave’
Horse Cave, KY
21" x 24"
After searching the internet and finding some very interesting city names I settled on this city because of the picture that came to mind. I thought it would make a pretty quilt.
Horse Cave has a population of only 2252 people. It is the largest city located in Hart County in south central Kentucky.
I started out with a piece of white Moda fabric and stapled it to a board. I drew a rough outline of the cave, water and mountains and began to paint with acrylics. I let that dry while I selected the fabrics for the sand and attached them with Heat Bond. I did some free motion quilting to look like sand. Then I moved on to the cave walls and cut out random shapes for the stones and once again used Heat Bond. I then quilted all those down with a lot of free motion quilting. I ran into a problem when the Heat Bond on the horses wouldn't stick to the acrylic paint so I had to pin them on and then sew them down using raw edge applique.
I chose the backing, cut the batting and pinned the areas I could to ready it for quilting. I also found it's hard to quilt over paint! I then quilted the whole piece mimicking the quilting I had done before to tack everything down. I added the binding and called it finished!
Catherine from Columbus, OH
Quilter: Pastor Katie Bishop
The Story Behind the Piece:
This week’s Project Quilt challenge was hard…
Not because I was uninspired.
We had to pick a place name as an inspiration for our project.
And then we could make anything.
Any size, any shape.
Anything.
And I think that anything was the problem.
I came across Dunmovin, California
(right off 395 near the Sequoia National Forrest)
And was inspired.
Because we move.
A LOT.
As pastors, we move whenever and wherever our Bishop sends us.
So in 5 years of marriage, we have lived in 3 different homes,
(and that is if you don’t count the six weeks we lived with my in-laws
while I was pregnant – God bless them.)
The idea of being “done moving”
brought peace, brought comfort,
brought this 27-year old thoughts of retirement.
And I liked it.
Which might have been some of the problem.
So here is my submission.
After many takes, here is my quilt,
Inspired by “Dunmovin, California.”
Created in Brunswick, Maryland
Quilter: SpringWaterDesigns
The Story Behind ‘Laurel’:
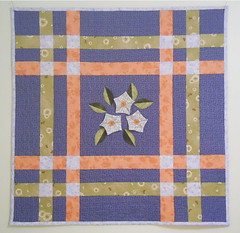
My inspiration for this challenge was Laurel, Maryland. When I was born my family lived in Laurel, a little town where my dad (and also his mother before him) was born and raised. I knew right away I wanted to do something with a Laurel flower. I used a picture of the flower to design a stylized version, and made them three-dimensional (I've explained how I made the 3-D flowers on my blog)
Starting with a darker background to contrast with the flowers, I pieced, then appliquéd the two toned green leaves to the center block, and bordered it all with a lattice type border with peach and green fabrics.
I quilted all over with a clear monofilament thread. The backing fabric that I used reminds me of viney brambles which symbolizes the little town that we later moved to when I was young (just about 5 miles from Laurel), and where I grew up…and still live in today. That town’s name is Savage, Maryland.
To add the 3D flowers, I placed a small peach colored fabric circle in the center of each flower and strung green seed beads when sewing each flower to the quilt. Then I frayed the edges of the peach center a little.
My finished quilt measures 32” x 32” and was made in my Jessup, Maryland home ~ which is really located in Savage, but the Post Office calls us Jessup ☺
Quilter: Marcia’s Crafty Sewing and Quilting
http://www.flickr.com/photos/craftysewing/5396544285/in/pool-1401824@N21
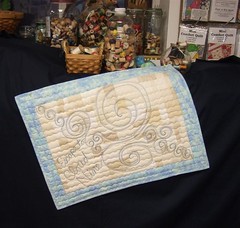
The Story Behind ‘Escape to Cloud Nine’:
Escape to Cloud Nine Quilt for Project Quilting.... It's the name of the place that I LOVE .... I read the challenge on Sunday and started thinking.... What place should I choose? Where's my favorite place?..... Our favorite campground on the Mississippi River, the hunting and hiking land behind our house, a quilt retreat, a quilt shop, a vacation spot, my mom's house, my brother's house, my sewing room at our home, my sewing room at the camper .... I brain stormed while I cut strips for the background fabric. Then I started sewing strips and taking pictures ... I had lots of ideas....but couldn't make up my mind.
I even sent an email to family members to enlist their help with the brain storming.
My husband said "What is the name of the creative space/place you go to in your head, when you are zoning in on your quilting and not paying attention to the real world?" Hyper Focusing??? Ritch suggested I name the quilt something like.... Hakuna Matata -- cause when I am "hyper focusing" that is where I go... when I am sewing, quilting, and creating. But he said that is not the right name! Has to be something about the creative space in your brain!!!
Then I did an internet search for names of places (towns and cities with unusual names) that might represent the name of the creative space in my brain. I read about the right brain and left brain and the parts in between that transfer the information back and forth. I thought I knew all about Attention Deficit and Hyper Focusing. I went Thesaurus.com and found tons of words that deal with imagination, creativity, and even more than I wanted to know! I found a site that had Quotes by everyone in the world. The coolest part is that I was reading more than I have ever read in years! Was that part of the challenge?
Finally I decided that Cloud Nine described my creative space or place in my brain. So I named my quilt Escape to Cloud Nine because I love to go there.....
Note: I blogged about the whole project from start to completion on my blog which is on my website at www.craftysewing.com. It explains how to make the background fabric and the use of double poly for the batting and quilting process.
Quilt measures 21" X 29"
Marcia Wachuta from Boscobel, Wisconsin
Quilter: AllthingsBelle
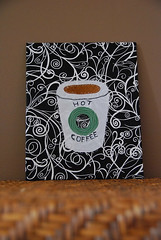
The Story Behind “Hot Coffee, Mississippi”
My name is Jennifer Rodriguez, and I'm quilting in West Jordan, Utah.
For my project I choose Hot Coffee, Mississippi and took a very literal approach. The Starbuck's-ish coffee mug was done with free motion embroidery. I wanted to have a "jittery" approach to my embellishment. I choose the black fabric specifically to resemble streams of steam.
It is 8"x10"
Quilter: Quilties
The Story Behind ‘Buttonwillow, CA’
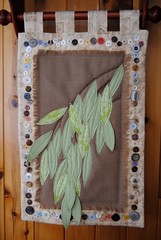
What a great name!! My husband thought it might be cheating that the name sounded so much like a quilt, but I thought it was too good to pass up! And maybe not everyone has a favorite tree, but I definitely do and it's a Weeping Willow! I love the way the leaves drape so elegantly. This quilt is tall and slender at 12" x 18" plus 2" tabs. The backing fabric is a tan cotton print with sketchy architectural details that reminded me of things we saw while visiting southern California (Santa Barbara, San Louis Obispo and more), so I thought it was fitting for this piece to give it a little California flair. It is also a good backdrop for the nice light brown linen and the variety of buttons. I started with all tan buttons, but opted for a wider variety and I really like the sparkle of color in the border. It keeps your eye moving around the piece.
Also be sure to notice the 3-dimensional willow leaves along the bottom and edges of the branch. It adds to the layering effect of a real willow branch and bridges the border and center for a united piece.
Made in Urbandale, IA by Emma Thomas-McGinnis
Quilter: QuiltingDiva
The Story Behind ‘Little Lizard Lick Dude’:
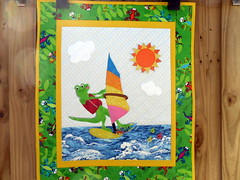
This quilt was made in Tampa, Fl and measures 22.5" x 27". I love this challenge. The second I read it, I figured I would make something beachy, or with a lighthouse or something, but I always do that. I was telling my mom that I really wanted to do something outside the box and something without a real pattern. She said she was watching a repo show and they were filming in Lizard Lick, North Carolina! I thought that would be interesting but went to the quilt shop with my list of cities, that one not included. I spotted the Gecko print by Timeless Treasures and knew I had a winner with Lizard Lick. I love appliqué so I searched clip art for a "lizard" print and found my guy.
I made appliquéd this quilt with different stitches, he is dimensional in the sunshine, I used fusible fleece for the puffy white clouds, fish buttons in the water and of course his little googley eyes! I love my little Lizard Lick dude.
Quilter: Kathleen P.
The Story Behind ‘Shanghai’:
Hi, I'm Kathleen and this is my first challenge. My friend Elaine (from high school, thanks facebook!) of the awesome Miro quilt last time introduced me to Project Quilting.
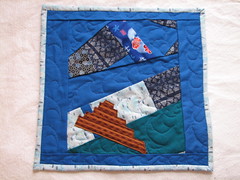
I love Chinese place names. There's something about being a second language speaker that allows you to see the words and their meanings rather than just hear the word as a place name (I, for example, am a Californian, and when I see "San Francisco" or "Los Angeles" I don't think about a saint called Francisco or a bunch of angels). Shanghai literally means above the water, but the first syllable, shang, is also the verb to ascend, as stairs . So I started thinking about stairs and water, and this strange little thing came out.
I also wanted to use this challenge to try free motion quilting for the first time. I'm a rather traditional or practical quilter--I've been making usable blankets out of small pieces of fabric since I was in high school and my mother suggested I quilt when I was having a rough couple of weeks (smart move, mom). The last few quilts I've made have been baby quilts for friends, and they're fun but nothing fancy or abstract or even decorative. Just warm cozy things to cover your baby in. I was lucky enough to go to an elementary / middle school where we did a ton of fabric arts, so I've always known how to sew / weave / knit / bead / spin / whatever. Lately I've been mostly sewing for my house and 2 year old, again very practically, just stuff we can use and save money on. So this little challenge made me do something entirely outside of my norm because it was not for anyone or anything and it wasn't going to do anything for the house.
I'm not sure how successful my first foray into free motion quilting was--I like the waves, but I certainly have a lot of work to go to learn the technique. (And possibly I should work out to build more upper arm strength?) I included a photo of this little square between two of our pretty glass windows because I sized this thinking of that space: maybe we'll have a rotating set of little quilts to spice up that wall?
Both parts of this quilt are paper pieced, and then I appliqued the stairs on top. I tried to get the perspective of going down the stairs into the water because I wanted to have the perspective of above the water. Again, not sure how successful that is as a pseudo-abstract concept, but I enjoyed the process. It's about 9 inches square. I made it in Clinton, NY (Oneida County).
And I can't take a good photo in this snowy light to save my life.
Quilter: Dashasel
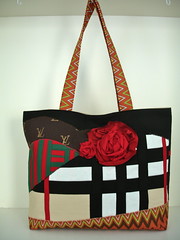
The Story Behind J'adore Terre Haute!
As soon as this challenge was posted, I started running through Google's various weird and funny America city names. There were so many great ones, but nothing was clicking. As I read them aloud to my husband, he said, you should do Terre Haute, Indiana. You see, my husband loves plays on words and he immediately connected Haute, to haute couture (too many fashion magazines laying around the house, I suppose!). From there I thought about the various designers, their logos and the patterns they were known for. I also decided on a tote bag because, well, isn't that the symbol for shopping!?!
For Louis Vuitton (LV on brown), I decided to paint the logo onto chocolate kona cotton. To do so, I attempted use of freezer paper and stencil creation- what fun! Then for Gucci (green and red stripes) I tried a bit of improvisational piecing by cutting out strips of various widths and lengths and patchworking them together at random. Burberry (white, black, tan plaid with red stripe) was created by piecing strips of black, white and tan together. Because some of Burberry's pieces have a layered look to the pattern, I topstitched on more black stripes to create the plaid look. Valentino (red roses) was represented by creating some raw edged rosettes. Finally, Missoni (zig zag) was simply represented by some Jay Carroll fabric that I have been dying to use!
Terre Haute translates to "High Land", so I knew that I wanted to create couture hills with my fabrics. For this step, I appliqued them to a background piece of fabric. I wanted this bag to fold up pretty flat but to still have some structure, so I appliqued through interfacing rather than batting. I did satin stitching for all the hills except Missoni, which was rag-edged and zig-zagged, in keeping with the zig-zags of the fabric.
With the front done, I decided to keep the back simple and just used the "Missoni" pattern with the saying "J'adore Terra Haute" on the back, with J'adore referencing Dior. I wish that I could say I intended to spell "Terra" with the "a" rather than "e" at the end but that was just some wabi sabi in my work :)
While I have made tote bags before, all of the techniques I used for quilting this project were new to me and I had a blast trying them out with varying success! Now I can go enjoy my t'haute bag!
The bag is approximately 15 inches tall, 18 inches wide, and 4 inches deep and was made in Milwaukee, Wisconsin.
Quilter: Kelsey Rose
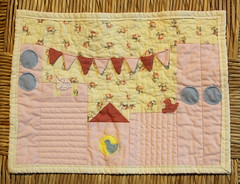
Hi, this is Kelsey Quilting from Mountain View, CA. For my town I chose Birdtown. This place just had a fun ring to it, and I started thinking, “What would a town for birds look like.” At first it was a bit too literal of a translation of the name “Birdtown” – I was thinking of birds in a very human-esque setting, which I ended up deciding would require a greater level of detail than I could provide in a challenge. Then it struck me – Birdtown wouldn’t be made of human houses, it would be made of bird houses of course! I added a few birds about their business – one in flight, one singing on his rooftop, and one as a silhouette in his doorframe, and a little bunting for decoration. I used a loopy quilting for the background as I thought it lended to the whimsical nature of the piece, and added some stitch in the ditch and straight line quilting to the buildings for visual interest. Final measurements: 10” x 14”.
I also chose fabrics to match a pillow set I made for my Mom for her sitting room using scraps. (Pillows here:www.flickr.com/photos/15912542@N07/sets/72157625688531678/)
(Unfortunately, in the low light I couldn’t get the colors to show true. What looks likes almost brick red is actually a rose color, and the background is ivory, not yellow..)
Quilter: Aunt Cindy’s Attic
The Story Behind ‘Give a Dog a Bone, He’ll Gnaw for a Day’:
Teach a Dog to Search for a Bone... At this point I couldn't decide between the rest of the options I had for quilt names, so I'll share them all. Choose your favorite!
Option 1: ...and he'll just annoy the neighbors.
Option 2: ... and he won't care. You'll probably just give him another tomorrow anyway.
Option 3: ... bone? Who cares about a bone? I'll just gnaw on my rope, ok?
Option 4: ...stop taking my picture already & just give me a bone!
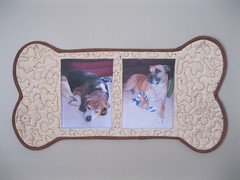
The inspiration for this quilt was the town of Gnaw Bone, Indiana. I limited my town name scope to my native state, otherwise I thought there would be too many possibilities. This is a dog bone shaped wall hanging. I used a layer of batting and a layer of stiff Pellon to insure that the bony knobs won't droop when it is hanging. The binding is applied traditionally. The dogs are both mine. They wouldn't pose together, hence the separate photos, but I'd planned for only one. They did not get on board with my project this week.
Gnaw Bone, IN is located in beautiful Brown County. I'm not sure that I've ever been there although it is located near a camp that my dad used to take us to. He was notorious for his "shortcuts", so it's likely that I've passed through at some point.
The quilt is approximately 13" x 7".
Created by Aunt Cindy of Aunt Cindy's Attic, Crawfordsville, IN
Quilter: ForQuiltsSake
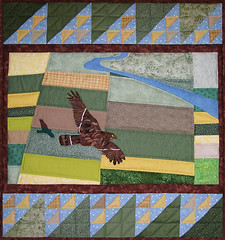
The Story Behind ‘Sometimes I Dream of Flying’:
Made by Pam Geisel of For Quilts Sake in Yellow Springs, Ohio, Jan. 2011 for Project Quilting Season 2, Challenge 2, What’s in a Name.
38” x 41”
My creative process and how I made it:
What a great idea for a challenge! I immediately did a search for unusual town names and quickly amassed a long list of possibilities. I slept on it and woke up Monday morning with a clear favorite, using “Birdseye, Indiana” as my inspiration. I’ve always loved maps and have been wanted to make a quilt looking down at the earth. I wasn’t sure if I was up to the challenge, so I “drew” out my idea on the computer to make sure I could get the perspective that I wanted.
I’ve also wanted to make a quilt that had some traditional quilt blocks but also had elements of an art quilt. I strip pieced the background, piecing the blocks at slight angles to give the perspective of distance. Using some of the same yellow and tan fabrics from the background, I pieced the “Birds in the Air” blocks a light blue background to represent the sky.
I wasn’t completely happy with the way the blocks faded into the background so I decided to add a small dark brown border between the background and the pieced blocks. Then still not satisfied I decided to add the dark brown border to the sides of the background only, to frame it like a picture.
I quilted the fields in the background 1/4" inside of each rectangle and also inside the small, yellow triangles in the "Birds in the Air" blocks. In the larger green parts of the blocks I quilted the echo of the "Birds in the Air" blocks.
I created the bird on a separate piece of fabric, fusing many small dark brown feather-shaped pieces of fabric. I did thread painting on top with both a dark brown and a tan-colored thread to help hold all the pieces down and to also give more definition to the feathers.
Once I decided on the right placement of the bird, I machine appliquéd the bird to the background. I pieced together a dark brown fabric with a dark green fabric, cut out a smaller bird-shape and fused it to the background just behind the bird for the bird’s shadow.
Aside from the literal having one eye on the hawk, I also made a quilt that was from the perspective of a bird. The working title was “Birdseye” but once I finished, I decided to call it “Sometimes I Dream of Flying.” For some unknown reason, the song “Surrey with the Fringe on Top” from the musical Oklahoma kept running through my head while I was making this quilt, even though I don’t know all the words to that song!
Quilter: Christine Hampton
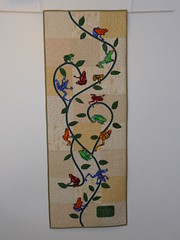
The Story Behind Toadvine:
Welcome to Toadvine - 23” x 62”
I found Toadvine, AL in an internet search. I immediately knew what I was going to make. My personal challenge was the use of bias tape. I had never tackled that before. The toad fabric is left over from a quilt I made for my son. I used a fusible product to turn the toads into iron-on appliqués. The leaves were cut freehand for variety. Toads and leaves were stitched down as raw edge appliqués. The background was quilted with meandering loops. I used a decorative stitch to finish the binding.
I quilt in Oregon, WI.
Quilter: Karen’s Crafty World
The Story Behind Bountiful:
My project is based on the movie title, "A Trip to Bountiful". There is also a town called Bountiful, Utah.
I first painted this picture with acrylic paints onto cream colored fabric. I then did some thread-painting. This piece measures aprox 12 inches by 6 inches and was produced in Elgin,IL.
Quilter: Kathleen’s Quilts
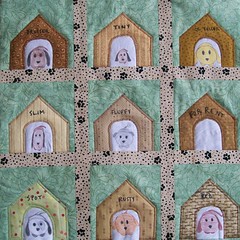
The Story Behind ‘Dogtown’:
Dog House Junction
A little town (more like a crossroads!) in California was my inspiration. Everyone has a home and there's room for more. I used pigma pen and crayons for the dogs and signs. The houses are zigzagged down. The road fabric was bright white but tea-dyed (I learned to do this in the first project quilting :) ) to fit in a little better.
18" x 18" created in Cissna Park, IL
----------------------------------------------------------------------------------------------
Quilter: Kim’s Crafty Apple
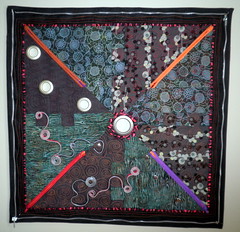
The Story Behind ‘Zip City’:
I am having a really hard time deciding which way this quilt should be orientated. I think I'm going to go with my gut and use the way that I first thought.
Inspirational City: Zip City, AL
When I first saw this challenge I immediately went to google and searched for 'Strange City Names'. I scrolled through the list and wrote down anything that caught my eye. The second time through I saw 'Zip City'. I instantly knew I was going to use this as an inspiration for a zipper quilt!
My mind raced with all the possibilities. I started one idea - it didn't work out but then a second did.
The 'zipper' blocks. Four of my blocks incorporate a zipper. I sewed a zipper between two triangular fabrics to create the corner blocks.
To create the blocks in between each corner block I decided to go with a zipper quilt block - something else I had found during google searches.
For the center block I did some crazy things with diagonals...I don't even know how to describe it but it worked.
Once I had the main portion of the quilt done I added the border. I only had four fabrics in the quilt - the deep turquoise and the dark grey - I needed a little 'pop' before the black border so I put in a skinny 'lip' of pink/purple/grey wavy striped fabric all around.
Time to quilt! I used thread colors in each corner that was the color fo the zipper in the opposite corner and quilted in a tight, swirl/twirl pattern.
I then bound the quilt with strips of zipper and black fabric - creating an urban look for the quilt.
It just wasn't enough so I added in some grommets, hand stitched zippers in fun swirl patterns and put in some silver studs to balance the silver in the quilt.
I had to block the quilt to get it to lay flat but I'm really happy with the end results.
Approximate Quilt Size: 25-inches
Created in Poynette, WI
Now for the PUBLIC Comment PRIZE!


NINE Chances to WIN!
Entry 1: REQUIRED! Leave a comment on your favorite entry (or at least that you voted) and vote for your favorite on the poll on the upper left hand side of the blog. - ***MUST DO***
Optional/Additional Entries – please note – if you want to qualify for these additional entries you must leave a SEPERATE comment for each – if you already follow or are a fan, etc just leave comments saying each. If you write everything in ONE comment you only will have ONE entry…
Entry 2: Follow my blog.
Entry 3: Follow me on twitter: www.twitter.com/kimscraftyapple
Entry 4: Tweet about this fantastic contest with hashtag #PQprimary (important or I won’t know you did it)
Entry 5: Like Project QUILTING on facebook
Entry 6: add my Project Quilting ‘Grab my Blinkie’ to your blog or blog about my giveaway (link your blog or post in your comment, please)
Entry 7: Head on over to GlitterWorkshop and let me know your favorite item in the store!
Entry 8: Like The Glitter Workshop on Facebook.
Entry 9: Sign up for my newsletter in the upper right corner of this page!
***Participants and Judges in project quilting ARE allowed to enter in the public poll/contest as well.***
This means you have NINE chances to win! I need you to write each of these entries as different comments in order to qualify you for all seven entries and include your email address. If you don’t include your email address I won’t be able to contact you when you win and I will have to choose a new winner. I will be picking the winner on Saturday, February 5th.
***Changes to Prizes/Voting this season***
- One person can no longer win both prizes. If this does happen (as it has), they will take home the ‘JUDGES Choice’ prize and the person in 2nd in the PUBLIC vote will take home the ‘PUBLIC’ prize. As before, each of these winners will not qualify for the random prizes. I’m doing this just to spread around all the amazing goodies so many great sponsors donated!
- The second is, I will not even be listing myself (KimsCraftyApple) on the Public Vote. Since this is my ‘creation’ I will never win any of the prizes – I don’t want to seem like this is biased towards me at all. I’m doing this merely for the fun, the challenge, and the camaraderie. I will still, however, be showing off my entry AND sending it to the judges for their critique.
Orientation Advice!
Hi everyone! I finished my piece for Project QUILTING but can’t decide which way should be ‘up’. Please let me know which option you like best!
Thanks so much for your feedback!
Quilter’s Block A-Palooza: Block #2: Word Search
The second block for the Block A-Palooza was posted yesterday. I managed to get my paper work done for taxes and the Sun Prairie Farmer’s Market AND managed to do the hand work on my Project QUILTING challenge piece so I decided to tackle the new block right away.
Here the instructions for the second block: http://www.ohfransson.com/oh_fransson/2011/01/bloggers-block-a-palooza-word-search-block-block-2.html#comments
I have to say – so far I’ve been very impressed with the detailed ‘how-to’ instructions for each block. They are laid out very well and are easy to understand.
Here’s what I came up with for Block #2: Word Search

Be Inspired!
Is all this cold and snow causing you to have a case of the winter doldrums? Well...this is the perfect time of the year to be inspired. Things might be slowing down a bit after the holiday rush so now's the time to be inspired to create something fun, new and innovative.
So how do you find those creative inspirations if you're in a rut? Participate in a Challenge!
Columns and Circles Inspired by the Office Space Challenge in Season 1
The second season of Project QUILTING is onto it's second challenge - What's in a Name. You can join in anytime for any challenge. You can even look at past challenges for inspiration to create something new.
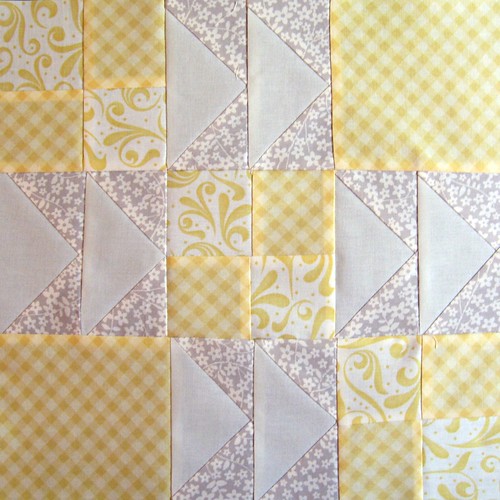
Follow along on a blogger Quilt Along. It looks like a fun one has just started over at QuiltDad called Block-A-Palooza. Quilt alongs, or even purchasing a crafting kit is a great way for you to hone a skill or learn a new technique.
Participate in a ‘Block of the Month’ Club like this Underground Railroad one at Fabrics N Quilts.
Another great challenge blog with fabulous inspiration challenge each week is Iron Craft. Some of the challenges are wide open, some more specific, all create inspiration!
Personalized Valentine's Day Gift Leather Card from joevleather
Want a fun, non-stressful challenge that you kids could even help you with - make some Valentine's for etsy's 'Special Delivery'. It's a great way to try some new card making techniques and spread some love. My girls and I made cards last year and I hope to do it with them again this year.
So far, the challenges I have participated in this year have inspired me to create two new products for my shop that I'm super excited to get off the ground. We'll just have to wait and see what happens from here!
I would love to hear if you have any challenges that you are participating in, plan to participate in or participated in in the past and were inspiring.
Iron Craft Challenge #4 – Get Cozy
When I saw this weeks Iron Craft Challenge – Get Cozy I knew that if I could find the time I would participate. I’ve seen coffee cozies everywhere – I’ve even bought one for myself – but I hadn’t played around with making them.
I thought about how to put a ‘twist’ on my cozy, and I finally decided to go with the orphan block route. Orphan blocks are quilt blocks that either didn’t work as planned for the quilt, or an extra one that ended up not being necessary for that particular quilt. Because it’s hard to throw good things away, quilters tend to get piles of these blocks. The big question is – what to do with them? In the past I have made table runners out of mine and even some cute ‘Orphan’ Owls. I thought some of the smaller, skinnier ones I had around would make perfect cozies! Here’s what I came up with:


And here’s the cozy I’m going to enter as my piece for the challenge – my
Purple and White Pinwheel Quilt Orphan Block with a Ruffle Coffee Cozy. I made the ruffle while experimenting with my new ruffler foot and it seemed to go perfectly with these orphan blocks. I just couldn’t resist!

To see the other cozies created check out the flickr pool: http://www.flickr.com/groups/1525156@N25/pool/
My Ruffler Foot!
 For the Log Cabin Challenge in Season 1 of Project Quilting, AllthingsBelle made this adorable log cabin quilt using her new ruffler foot. As soon as I saw it – I knew I had to add a ruffler foot to my Christmas List. Well, my quilting mother-in-law was kind enough to fulfill this particular Christmas Wish! (thanks!)


Setting 12
I’ll be posting a new creation that I made for this weeks Iron Craft Challenge in just a little bit that I was able to use one of my fabulous new ruffles!
Bloggers’ Block-A-Palooza…waiting for spring
Because I don’t have enough on my hands with participating, organizing and running Season 2 of Project QUILTING and enjoying the inspiration from the Iron Craft Weekly Challenges – I’ve decided to participate in the Bloggers’ Block-A-Palooza.
Check out QuiltDad’s Blog here: http://www.quiltdad.com/p/bloggers-block-palooza-quilt-along.html to read more of the details. It’s also not too late for you to join in!
Here’s my first block: Flying Over Fields

To see what other’s blocks look like check out the FLICKR GROUP.
Project QUILTING – Guest Judge QUILTDAD!
I am super excited to have some fun new guest judges this season! The first is one that I’ve been watching on Twitter – QuiltDad! QuiltDad will be the guest judge for the second challenge going on NOW!
Here’s his bio:
John Adams is a husband and father of 3 who enjoys sewing and quilting in his spare time.
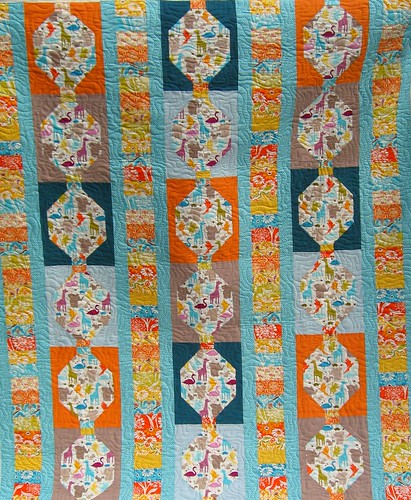
Inspired by the growing number of crafting blogs and the emergence of vibrant, modern quilting fabrics in the textile industry, John convinced his wife to teach him how to use her sewing machine in 2004 and hasn't looked back. He started his popular blog, www.QuiltDad.com, in 2008 to share his love of patchwork with others.

Since then, John has become very active in the online quilting communities. Today, he applies his modern quilting aesthetic by designing quilt patterns for both fabric designers and companies and contributing frequently to creative blogs, books and other collaborative endeavors. John is also a co-founder of the popular e-magazine Fat Quarterly.
John and his family live in Cary, North Carolina.
Quilt Dad has also just started BlockAPalooza on his blog – check it out ASAP and join along! I hope too :)

Project QUILTING Season 2 – Challenge 2 – What’s in a Name?
I'm delighted by the number and the quality of the entries for the first Challenge. Judging is really difficult. I haven't seen the critiques from the other judges, except those posted to the blog, but I know I've committed myself personally to including both positives and negatives in my comments. Please don't be discouraged by any comments we made. You're all doing a great job and will continue to develop as quilters if you take what we've said and look at your work differently because of it. If you have any questions concerning any comments, email Kim and she'll have us clarify. She's going to link to some tutorials and we'll write some for her if we can't find any that we like for the needed subjects.
For those of you just tuning in you can read more about Project Quilting Here: http://kimscraftyapple.blogspot.com/2010/04/project-quilting.html
This week’s PRIZES!
The winner of the JUDGES vote will receive $10 to FabricsNQuilts AND $15 to FabricFascination
The winner of the PUBLIC Choice will receive $10 to SpiceBerryCottage AND A Set of 8 Art Quilt Postcards from HeatherLairDesigns.
THREE randomly drawn participant will receive either a Pattern & Notecardsfrom Marcia's Crafty Sewing & Quilting OR Log Cabin Fever by Evelyn Sloppy from UniquelyNancy OR $20 for Machine Quilting Services from QuiltsbyBarb.
This week’s Judges!
Guest Judge: QuiltDad
Now for the challenge…
Challenge 2 – What’s in a Name?

Anyhow, I was noticing the exit signs and the really cool names the cities and villages in Virginia have. Places like Longdale Furnace, Short Pump, Clifton Forge and Stuarts Draft. And so, I thought, "Why not a challenge using a place name?" So this challenge was born.
1. Choose the name of a place, any place with a name that tickles your imagination.
2. Make a quilt using that name as your inspiration. I don't want you to choose New York and use the skyline. That would be the place as your inspiration, not the name. (New York as a name doesn't inspire much, does it?)
3. No restrictions on colors, sizes, materials or shapes. This is challenging enough.
4. After your project is finished, you may give it a different name than you started with if you'd like. You do know that we like a clever name, right?
5. POST your entries with a description of your creative process, including where you are (ie, I create in Madison, WI) and the size of your project by Sunday, January 30, 2011, at noon, CDT, to this flickr group – Project QUILTING with KimsCraftyApple: http://www.flickr.com/groups/1401824@N21/ OR email a picture/description of your completed project to lapaceksorchard {at} gmail {dot} com with PROJECT QUILTING in the subject line.
6. If this is the first Project Quilting challenge you've participated in, please email Kim at lapaceksorchard {at} gmail {dot} com with PROJECT QUILTING in the subject line so that Kim can send you feedback from the judges and keep you updated on the behind the scenes going-ons.
-Submitted by Diane
Helpful Links for Quilters
Beginning Quilting and Further:
- The 3 B’s – Borders, Backing and Binding
- Easy Peasy Machine Binding
- Blocking Quilts
- Matching Seams
- Quilt Spacer Border Calculations
- How to Bind Inside Corners
- Learn How to Paper Piece
Miscellaneous
Project QUILTING Random Winners and Public Comment Winner
So, I could just write everyone’s name down, assign them a number and use www.random.org to pick the random winners – but what fun is that? Just like last season, I wrote everyone’s name down (minus my own, the public winner, and the judges winner), folded them up, 
Cedi was the first to draw. 
And the winner was QUILTIES!


Congrats to all on winning these wonderful prizes! To those that didn’t win – no worries – lots of fun prizes will be offered in next weeks challenge (posted tomorrow, Sunday, January 23rd at NOON)!
The last prize I have to choose today is the Random Public Comment Winner. Since there were 75 comments I did break down and utilize random.org to choose the winner.
74 Cynthia said...
Wow! What a hard decision but I finally made one. My favorite piece in your shop is the cute Kawaii cupcake ring. It is so bright and cheery I bet it would put a smile on the face of everyone who sees it
Congratulations Cynthia! I’ll be contacting you ASAP and letting you know how to redeem your $20 to TheApple!
Sign Up for my Newsletter!
Project QUILTING on Facebook
PersimonDreams on Facebook
Blog Archive
-
▼
2011
(225)
-
▼
January
(28)
- Names, Names, It’s all about the Name!
- Time to VOTE for Project QUILTING’s – What’s in a ...
- Orientation Advice!
- Quilter’s Block A-Palooza: Block #2: Word Search
- Be Inspired!
- Iron Craft Challenge #4 – Get Cozy
- My Ruffler Foot!
- Bloggers’ Block-A-Palooza…waiting for spring
- Project QUILTING – Guest Judge QUILTDAD!
- Project QUILTING Season 2 – Challenge 2 – What’s i...
- Helpful Links for Quilters
- Project QUILTING Random Winners and Public Comment...
- Project QUILTING Primary Color Winners – Public an...
- Project QUILTING – my Bookshelf Quilt - Primary Co...
- Challenge from the Storque – Challenge 1
- Iron Craft Challenge #3 – Time to BUNT – A Valenti...
- Project QULITING – Sometimes Flu Happens…
- TIME TO VOTE for Project QUILTING’s Primary Color’...
- Treasury Wednesday
- Front Page - Etsy
- Project QUILTING Season 2, Challenge 1 – Primary C...
- Project QUILTING – Amazing SPONSORS!
- KimsCraftyApple on Etsy’s Front Page
- Project QUILTING – An Interview with SarahB
- Iron Craft Challenge 1
- A Spoonflower New Year’s Resolution
- Project QUILTING – An Interview with Diane Lapacek...
- Happy Twenty Eleven!
-
▼
January
(28)
Popular Posts
-
I just have to say you all are so TALENTED! I'm in awe with ALL the projects submitted for this challenge! If it weren't for you (th...
-
I’m really excited to be a part of the Quilting Gallery’s big St. Patty’s Day Blog Hop Party. If this is your first time here I just want t...
-
Today was Alchemy’s last full day with me. I thought I’d show her how to make a few rings and earrings like the ones I sell at TheApple . ...
-
Happy Monday everyone! I’ve been trying to find some time to sit down and put this post up for well over 24 hours now. The summertime, pr...
-
Every week that challenges are due I feel like I hold my breath and open up flickr fifty times a day to see if someone posted their proj...


