Home Sweet Home Quilt Along
- Schedule
- Block 1 - My Home
- Block 2 - Lapacek's Orchard
- Block 3 - House by the Bay
- Block 4 - My Tilted House
- Block 5 - Two Trees
- Block 6 - Tree of Life
- Block 7 - Under the Moreton Bay Fig
- Block 8 - A Wonky Modern House
- Block 9 - Scrappy Trees
- Block 10 - A Home for the Birds
- Block 11 - The Happy Tree
- Block 12 - the little house
- Block 13 - Three Trees
- Block 14 - Under the Apple Tree
- Block 15 - A Home for Hoot
- Block 16 - Branch Sweet Branch
- BONUS - accuquilt home
- BONUS - Acid Cottage
- BONUS - Marcia's Crazee Patch House
- BONUS Block - Rippling Pond
- Flickr Group - Post your blocks here!
- BONUS - Acid Cottage
Project QUILTING
Feedback & Features
My Fabric is For Sale!
Kim's Crafty Apple
the Apple
Labels
My Flickr Stream!
My Blog List
-
-
49 Unique DIY Valentines Gift Ideas21 hours ago
-
Catch Up (2nd half of 2025)4 days ago
-
2026 Crafty Goals3 weeks ago
-
2nd Annual Garver Pumpkin Party2 years ago
-
End of blog3 years ago
-
-
A Japanese Stash Buster Quilt6 years ago
-
Quilted Tassel Pouch Tutorial6 years ago
-
H2H Quilt Challenge 20196 years ago
-
Shuffling6 years ago
-
Quiltsy Cares 3/31/196 years ago
-
Eco-living On A Budget6 years ago
-
a new day dawns7 years ago
-
-
-
-
-
Hand Maker Blog Tour9 years ago
-
-
The San Salvador Sails By ...9 years ago
-
-
Gift of love9 years ago
-
-
New Updates Coming Soon10 years ago
-
Sweet Jenny Belle10 years ago
-
-
-
Winning Treasury #22011 years ago
-
Dianabol11 years ago
-
Dandelions11 years ago
-
A Quilty Finish12 years ago
-
A walk in the snow13 years ago
-
-
the harvest begins~13 years ago
-
-
My Blog Has Moved!13 years ago
-
Polka Dotted Dress Envy13 years ago
-
Come visit our new blog!13 years ago
-
Handmade Christmas Recap 214 years ago
-
-
Blech18 years ago
-
-
-
-
-
-
-
-
Favorite Websites
Kim's Crafty Apple has MOVED to www.PersimonDreams.com
I’m re-branding myself from Kim’s Crafty Apple into ‘Persimon Dreams.’
You can now find me at:
www.facebook.com/PersimonDreams
www.twitter.com/PersimonDreams
www.pinterest.com/PersimonDreams
(and my jewelry is still at www.theapple.etsy.com)
BIG ETTEAM GIVEAWAY! - NiftyKnits' Alchemy Meerkat and other fabulous prizes!
For those who haven't followed the story, it's well worth reading! Three little meerkats from Niftyknits have been travelling around the world, staying with friends from Etsy's ETTEAM and collecting souvenirs along the journey.
Alchemy the Traveling Meerkat has arrived at Lapacek’s Orchard
Alchemy gets a view of the Orchard and visits Packerland!
I wasn’t the only one lucky to have a fantastic, fun filled visit with the lovely Alchemy, many other etteam members were able to experience her as well. – For the interactive version of Alchemy's map CLICK HERE
To enter to win Alchemy (and all the fantastic items she collected on her travels) – be sure to go to the etteam blog: http://etsytreasuryteam.blogspot.com/2010/06/big-etteam-giveaway-niftyknits-alchemy.html, visit the shops and comment on your favorites!
***This giveaway will end on Monday, JULY 5th at 12Midnight PST and the winner will be announced on the Meerkat World Tour Page and here on the ETTEAM Blog.
*** The winner will be chosen by Random.org.
I’m a WINNER!
I was informed not too long ago by Amy of Amy's Creative Side that I was a winner from the Blogger’s Quilt Festival – Spring 2010. 
Quilt of the Month Club – Fabrics N Quilts
I recently signed up for the 12 month Block of the Month Club – 1930s from FabricsNQuilts. Here are the first two blocks that I have finished…
I look forward to seeing what will be coming in just a few days!
Log Cabin Entries – Time to Vote – Project QUILTING
Every week that challenges are due I feel like I hold my breath and open up flickr fifty times a day to see if someone posted their projects. My biggest fear is that no one will enter – luckily that hasn’t even come close to happening! Each week I am blown away by the amazing projects that people come up with – this week was no exception.
For those of you just tuning in you can read more about Project Quilting Here: http://kimscraftyapple.blogspot.com/2010/04/project-quilting.html
and about the fourth challenge of Season 1 Here:
http://kimscraftyapple.blogspot.com/2010/06/season-1-challenge-4-log-cabin.html
CHALLENGE WINNERS: There will be two winners for this challenge – one for the public vote and one for the ‘judged vote’ – Diane, Pam, and Barb.
The winner of the PUBLIC Vote will receive 4 fat quarters (their choice) from FabricAlaCarte AND a $10 gift certificate from the FatQuarterShop! Voting is EXTENDED this week and will be open until SATURDAY, July 3rd at 7:00 PM CDT.
The winner of the JUDGES Vote will receiver their very own copy of Judy Martin's Log Cabin Quilt Book AND a $10 gift certificate from the FatQuarterShop!
OTHER BONUSES:
A RANDOMLY Drawn Participant will win a pdf pattern for this beautiful quilt by FabricsNQuilts and second drawn participant will win a pattern for Diane's Starry Nine Quilt.
Don't forget! Everyone that enters can decide if they want their name entered in a drawing for $50 off the 2010 Quilts by Barb Quilt - Papercraft - Scrapbooking Getaway Weekend!
I will also be sending everyone their rank (somewhere between 1 and 10 – be sure you’ve emailed me {lapaceksorchard@gmail.com} your email address) and any critique’s the judges have about your creation. The top 3 will be posted on my blog this weekend.
PUBLIC WINNERS: I will also be giving out a prize to the public. You’ll find out how to WIN at the bottom of this post after you’ve checked out each of our challengers entries.
***A Note about the prizes and winners – Voting will be extended to Saturday, July 3rd at 7pm this week due to the upcoming Fourth of July Holiday. I will not have internet access at the end of this week. The next challenge will still be posted at NOON on July 4th – I’ll just have a little overlap between the new challenge and the winners of this challenge.
And now here are all the entries – in no particular order…
***Please note – I have left the images smaller than I normally do as I’ve received some feedback that my blog was loading slowly – hopefully this will help that issue. I strongly URGE you to take closer looks at the project by checking out their submittals on the flickr group: http://www.flickr.com/groups/1401824@N21/
Quilter: Spring Water Designs

The Story:
This is my entry for the Log Cabin Challenge. It measures 36" square. First I started with a tree in the center (where logs come from). Then I surrounded it with 12 6" log cabin blocks. The outer corners are 2 large 18" log cabin blocks that I cut in half on the diagonal.
I used two sides of one of the gree fabrics used as leaves for the tree. I love the log cabin block, and kept mine very traditional looking with the use of reproduction fabrics. I created this quilt in Jessup Maryland.
~ Spring Water Designs
springwaterdesigns.blogspot.com/2010/06/logs.html
Quilter: PennyFabricArt
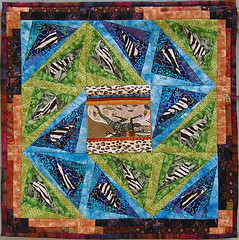 The Story:
 For this week's "thinking outside the square" I resurrected a triangle log cabin concept based on a quilt I had done about 5 years ago.
That project was originally a twin quilt that had both triangle and square log cabins, which I changed my mind and made a throw. I still had orphan blocks of 3 of the brown squares, 2 of the triangles, and 1 of the picture blocks, so I decided to make a wall hanging that's a derivative of the original.
The triangle log cabins were drafted on graph paper then I scanned that to make templates on the computer.
I cut the brown blocks to use as the border. My "wrong side" fabric is a metallic print dyed fabric, which I used for the binding.
It measures 28" square.
A note: It occurred to me as I was finishing that I should have checked to see if using orphan blocks is against the spirit of the time-constraint aspect of the challenge, or if it constitutes an unfair time advantage to do that. So if the other contestants or the judges feel that warrants point deductions or disqualification, please say so and do what you think is appropriate (I'm happy to go with the judges and public opinion on it).
QUILTER: QuiltingDiva
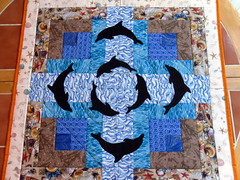 The Story: ‘Dolphin’s at the Beach’
 I knew it had to be beachy so I thought about it all week and looked through lots of books. I couldn't find anything that struck me so this is my first original idea that came straight from my head and into the fabric! I made the 4 blocks with the colors of sand and ocean. I was watching the stories of the oil spill while I created this quilt and thought about how sad it is for the dolphins currently living in these horrible conditions.
For the back/front fabrics, I created the momma dolphins using the front of 3 different black prints and the baby dolphins are the backs of those 3 fabrics. You can see a slight design on the baby dolphins - although it is very hard to see in the photos.
It is machine pieced, machine applique and machine quilted. I used my 4 different water prints and 3 sand prints and quilted in lots of geometric shapes. The back and binding are bright orange because no day at the beach would be complete without the sunshine!
This quilt measures 28" square and was made in Brandon, Florida.
Stacy Edell
Quilter: Kathleen Quilts
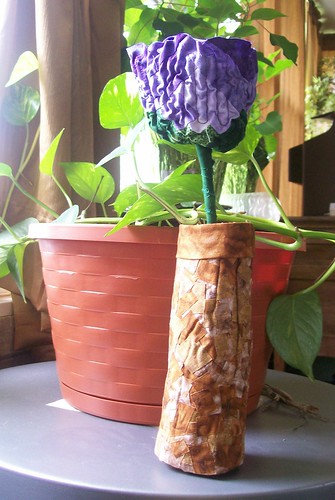
The Story:
I made three log cabin blocks, cut them into petal shapes, used Texture Magic to fluff them. I sewed the petals together, added a stem and a few drops of dew. Long ago my nieces taught me to make a vase from a bottle, masking tape and shoe polish. That was the inspiration for my fabric vase which used both sides of a brown fabric plus another brown. 13" x 4". Created in Cissna Park, IL
QUILTER: Sarah B
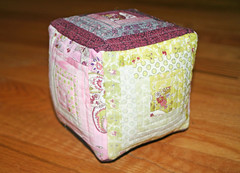
The Story:
I create in Colorado.
My completed log cabin challenge project! This was inspired by the phrase "think outside the square" -- my immediate thought after reading was a cube! This is really a quilt block! :)
I had thought I'd use this as a giant pincushion, but I think I'll just set it on my desk to admire instead!
* 23 squares from a Eva by Basic Grey (Moda) charm pack (1 fabric shows up on 2 sides)
* muslin
* batting
* polyester stuffing
Measures approximately 4"x4"x4
Quilter: KimsCraftyApple
Here is my submittal for the log cabin Project Quilting Challenge.
It measures approximately 34.5" x 32".
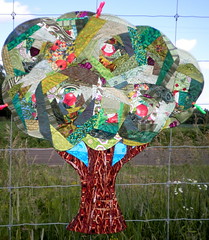
When this project first showed up I thought, "Of course - a block I've never done before!" Then, I thought some more and figured it would be a great way to use my scraps. I spent an entire day organizing my scraps by color for this project. After that day, I was walking with my coffee to a meeting and I thought - wow, wouldn't a tree be neat if I made the log cabins sort of circular so each strip was a 'leaf' of the tree? *Day wasted sorting by color...oh well*
I got to work right away. You can look through my album to see all my 'work in progress' & close up's if you want.
I used an awesome tree branch fabric for the trunk and the layers some strips of other brown fabrics to create a bit of dimension.
For the leafy portion of the tree I used many layers - first a solid layer of hand-dyed green, then some leafs from commercial prints and then finally my log cabin blocks. Most of the blocks have an apple print in their center. Some of the blocks are based from a square, some from a pentagon and some from a hexagon. Different shades of green circle each 'red' to create this fantastic leafy apple tree (of course I had to do an apple tree).
I have very few pastels in my stash so I had to flip quite a few fabrics over to create that dimension in the tree.
The log cabins are raw edge appliqué onto the quilt.
Swirly 'leafs' were quilted all over the green, log cabin portion of the quilt. I did some more rectangular swirls on the trunk of the tree to try and mimic a log cabin and/or the knots you would see in a tree trunk.
To finish the quilt off I 'pillow cased' a fun leaf print to the back .
I'm excited to hear what other's think of my apple tree and this tree was created with love in Poynette, WI.
PS. Can you tell I have trouble with short and sweet narratives!?
Quilter: Karen’s Crafty World
The Story:
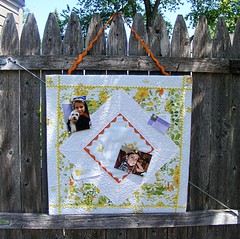
I started this project not knowing what it was going to turn into. I made 4 12" log cabin blocks from 3 inch strips of vintage linens. I ended up using only 2 of the blocks which I then cut in half. I still didn't know what it was going to be so just started fooling around with placement, adding the white to the triangles and a frame came to mind. Added large orange ric rac to peek out. Somewhere along the way i was thinking...maybe a big photo in the middle......then I thought ...bulletin board! The back is four 12" peices of cork held together with heavy duty tape. I then quilted the top leaving the middle unquilted so that it would 'pop' and added some yellow ricrac (I heart ric-rac). I then stretched it over the cork and secured the peice to the back side. More ric-rac for hanging and it was done. I think it turned out great! Oh, I almost forgot....the fabric in the very middle and on the sides are the backside of that fabric.
I hot-glued large beads to the plain tacks to jazz them up a bit. Everything came from my stash except the cork. This peice was made in Elgin,IL and is now hanging in our kitchen. It measure 24" X 24".
Quilter: LoveBugStudios
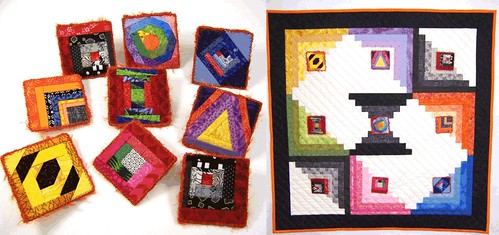
The Story:
This quilt is called "Nine Pins". I have done log cabin blocks before, but I have always wanted to try blocks on a smaller scale. The idea was to use scraps to make different variations of the Log Cabin block, and finish them to around 2.5". I decided to turn them into wearable pins, but then thought maybe they couldn't be considered as one project. So I decided to make a backdrop quilt for them, so the pins could become the centers of each block.
The finished backdrop quilt uses 8 of the traditional Log Cabin block, with the center being the Courthouse Steps variation. I actually saw this as an opportunity to also "go to town" with my AccuQuilt strip cutter, using a method that enabled me to cut all of the white "logs" in one pass. I have lots of logs left over from that! The colored logs were cut from scraps of 1.5" strips that I keep handy.
Since the quilt has so many colors in it, I decided to use orange for the quilting & binding to make it more cohesive. I also used a decorative orange yarn couched around the outside of each pin to tie them into the quilt.
The finished quilt measures 35" x 35", and was made in Hainesville, IL.
Quilter: Auntie Stina

The Story:
My finished project for the log cabin challenge. I *love* the Fairy Frost collection and glad I got a chance to use it.
The black squares are probably not from the same line, but they have iridescent dragonflies and I just couldn't resist. This is the fabric that I chose to use the backside of. You can see a little in the actual blocks, but all of the binding is the dragonflies.
The whole thing is approximately 17" on all sides. I wanted to go bigger, but ran out of time. :-)
Quilter: MoranArtandQuilts
The Story:
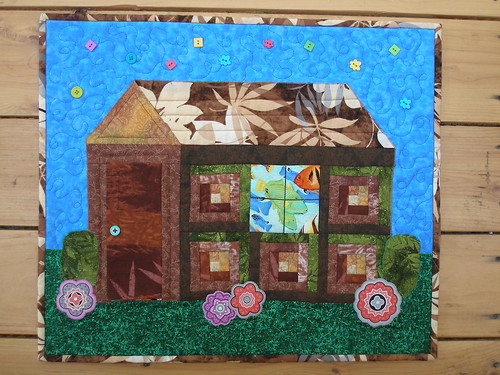
The idea was presented to me to make a log cabin from the log cabin blocks. And then the question; would that be tacky? Welllll, maybe, but I could make it whimsical and fun! So I made the 5 log cabin blocks (using the back of one fabric as directed) and constructed a log cabin from them. I decided to put something silly in the window so I chose fish. Why not? Then I thought it would be cute if the door opened to show more fish so that's what I did. I added some cute flowers, whimsical quilting and buttons in the sky. It was a fun wall hanging to make and something a little different than what you'd expect.
Catherine (MoranArtandQuilts)
Columbus, OH
Quilter: AllThingsBelle
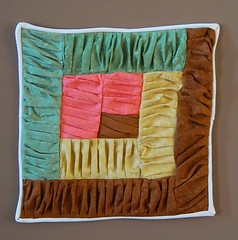
The Story:
Jennifer Rodriguez from West Jordan, UT.
Finished dimensions: 12" square
I just found out about this blog and challenge earlier this month. Unfortunately and fortunately we were on vacation all week, so today was my only day to attempt the challenge (during my daughter's 2 hour nap!)
I had been thinking all week about it. I had a few ideas, but I recently acquired a ruffler foot and have been "ruffling" anything that doesn't move.
It seemed perfect to try a shabby ruffled log cabin block! I adore it. I like it so much that when time permits, I would like to do a large quilt with this technique. I love the warmth of the texture and appearance!
As the challenge requested, I did use both sides of the fabric. However, with these particular batiks, there seems to be little to no difference :/
Quilter: PamelaQuilts
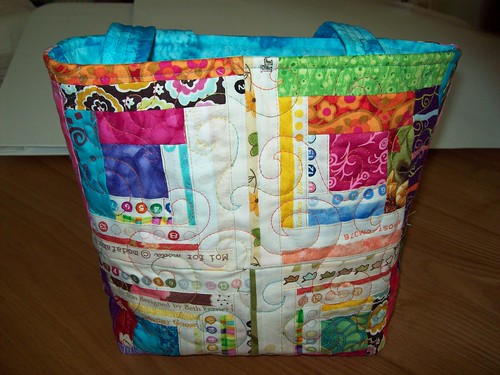
For this weeks Challenge I decided to make a quilted bag. I happened to come across a log cabin quilt made with selvages this week, so of course that got dropped into the mix also!
This bag is 11 inches wide and 9 1/2 inches tall. The bottom is 3 x 8. It is lined with sky blue, including two patch pockets made with blue and purple fabric. The handles are also quilted and measure about 18 inches long.
I foundation pieced my squares (8) on 6 inch muslin squares and used my small scrap bin for the pieces along with some of my selvage collection. The centers are 4 different fabrics, the purple one I used the right side in one square and the wrong side in the other!
I quilted this (with some difficulty due to the weight of the selvages and the foundation!) in a swirl pattern using warm and natural batting.
Public Prize!
This weeks randomly drawn public prize will win a glass pendant of their choice from HRBeaDesign! Read below on how you have seven chances to win!
SEVEN Chances to WIN!
Entry 1: REQUIRED! Leave a comment on your favorite entry (or at least that you voted) and vote for your favorite on the poll on the upper left hand side of the blog. - ***MUST DO***
Optional/Additional Entries – please note – if you want to qualify for these additional entries you must leave a SEPERATE comment for each – if you already follow or are a fan, etc just leave comments saying each. If you write everything in ONE comment you only will have ONE entry…
Entry 2: Follow my blog.
Entry 3: Tweet about this fantastic contest with hashtag #PQlogcabin (important or I won’t know you did it)
Entry 4: Become a Fan of Project QUILTING on Facebook:http://www.facebook.com/ProjectQUILTING
Entry 5: add my Project Quilting ‘Grab my Blinkie’ to your blog or blog about my giveaway (link your blog or post in your comment, please)
Entry 6: Head on over to HRBeaDesign and let me know your favorite item in the store!
Entry 7: Sign up for my newsletter in the upper right corner of this page!
***Participants in project quilting ARE allowed to enter in the public poll/contest as well.***
This means you have SEVEN chances to win! I need you to write each of these entries as different comments in order to qualify you for all seven entries and include your email address. If you don’t include your email address I won’t be able to contact you when you win and I will have to choose a new winner. I will be picking the winner on Sunday, July 4th. *Prize will be shipped on or soon after July 21st when Heather of HRBeaDesign returns from her vacation.*
Project QUILTING – RECYCLE Challenge from PamelasQuilts – Just a tad late…
My google alerts notified me that Pamela had blogged about Project QUILTING so I went to check it out. It turns out that she did manage to finish the RECYCLE challenge – just a week later than it was due! No worries though – we all still love to see what has been created so I’m going to do a quick post on it. If you want more details about Pamela’s process be sure to check out: http://pamelaquilts.blogspot.com/2010/06/project-quilting-challenge-three.html
From Pamela:
The rules of this challenge were to make a quilt totally out of recycled materials, excluding the thread and the batting. We were also to add three recycled embellishments to the quilt. When I first read the rules, the first recycled materials I thought of was my drawer full of jeans. I've been saving them for some time, using them occasionally for patches on other jeans, but mostly thinking that sometime I would make a quilt out of them.
At this point I thought that I didn't just want to make another lap quilt, but wanted to make something a little more creative. After thinking a bit I realized that I have been talking about making a dog bed for quite some time, but haven't actually done anything about it. So I grabbed my doggie's fleece mat and ran it through the washer and dryer. This was going to be one side of my project, and determined the finished size of the bed.
[AFTER piecing and quilting all the parts of this doggy bed together]
I dumped all my saved filling material into the sack, then put this in the bed. Fluffed it up, laid it out and called the dog - she laid right down on it and loves it! I really enjoyed making this project, and I liked the feeling of the denim squares so much that I plan on creating a lap quilt using future denim scraps - but instead of saving the whole pair of pants I will simply cut my squares and save them, discarding the rest of the pieces so they won't take up so much space! I think a denim quilt with flannel backing would be so nice for picnics by the beach!
Thanks Pamela for sharing your project with us all! It looks so cozy and I’m glad Tipper loves it!
My Project QUILTING RECYCLE Challenge – How It Happened…
I figured with the next project QUILTING challenge due at NOON tomorrow I had better put up my little ‘story’ about my last challenge piece…
There is a very long story to go with this piece.
When I saw the challenge, a few ideas ran through my mind (crazy quilt, jean quilt, etc.) but then I thought - converge a painting! I have a painting in my living room I wanted to do first but it turns out it's painted on some sort of board...can't sew that. Since I was very limited on time I finally decided to give in and cut up my "Monet."
SIDEBAR: My “Monet” story – In 1996 I was in 8th grade and a member of my middle school Odyssey of the Mind Team. Part of the challenge for the skit we had to create was to paint one of the paintings from the list and incorporate it into our play. I chose to paint Water Lilies, by Claude Moneten.wikipedia.org/wiki/File:Claude_Monet_ -_Water_Lilies.JPG. We then had to cut my painting in half and we glued it to these cardboard box contraptions so that when I 'fell through it at the museum', the boxes would flip into the new scene. Anyway, this was one of those things I could never get rid of but didn't really know what to do with it. 


The completed project!
Approximate Dimensions: 30 x 37
Creator: Kim Lapacek
Location: Poynette, WI
***Keep an eye on the flickr site to see the new challenge projects as the come in – hot off the machine! http://www.flickr.com/groups/1401824@N21/
An Interview with Tisha Sandberg – Instructor of the Papercraft/Scrapbooking Portion of the QuiltsbyBarb Getaway Weekend
As well as being able to learn some fantastic new quilting projects on the 2010 QuiltsbyBarb Getaway Weekend you will also have an opportunity to learn from an artist on some Papercraft/Scrapbooking techniques.
Meet the instructor - Tisha Sandberg
I asked Tisha a few more questions about herself and her art so we could find out even more. And here’s what she had to say:
***All Images shown are examples of Tisha’s work***
When did you first start creating things?
I’ve always loved making things; Halloween costumes, Valentine boxes (I’m seriously dating myself now!) really anything that involves working with my hands. I grew up around lots of boys, so I also built things with wood, used tools and did lots and lots of yard work, which I think can also be creative…digging, planting, growing.
What were the first things you created? and how did your creativity progress from there?
My first serious art experiences were in Jr. High School. I had an incredible teacher who exposed me to things like printmaking, sculpture and other forms of art that, in retrospect, were pretty amazing for Junior High. I also lived in a college town and was able to take classes in the summer. A friend and I took a class one summer and there was a nude model. When my dad picked us up we didn’t say a word for fear we wouldn’t be able to take classes any more.
My early art experiences really stuck with me but I didn’t get back to art seriously until about 12 years ago. I turned a room in our house into a studio and it really changed my life. Everybody needs a workspace of their own….even if it’s a tiny one!
Where do you find your inspiration?
Everywhere! I love design and texture and look to everyday things for inspiration. I take a lot of photographs and also carry a notebook with me all the times. I’m also drawn to primitive, African and Indian art and like to browse through books with images of cave art or the designs on clothing, etc..

Do you still dream about making other things? If so, what? Absolutely! But as I get older I’ve realized that I just can’t do everything that I have a desire to do. I’d rather do a few things well than lots of things in a mediocre way.
What's your favorite variety of apple?
Honey Crisp, but I buy Empires because they keep so well.
What are your favorite shops on etsy? Why do you like them? I love printmaking, so love all the sites that have silk screen and relief printed items. I also love handmade books and cards because they can be really unique, funky, beautiful, etc., and still have a functional use. There are so many great shops it’s hard to pick a favorite.
see more of her fantastic work
So now that you’ve ‘met’ the instructor let’s find out MORE!
What will we be doing? 
We will be having a special area with lots of room for scrapbookers, card makers and papercrafters to share ideas and enthusiasm for the things they love to do. We may even find some things to do with all those beautiful leftover scraps of fabric!
projects
-
handmade books that can be used as photo albums or scrap books
-
handmade cards and creative packaging ideas for giving them as gifts
-
templates and instructions for making gift bags, boxes and photo/music CD cases
-
other instructional information
***Information will be presented on photo editing/altering, printing your own papers, using materials you won't find in a scrapbook store and much, much more. There'll be plenty of time for you to share your own creative ideas as well. So come and join us!
I am personally excited about this addition to the quilt retreat weekend! There are some great lessons being taught that can be incorporated into creating amazing OOAK fabric (rubber stamp carving) and art quilting! What fun and what variety!
Themed Thursday - Sunglasses
I’m the girl that wears sunglasses ALL the TIME – even when it’s not sunny! I often get laughed at for my fantastic sunglass tan lines but it doesn’t bother me – my eyes are safely hidden behind the glasses – and it’s another fun thing to collect. I just popped up etsy’s front page and saw a fantastic pair of sunglasses featured and it made me wonder what other great frames I could find in the vintage sections on etsy…let’s see!

Half Tint Oversize Sunglasses by apricotbabybaby
Unique Vintage 70s Rodenstock Big Lens Sunglasses NOS from Vintage50sEyewear


Which pair would you love to own?
Sign Up for my Newsletter!
Project QUILTING on Facebook
PersimonDreams on Facebook
Blog Archive
-
▼
2010
(276)
-
▼
June
(27)
- BIG ETTEAM GIVEAWAY! - NiftyKnits' Alchemy Meerkat...
- I’m a WINNER!
- Quilt of the Month Club – Fabrics N Quilts
- Log Cabin Entries – Time to Vote – Project QUILTING
- Project QUILTING – RECYCLE Challenge from PamelasQ...
- My Project QUILTING RECYCLE Challenge – How It Hap...
- An Interview with Tisha Sandberg – Instructor of t...
- Themed Thursday - Sunglasses
- Project QUILTING – Season ONE Random Drawing Prizes
- Summer Solstice
- Season 1, Challenge 4 - Log Cabin
- Top Ten Reasons to Try Project QUILTING
- Project QUILTING – the Judges have Spoken for the ...
- Project QUILTING – Random Generator Winner
- Project QUILTING – the Winners of the RECYCLE Chal...
- A Road Trip Through ‘Shop Local
- Themed Thursday – All About Dad
- Time to VOTE for the RECYCLE! Project QUILTING Cha...
- Belated Project Quilting Entry
- Meet our Guest Judge – Kris from fabricalacarte an...
- Season 1, Challenge 3 - The Recycled Quilt
- Project Quilting – Road Trip Journal
- More WINNERS!
- Project QUILTING Road Trip Challenge - WINNERS
- Themed Thursday - Barns
- Take a Beautiful Handmade Patchwork Duffle on a Ro...
- Newsletter…
-
▼
June
(27)
Popular Posts
-
I just have to say you all are so TALENTED! I'm in awe with ALL the projects submitted for this challenge! If it weren't for you (th...
-
I’m really excited to be a part of the Quilting Gallery’s big St. Patty’s Day Blog Hop Party. If this is your first time here I just want t...
-
Hi Everybody, There have been a few questions, so I thought I'd address them here. (Sorry I didn't jump in sooner here, but it's...
-
Today was Alchemy’s last full day with me. I thought I’d show her how to make a few rings and earrings like the ones I sell at TheApple . ...
-
Happy Monday everyone! I’ve been trying to find some time to sit down and put this post up for well over 24 hours now. The summertime, pr...


