Grab My Button!

Grab My Button


Fabric Fascination Quilt Along


another Quilt Along!

May For Me - BINGO!


My Blog List
-
-
Plus Quilt Along Week 15 days ago
-
-
Picklewedge Quilt3 weeks ago
-
2nd Annual Garver Pumpkin Party8 months ago
-
H2H Challenge 202310 months ago
-
End of blog1 year ago
-
The Treehouse Hexagon Quilt Project2 years ago
-
Members-only practise22 years ago
-
Quiltsy Cares 2021 - Quilts3 years ago
-
-
-
Quilted Jacket3 years ago
-
Blog Photos4 years ago
-
Shuffling5 years ago
-
a new day dawns5 years ago
-
-
Never Give Up6 years ago
-
-
SAVE THE DATE!!!7 years ago
-
Hand Maker Blog Tour7 years ago
-
Cotton yarn utopia - found!7 years ago
-
The San Salvador Sails By ...7 years ago
-
-
Girl's Weekend to Arizona7 years ago
-
New Updates Coming Soon8 years ago
-
New Design with Lots of Humor!8 years ago
-
-
Challenge #2219 years ago
-
Dianabol9 years ago
-
A Quilty Finish11 years ago
-
A walk in the snow11 years ago
-
-
the harvest begins~11 years ago
-
-
My Blog Has Moved!11 years ago
-
Polka Dotted Dress Envy12 years ago
-
Come visit our new blog!12 years ago
-
Handmade Christmas Recap 212 years ago
-
-
Blech16 years ago
-
-
-
-
-
-
-
-
-
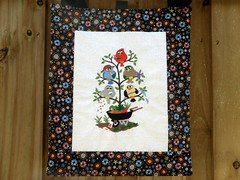
Blogger’s Block-a-Palooza: Block #10 – Turned Geese
It took me a few extra days to get at Amy’s Creative Side’s 10th block for the Bloggers Block-A-Palooza due to a 3rd birthday celebration and a horrible cold…but I did it!
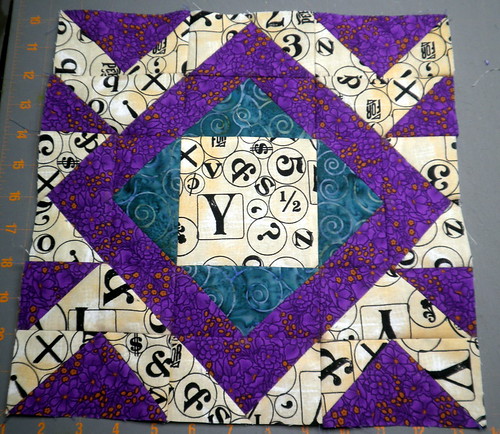 Amy’s method of creating the geese was a simple one…if I would have had a clear head and put all my fabrics right sides together. Turns out that I got one of my four blocks put together properly…didn’t realize it until after I did the first round of cuttings so spent plenty of time seam ripping on this one (completely my own fault). BUT I think it still turned out nicely and no one will ever know that I had to rip out the majority of these pieces…
I do really like how Amy created a block out of just two blocks (one being just a simple square…the other the flying geese) and created something that looks really complicated. If you sit down and follow her directions…this block is not complicated at all!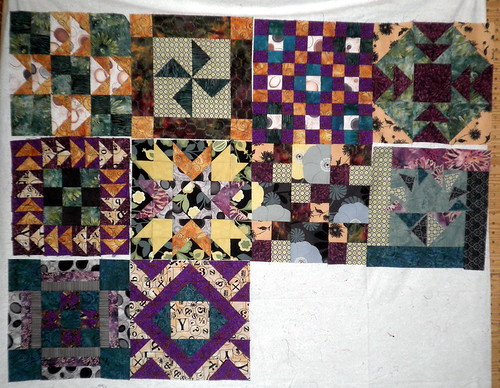
An overview of the 10 blocks I have finished thus far. I hope to get Block 11 put together tomorrow…right now my head is swimming too much and I don’t feel like ripping a bunch of seams again :)
SCHEDULE:
Monday, January 24
Block #1: John Adams
Quilt Dad
Thursday, January 27
Block #2: Elizabeth Hartman
Oh, Fransson!
Monday, January 31
Block #3: Amanda Sasikirana
sasikirana handmade
Thursday, February 3
Block #4: Cherri House
Cherry House Quilts
Monday, February 7
Block #5: Kaye Prince
Miss Print
Thursday, February 10
Block #6: Monica Solorio-Snow
Happy Zombie
Monday, February 14 Happy Valentine's Day!
Block #7: Heather Bostic
House of a la Mode
Thursday, February 17
Block #8: Angela Yosten
Moda Home Mom
Monday, February 21
Block #9: Scott Hansen
Blue Nickel Studios
Thursday, February 24
Block #10: Amy Ellis
Amy's Creative Side
Monday, February 28
Block #11: Fat Quarterly team
Fat Quarterly
Thursday, March 3
Block #12: Jennifer Davis
Sugar Stitches
Monday, March 7
Block #13: Tia Curtis
Camp Follower Bags & Quilts
Thursday, March 10
Block #14: Ryan Walsh
I'm Just a Guy Who Quilts
Monday, March 14
Block #15: Kerri Horsley
lovely little handmades
Thursday, March 17
Block #16: Vanessa Christenson
V and Co.
Thursday, March 24
Block layout: Julie Herman & Natalia Bonner
Jaybird Quilts and Piece N Quilt
TBD
Wrap-up, charity auction
TO See what everyone’s working on check out the flickr group:http://www.flickr.com/groups/bloggersblockapalooza/
It’s time to VOTE for your favorite Project QUILTING entry for the Hardware Store challenge:
http://kimscraftyapple.blogspot.com/2011/02/time-to-vote-project-quilting-hardware.html
“I So Much Love You” ~Capri
I try to keep all my different ‘hats’ in the blogging world separate from one another – but there are a few that are just too precious for me not to share… I am a few days late (4 actually) in posting my ‘birthday’ blog for my beautiful little 3 year old, Capri. (I was taken down for a few days by a nasty cold…)

 On February 24th, 2008 at 8:16pm my beautiful little girl – Capri Grace joined our family. To read more about her birth story click HERE.
 Capri at 1
 Capri at 2
 Capri at 3 –
and this picture perfectly depicts what my ‘sweet, little snuggly’ Capri was like on her birthday – stubborn and wryly. I have to say – it’s never been the terrible 2’s here – more like the terrible 3’s. I had about 3 months of a break from them but now I have another 12 months to endure…wish me luck.
 We had a very laid back birthday celebration for Capri. Grandma and Grandpa Van came during the day to hang out and play. We went to ‘Market Street Diner’ for lunch and to enjoy our ‘free birthday cake’. There were plans to go to Bouncy Town but due to some behavioral issues we had to pass.
  Papa brought home Capri’s favorite pizza – cheese and olives and then Grandma and Grandpa Lapacek came by at night to enjoy some ‘blue’ cake with the birthday girl.
I’m pretty sure Capri had an enjoyable celebration and is quite happy with her new toys and clothes. I can’t believe that my baby is already three and soon to be a big sister!!
 Just a few things about my lovely Capri…
- she’s so easy to give you a smile and is happy to snuggle whenever necessary
- building with blocks/lego’s/etc, coloring, and putting together puzzles are just a few of her favorite things
- she was slow to start talking but now that she has, she continually amazes us with all the things she has to say
- her eyes are definitely going to get her in trouble with the boys someday
- she shows no fear
- I can’t wait to have her measured at the doctor next week so I can share with you exactly how tall she is – and she is tall!
- My favorite thing that she has said to me that still melts my heart is, “I so much love you.”
Time to VOTE! Project QUILTING: Hardware Store Challenge

1. projectquilting, 2. Quilting Diva's Entry for Project QUILTING- Hardware Store, 3. tool time close up, 4.After the Rain: closeup drain cover, 5. Spring Cleaning - Showering Gnome, 6. we are the same - PIC 6, 7. Connectivity Up Close Feb 25 2 2011 012 (Large), 8. Spring Peek 2, 9. Katie Bishop "Little Mrs. Fix-It," corner, 10. Challenge 4 of Project Quilting – Inspiration Hardware Store - " Organizing Papa" 9, 11. His Veins Run Blue, 12. palettequilt3, 13. Spring IS coming, 14. projectquilting, 15. ENTRY Project QUILTING - Hardware Store Challenge - How Does Your Garden Grow?
Well, this week really threw an extra twist at me. I was really happy that I came up with my idea right away and got at it. I came down with a crazy cold that had me down and out for a good 24 hours – still not myself, but at least I’m able to function again. I’m sure that I’m not the only one facing extra challenges to get this piece done but I’m super excited about the 13 amazing entries we have this week!
For those of you just tuning in you can read more about Project Quilting Here: http://kimscraftyapple.blogspot.com/2010/04/project-quilting.html
and about the fourth challenge of Season 2 here:
http://kimscraftyapple.blogspot.com/2011/02/project-quilting-season-2-challenge-4.html
CHALLENGE WINNERS:
***See the bottom of this post for two minor changes made to this years prize/voting process
This week’s PRIZES!
The winner of the Public vote will take home $10 to FabricsNQuilts and $10 do Dye Candy.
The winner of the Judges Choice will take home a Pattern & Notecards from Marcia's Crafty Sewing & Quilting and $15 to FabricFascination.
THREE randomly drawn (by my two little beauties) participants in this weeks challenge will take home either $10 to SpiceBerryCottage OR $20 for Machine Quilting Services from QuiltsbyBarb OR a pdf of 2 maze quilt patterns from Lisa Penny!
Voting closes at 7pm CDT on Friday, March 4th.
This weeks’ JUDGES!
Guest Judge: Ann of RenegadeQuilter
OTHER BONUSES:
Don't forget! Everyone that entered a piece for this challenge can decide if they want their name entered in a drawing for $50 off the 2011 Quilts by Barb Quilt Retreat Getaway Weekend.
I will also be sending everyone their rank (somewhere between 1 and 10 – be sure you’ve emailed me (lapaceksorchard {at} gmail {dot} com) your email address) and any critique’s the judges have about your creation. The top 3 scoring projects will be posted on my blog next weekend.
PUBLIC WINNERS: YES, you can win a prize too! You’ll find out how to WIN at the bottom of this post after you’ve checked out each of our challengers entries.
And now here are all the entries – in no particular order…
***Please note – I have left the images smaller to help the blog load a bit faster. I strongly URGE you to take closer looks at the projects before voting by checking out their submittals on the flickr group:http://www.flickr.com/groups/1401824@N21/
Quilter: PastorKatieBishop
“Little Mrs. Fix-It”
I loved this challenge, mostly because it made me think about walking though the old hardware store with my father. I never really knew what we were supposed to be getting, I just thought it was cool that my dad and I went together.
The inspiration for this challenge was the rows and rows of little things all over the store. From the paint chip aisle (do they call them paint chips anymore?) to the nuts and bolts, to the seed packets for spring, I loved the ordered chaos that was the hardware store. And such colors! Everything was color coded! I drew inspiration for the fabric choice from the colors I found throughout the store.
So, I made a ticker-tape quilt. First I decided on the size and made a quilt sandwich. Then I picked the sizes of the pieces (1 inch squares, 1x2 inch rectangles and 2 inch squares – sooo small!) and then I pined them to the backing. I wanted to make sure the colors looked random so I moved things around until just right.
Then I machine sewed on top of the pieces. Once I finished that, I cut some of the fraying off, left a bit of it for that “rough” hardware store look, and began to place the nuts and bolts I purchased. I used regular jam nuts on the smallest squares, wing nuts on the rectangles and Lock washers (something I found to be beautiful in and of themselves) for the larger squares. I spread them out over the quilt using clear thread. I think it makes the squares look like the little packages of hardware at the store.
One of my critiques for the last challenge was that my binding was terrible. (Which it was.) So I worked really hard on my binding for this piece. I followed a couple of tutorials, and am still not 100% pleased with it, but am happier then I was last time. I guess I am learning that proves that quilting is always a work in progress.
My hardware store quilt, “Little Mrs. Fix-It” turned out to be beautiful and quite fun to make! I hope you enjoy.
Quilter: SallyManke
The story behind ‘Organizing Papa’:
When I first read about the topic for this challenge, I thought PERFECT. My hubby is a hardware store! Although he loves Ace, True Value, Lowes, Menards and HD...he has more than all of them. Between the garage, the basement, the shed, his truck and our business he alredy owns EVERYTHING. He just can't find what he needs. This is the finished challenge project. The total cost of this project was $2.29 for the clothesline. All other items were recycled and I still have half of the package of clothesline left.
Created in North West Michigan on the shore of Lake Michigan
Quilter: ForQuiltsSake
Made by Pam Geisel of For Quilts Sake in Yellow Springs, Ohio, Feb. 2011 for Project Quilting Season 2, Challenge 4, Hardware Store.
20.5” x 23.5”
My creative process and how I made it:
Coincidentally, when I saw the challenge for this week, we’d just returned from the hardware store where we’d bought a combination lock (to replace the one we don’t know the combination of). So I went back out. We have less 4000 people in our village, but we do have a local hardware store, and its part of the Do It Best chain. It’s pretty small, only three aisle and a basement (which oddly enough is actually under the business next door and not under the actual store), so I didn’t need a lot of time to look around.
I took a few photos and bought a few things then went home to analyze them. All of my items had holes in them (I guess I was thinking it would be easier to attach them to a quilt if they already had a hole) and two of the items, the drain cover and the washer, were water related. Then I remembered that there are drain chains that can be used instead of downspouts. I was ready to start.
I knew I wanted to thread yarn and ribbons through the openings on the drain cover, so before I got any fabric out, I got out my yarn and ribbons to see what color combinations I had. Since embellishments are usually one of the last things I put on a quilt, I usually don’t think about it much during the design stage, but since this was going to be the main focus, I thought I’d start here. Once I decided which color family I wanted to work with, I started looking through the fabrics. Right away I found a batik fat quarters that had rows of circles which reminded me of drain chains, and two batiks that co-ordinated with it. No need to keep looking.
I figured out the fabric layout quickly, the width determined by that fact that the bottom piece of fabric was a fat quarter, so I just used it all. I pieced the fabrics then started quilting. The quilting starts at the top with straight vertical lines on top of some of the “drain chains,” then the quilting moves through the thin yellow pieces still as straight lines but this time at angles following the blue printed patterns (more noticeable in the close up photos), and then the quilting moves into the main part of the quilt and the lines are free motion curves following some of the patterns on the fabric and they go all the way down to the bottom of the quilt, representing the way water would travel into the earth. I don’t do a lot of free motion quilting, but it seemed appropriate for this quilt. I didn’t want a visual binding at the edges so I used a facing technique that I’d just learned, one which makes the corners less bulky.
For the embellishments, I “sewed” gray cording on the drain cover to soften it visually and also threaded several pieces of yarn and ribbon of varying lengths then sewed it on to the quilt. This is the only item that I bought at the hardware store that I used on the quilt. The embellishment in the upper left corner was made by cutting a piece of cardboard the same size as my washer and wrapping yarn and ribbons around it. I didn’t want to use the actual washer as it was pretty heavy and I didn’t want the extra weight, but I think it’s obvious that it was inspired by the washer. Since the fabric had printed chains on it, I didn’t feel the need to attach the chains to this quilt.
Quilter: QuiltingDiva
The Story Behind - Seed Keeper:
I wanted to something with organizing. I had made a notebook holder/letter center with the office store challenge so thought I would stay with that theme. I went to Lowes and the first place I came to was the little seed spindle thingy. Now I am not a gardener so I didn't know what a gardener would need to organize but I thought I would make something to hold your seeds. I remembered I had a gardening tweet all stitched out so after searching high and low for it, I found it and it was perfect for my little seed holder/mini quilt.
The quilt measures approx 11.5" x 13.5". I added little ribbons for hanging with a dowel (first time I do that) and put a phrase on the back "any day spent gardening is a good day!". It was a quick project for me, but I like the result.
Tampa, FL
Stacy Edell
QuiltingDiva
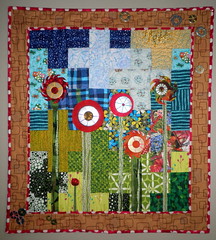
Quilter: Sally’s Angelworks
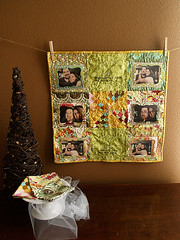
The Story Behind ‘We are the Same’:
I'm going to try to tell my story pic to pic...If you get lost within the story, the whole thing is on my blog:
sallysangelworks.typepad.com/sallys_ponderings/2011/02/we...
PIC 1:
I saw the display of ceiling fans and the first thing I thought was...I just finished that Block-a-palooza block with the half square triangles and it looked just like a ceiling fan...
PIC2:
Then I saw this (which I really really want to purchase for my kitchen...it'll take a little more convincing Mr Gorgeous for this one)...
I thought...ohhhhh I need crystal beads or buttons or something that looks like this!!
Pic3:
And then I HIT the Jackpot, baby...
When I saw this, I saw my quilt! And I saw an idea to make it practical. I adore making art, wall hangings, little vignettes...but this quilt was going to have little windows...and what to put there? Every good scrapbooker knows what - pictures, of course!!
PIC4:
As it was all forming in my head, I came upon these doors...
If you've been following my blog at all, you know I just learned how to free motion quilt...well, i started learning...i'm still practicing...it's going pretty well...but this pattern on the door really looked like something i wanted to do on fabric!!
PIC5:
So here's my finished quilt...
and my inspired elements…
- ceiling fan half-square triangles... with a little chandelier crystal in the center!
- the window pockets with little crystal "doorknobs" over them and scrolly quilting on all of it...
- heart quilting over both pieces of the quote, "whatever our souls are made of... ...his and mine are the same" (ADORE that quote!!)
- The little windows were made with my Big Shot die cutting through interfaced fabric, and then the fabric hemmed and sewn around a 4x6 page protector (cut down to a smaller width).
Btw, I love these pics of Mr Gorgeous and me...three of them I took of us, and three of them my mom took last Thanksgiving...*sigh* ... love the guy, too!!
And isn't that fabric designed by Tula Pink called "Parisville" the best??? I love, love, love it!! :)
Isn't this journey fun? As I let inspiration hit me this week, I realized that I truly have a deep desire to be inspired by even the most random things around me. My senses were completely heightened. I am so excited that it will spill over to my song writing, my scrapbooking, and even my parenting. I'm hoping I can even inspire my kiddos with the most mundane things! But that's just another part of this journey I'm on...
Thanks, Project Quilting!
Sally’s Angelworks – quilt measures approximately 22.5"x22.5" and was Made in Texas
Quilter: Marcia’s Crafty Sewing & Quilting
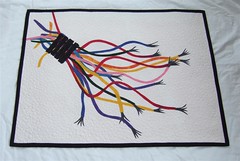 Connectivity Quilt
 Marcia Wachuta - Marcia's Crafty Sewing and Quilting
Boscobel, Wisconsin
What does a piece of wire, a wire stripper, and electrical tape have in common with a quilt?
A single stand of wire stands alone as one single piece, a wire stripper opens up the ends to prepare it to connect, and the electrical tape holds all the wires together.
A quilter sews alone til she finds a community of quilters who are brought together through their love of quilting.
That's why Connectivity is the name of my quilt!
Quilter: Aunt Cindy’s Attic
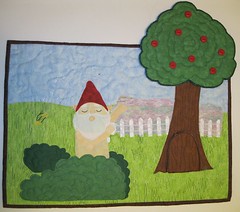
The Story Behind ‘Spring Cleaning’
I decided to look online first for inspiration pieces. It's much easier with 2 little ones that way. First, I came across a mail slot, then I went to things for summer (I'm definitely done with the cold weather!). I found weed killer spray (the kind you attach to your garden hose), and garden edging fence.
Right after I read the challenge for this week, I went to see "Gnomeo and Juliet" with my family. After looking at the outdoor items, a gnome found his way into the yard. I liked the concept of seeing spray from the weed killer, but decided that a sprinkler would be a little better for this gnome. I decided that the gnome should shower in a garden. He needed a few cleverly placed bushes to hide his gnome-privates. I decided that a mail slot wouldn't specifically work for this scene, but a door to a hiding place in a tree would function about the same way as a mail slot. A penguin has moved into the tree and is spying on our gnome. We still have snow on the ground, but it should leave soon and I think the penguin will go with it. I expect one of his friends, including the Keebler elf, Tinker Bell, Buzz Lightyear, Santa, Wile E. Coyote, Peyton Manning or Betty White (she's everywhere!) will take his place soon. There's a little velcro holding the friends in the tree as well as a pocket on the back of the quilt to hold them when not in use.
The water coming out of the sprinkler is jewelry wire and beads. The eyes, ears, nose and mouth of the gnome were hand embroidered as were the black portions of the sprinkler. I've not used beaded embellishment on a quilt before and I avoid hand stitching as much as possible. This quilt was a pretty big stretch for me, but was a lot of fun!
The quilt is approximately 13" x 19".
Created by Aunt Cindy of Aunt Cindy's Attic, Crawfordsville, IN
Quilter: Christine Hampton
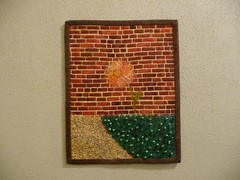
Spring Peek - 8” x 10” Made in Oregon, WI
Hardware store inspirations were in the yard design section: bricks, crushed stone paths and grass seeds.
My personal challenges were bead embellishment and thread painting.
The crushed stone path was pieced to the grassy area with a gentle curve. I free motion quilted around the individual bricks in the wall to make them stand out more. Then I added more quilting to the ground areas and a decorative flower stitch across the seam lines. The thread painted flower was free-handed with a variegated thread. I finished it off with a scattering of green beads to represent the grass seeds.
Quilter: Dashasel
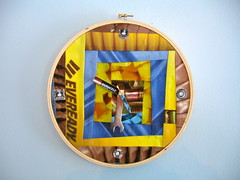
The Story Behind ‘Tool Time!’
Over the past few months we have attempted (attempted being the key word!) various home improvement projects. So when this challenge appeared, I immediately thought of my husband's many trips to the hardware stores. Most recently he purchased some wood, so that made me think of lumber stacks, and in terms of quilting, log cabins! However, whatever we do with wood, it never quite turns out perfect, so that led me to want to do something with wonky log cabins (plus I like trying new things and have never made a log cabin block before).
So with visions of lumber in my mind, I headed off to the hardware store, son in tow, coincidentally wearing his little "Mr. Fix-it Shirt". As I wandered around the store, I felt out of place... I'm not all that handy and I had no idea about the uses for some of the things I was looking at. I did make some mental notes that some of the garden gloves looked like they could be good for quilting and that some of the straps they sold could be used for messenger bags :), but I digress. As I wandered, I snapped some of the photos in the mosaic. I looked for interesting textures and things that reminded me of quilting or sewing. I also looked for colorful items. I kept coming back to a laundry clamp because it reminded me of an embroidery hoop and I wondered what I might do with that.
As I headed home, I kept thinking about my gut desire to use plaids and orange (Home Depot is one of the many hardware stores we often go to) as points of inspiration too. Then it dawned on me that I kept thinking about these because of the show "Home Improvement" with Tim Allen. In the show, he is a home improvement guy with his own show called "Tool Time." From there, I knew exactly what I would do-- I would re-create "Tool Time" using an embroidery hoop to make a clock. The clock would have a wonky log cabin with fabrics made from the photos I had taken at the store. The square in the hoop also seemed fitting to represent how out of place I had felt in the hardware store (you know, "the square peg in the round hole"...). The colors would not be plaid or orange, but inspired by the Mr. Fix-it shirt my son had worn. So with this in mind, I bought a clock movement kit and embroidery hoop, and then printed the photos onto printable fabric. The fabric pieces were cut in 1.5" and 2" strips and I tried to create wonkiness as I went by cutting alternating diagonals (varying in severity) and the thickness of the strips as I wanted to provide balance. I added the battery, wrench and fastener as clock hands. I only had 4 nuts to denote 12, 3, 6 and 9 o'clock because I didn't want the nuts to take away from the wonkiness of the clock.
The clock is 10" in diameter and was made in Milwaukee, WI.
Quilter: AllThingsBelle
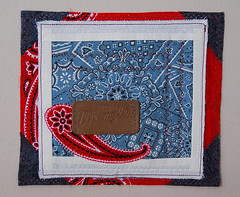
The story Behind ‘His Veins Run Blue’:
I'm Jennifer Rodriguez and I'm art quilting in West Jordan, Utah.
My piece, "His Veins Run Blue", is inspired by my husband. and of course our theme the hardware store. It is a mini art quilt - 6.5" x 7.5"
When I visited the store for inspiration, I thought about how the only times I go to Lowe's or Home Depot is when my husband needs something. More than half the week he is a white collar electrical engineer, but if he had it his way everyday his hands would be dirty from a blue collar job.
The items I was inspired by were the blades (the silver points on the quilt), the denim (the Wrangler emblem), and red bandannas.
I did the white frame to symbolize the white collar that boxes in my husband while the blue collar elements are trying to sneak out.
I embellished with lots of topstitching - similar to what you would see on shirts and jeans - including using my serger.
Quilter: Quilties
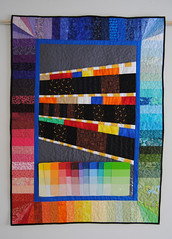 The Story Behind ‘Palettes’
Why does spray paint come in such basic colors? That's the thought I had in the hardware store looking at the rows of red, yellow, blue, and white. Moving a little further down the aisle, yes, there are the paint chips that offer a wider rainbow of colors...but still, I started thinking about my stash of fabric and the wide range of possibilities there in comparison to that aisle of spray paint!! How lucky are quilters?!
This quilt is 45" x 33". It is all pieced. There is a clear vinyl pocket on the bottom, holding real paint swatches from the hardware store (who can resist grabbing those as you walk by?!) The 1" inner blue border is the exact blue of painter's tape (the third item from the challenge).
made in Urbandale, IA by Emma Thomas-McGinnis
Quilter: Kathleen Quilts
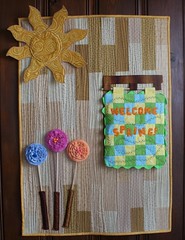 The Story Behind 'Spring IS Coming’:
Walking through our local hardware store I am always drawn to dowel rods. They are just the handiest thing. I love the way they are all stacked and poking out of their holders. On this trip I also noticed all the coiled objects, all in lots of colors... the wires on spools, extension cords. I noticed the stock had changed and Spring items were taking their places on the shelves. There were things for planting and many decorative items. One display had oversized objects (butterflies and other bugs) on long poles to stick in the garden for decoration. And through it all an old wood floor worn by years and years of town people wandering the aisles looking for just the right part to fix something. Anything is possible with the right part! Even Spring! Please!
The background was inspired by the wood floor. All different boards worn in different ways depending on the foot traffic, or stock placement or sunshine. I used pieces of tans, browns, neutrals and wavy line quilted with several different threads: browns, beige, gold, peach. The flowers are biased strips of fabric gathered and stitched in circles on a stiff fabric circle background. Each have three beads for the center. Dowel rod stems insert in to bits of fabric on the back and entire flower can be removed from it's holder.
Sun is a circle plus separate rays, all reinforced with heavy stabilizer. It's fashioned after a large metal decorative sun that was hanging in the store. Sun is stitched in a few places but left free in others to highlight the 3D effect.
Spring quilt is pieced bright colors with appliquéd letters and winding leaves (soon to sport flowers?). Instead of binding, ric rac is peeking out of the edges that hold the front, back and batting together. Quilt can be removed - it is hanging with another dowel rod. With the flowers and quilt removable entire project can be changed to adjust for the seasons. More fun!
Created in Cissna Park, IL
30" x 22"
-------------------------- ------------------------------ ----------------------
Quilter: KimsCraftyApple
Not eligible for Public Voting Prize
The Story Behind ‘How Does Your Garden Grow?’
With saw blade flowers, and washer rings,
and plus signs all in a row.
I loved this challenge as I loved the Office Supply Store Challenge. I love seeing something and being inspired to create something else from it.
The very first piece of inspiration was the top of a Phillips Screw - which is plus sign shape. After recently seeing a plus sign quilt on Ryan Walsh's 'I'm Just a Guy Who Quilts' Blog I knew that would be the perfect place to start.
I also saw a lot of spring planting supplies at the store so instantly thought of doing a flower quilt - but I wanted to add a twist to my flowers. Which is why some of them are shaped as saw blades and I hand sewed washers onto the flowers to create another dimension. I know the washer inspiration was pretty literal here but I do love the contrast of fabric and metal.
One of the fabrics in my plus sign is a commercial print of seed packets - another item I saw at the store.
I bordered the main portion of the quilt with a pink polka dot lip, then a sandy brown, geometrically rectangular print and bound with that same pink polk-a-dot fabric. I love mixing geometric elements together which is also why I added a few washers to two corners of the border.
The 'hook' sun came up at the end. I just felt like something more needed to happen. As I was looking through my supplies I saw these golden hooks and they just seemed to create the sun by themselves. I really think it's a fun, shiny extra element to this piece.
This piece measures: 24" x 26.5"
Created by Kim Lapacek
in Poynette, WI
ps. I really love the plus sign look - I will definitely be doing another one of these in the future...
Now for the PUBLIC Comment PRIZE!
 Everyone is eligible to win an adorable and functional coffee cozy from QuiltingDiva for this weeks Public Comment Prize!
NINE Chances to WIN!
Entry 1: REQUIRED! Leave a comment on your favorite entry at the bottom of this blog post (you can also comment on twitter/flickr/facebook but that won’t get you an entry) (or at least that you voted) and vote for your favorite on the poll on the upper left hand side of the blog. -***MUST DO***
Optional/Additional Entries – please note – if you want to qualify for these additional entries you must leave a SEPERATE comment for each with your email address– if you already follow or are a fan, etc just leave comments saying each. If you write everything in ONE comment you only will have ONE entry…
Entry 2: Follow my blog.
Entry 3: Follow me on twitter: www.twitter.com/kimscraftyapple
Entry 4: Tweet about this fantastic contest with hashtag #PQHardware (important or I won’t know you did it)
Entry 5: Like Project QUILTING on facebook
Entry 6: add my Project Quilting ‘Grab my Blinkie’ to your blog or blog about my giveaway (link your blog or post in your comment, please)
Entry 7: Head on over to QuiltingDiva's and let me know your favorite item in the store!
Entry 8: Sign up for my newsletter in the upper right corner of this page!
Entry 9: Blog about Project QUILTING and leave a link here to what you wrote.
***Participants, Judges, and Sponsors in project quilting ARE allowed to enter in the public poll/contest as well.***
This means you have NINE chances to win! I need you to write each of these entries as different comments in order to qualify you for all seven entries and include your email address. If you don’t include your email address I won’t be able to contact you when you win and I will have to choose a new winner. I will be picking the winner on Saturday, March 5th.
***Changes to Prizes/Voting this season***
- One person can no longer win both prizes. If this does happen (as it has), they will take home the ‘JUDGES Choice’ prize and the person in 2nd in the PUBLIC vote will take home the ‘PUBLIC’ prize. As before, each of these winners will not qualify for the random prizes. I’m doing this just to spread around all the amazing goodies so many great sponsors donated!
- The second is, I will not be listing myself (KimsCraftyApple) on the Public Vote. Since this is my ‘creation’ I will never win any of the prizes – I don’t want to seem like this is biased towards me at all. I’m doing this merely for the fun, the challenge, and the camaraderie. I will still, however, be showing off my entry AND sending it to the judges for their score and critique.
Challenge 5 will be posted on Sunday, March 6th at NOON!
WIP Wednesday
I’m completely snagging this idea of a ‘WIP (Work In Progress) Wednesday’ for blogging from Renegade Quilter. It seems to be a perfect post for me since I have so many projects going on all at once right now.
So…here are some updates on the projects I’ve been working on…
Boxed In:

 I have created two more blocks for my ‘Boxed In’ Quilt…
 So, I’m currently at 6. I would like to make at least 9 blocks…12 would be ideal…we’ll just have to see what happens.
the Mystery Quilt:
 I have actually made LOTS of progress on my Mystery Quilt. Above you can see that all the ‘little blocks’ were completed.
 Then it was time to piece the whole thing together. I’ve found that I am much more accurate if I piece in blocks versus strips. I’m not sure if you can see in the picture above but I put 4 blocks squares together to start.
 Then I put four of those blocks together on the top two rows, and doubled them in the bottom row.
 Here you can see that I’m down to four main pieces.
 And above you can see the single full strip that I have to show (which was shorter to do horizontally than it would have been to do vertically).
 And here’s the picture of the main portion of the quilt put together. Now, I have to decide on borders and get the quilt off to Barb for quilting!
Block-A-Palooza Quilt
 I’m still at the same place I was yesterday with the Block-A-Palooza Quilt. The 10th block comes out tomorrow but with the combination of my daughter’s 3rd birthday and me not feeling so hot…we’ll see when I get it finished…I’m sure before the 11th comes on Monday!
My Bloom Quilt
I haven’t blogged about this quilt yet but I am in the process of working on this Bloom Quilt from Amy Butler.
Of course, I’m doing it slightly different than the pattern but it will be pretty close.
 This is not the best picture but I sewed 8 strips of different fabric from my stash together to create the base of my Bloom Quilt. Instead of adding the ruffle and just flipping the quilt, I sent it to QuiltsbyBarb to do a meandering (Bare Bones) quilting pattern all over the quilt. I will be skipping the ruffle and binding this instead. I think it will just help keep things together a little more nicely and will be easier for me to work with – especially with this growing belly I’ve been dealing with. The quilted quilt is on it’s way back to me which means I need to start working on cutting some circles of fabric to create my yo yo’s.
Project QUILTING – Hardware Store
Of course, I’m taking a step away from all these WIPs to complete my Project Quilting Piece. I’ll just show you a few pictures to ‘peak’ your interest in what I’ve come up with (so far…it seems to change itself as I go…)


 Above are my three main ‘inspiration’ photo’s that I took at my local hardware store.
 I actually saw my first cross/plus quilt while I was browsing Ryan Walsh’s blog ‘I’m Just a Guy Who Quilts’ – I was immediately intrigued by the geometry and the visual effect of it. If you look at the end of a Phillip’s screw – it’s a plus sign! Bingo! I could try out creating my very own cross/plus quilt for part of the PQ Challenge!
 A photo of me continuing to play with my layout on my design wall. Stop by later this week to see what ‘happens’ as this quilt is completed!
And with all that – that’s where I am on my WIP’s this week!
Meet this Week’s Guest Judge – Ann of Renegade Quilter
I am happy to be introducing you to Ann of RenegadeQuilter. I discovered Ann on twitter and was very happy when she agreed to be a guest judge for this week’s Project QUILTING challenge. And now, here’s Ann to tell you about herself (and as I read it, I see we have much in common in our quilting methods!):
My name is Ann and I blog over at Renegade Quilter. I have only been blogging since November of 2009 and I am loving it. I have been sewing since I was a little girl. My mom made my clothes when I was young and I use to make stuff with all of the scraps. My mom taught me how to make garments, however, the rest of the sewing stuff I taught myself through trial and error. My first quilt I ever made was made out of old drapery fabric samples and my mom still has it today.
Over the years I have learned how to make home decor items as well as hand bags which I sell at a local artisan barn and I make custom order bags as well.


So far I haven’t really ventured to far into designing quilts. I tend to take a pattern and then tweak it as needed usually because of some crazy error that I made either in fabric calculations or a cutting error. That is why I refer to myself as the Renegade Quilter. I really don’t follow the ‘rules’ or ‘instructions’ when I create something. If I make a mistake I turn it into an opportunity to create something wonderful.


I am involved with a couple online quilting bees and I am lucky to have a small quilting group of friends that I do quilting related stuff with. Such as quilt camps, annual trips to Sisters, OR for the outdoor quilt show and of course fabric shopping.
I wish I could say that I make a living from sewing but I don’t. It is just a hobby that I have and happen to love.
Thanks to Kim for having me be a judge. I am looking forward to the entries.
Blogger’s Block-A-Palooza – Block #9: Lemonade Stand
 Here’s what my block turned out to be this time. I have introduced a few new fabrics (more purples and turquoise…just different batiks, and a black and white skinny striped commercial print from Moda) – and even a new color (the brown by the geese). I still have 7 more blocks to do so I’m want to be sure to spread out my fabric’s fairly evenly…we’ll see what happens in the end though!
And here’s an overall of all 9 blocks thus far. Do you have a favorite yet?
SCHEDULE:
Monday, January 24
Block #1: John Adams
Quilt Dad
Thursday, January 27
Block #2: Elizabeth Hartman
Oh, Fransson!
Monday, January 31
Block #3: Amanda Sasikirana
sasikirana handmade
Thursday, February 3
Block #4: Cherri House
Cherry House Quilts
Monday, February 7
Block #5: Kaye Prince
Miss Print
Thursday, February 10
Block #6: Monica Solorio-Snow
Happy Zombie
Monday, February 14 Happy Valentine's Day!
Block #7: Heather Bostic
House of a la Mode
Thursday, February 17
Block #8: Angela Yosten
Moda Home Mom
Monday, February 21
Block #9: Scott Hansen
Blue Nickel Studios
Thursday, February 24
Block #10: Amy Ellis
Amy's Creative Side
Monday, February 28
Block #11: Fat Quarterly team
Fat Quarterly
Thursday, March 3
Block #12: Jennifer Davis
Sugar Stitches
Monday, March 7
Block #13: Tia Curtis
Camp Follower Bags & Quilts
Thursday, March 10
Block #14: Ryan Walsh
I'm Just a Guy Who Quilts
Monday, March 14
Block #15: Kerri Horsley
lovely little handmades
Thursday, March 17
Block #16: Vanessa Christenson
V and Co.
Thursday, March 24
Block layout: Julie Herman & Natalia Bonner
Jaybird Quilts and Piece N Quilt
TBD
Wrap-up, charity auction
TO See what everyone’s working on check out the flickr group: http://www.flickr.com/groups/bloggersblockapalooza/
If you want to participate in a different challenge – the 4th Project QUILTING Challenge is currently live: http://kimscraftyapple.blogspot.com/2011/02/project-quilting-season-2-challenge-4.html
Meatasaurus – an Odd Custom Order
My good friend Kaitra was visiting the other weekend. She had a little project for me to work on while she happily played with my little ones…she needed three ‘fork holsters’ that fit on a belt.  She brought me some Meat Fabric from Spoonflower to create these unique fork holsters for the ‘Meatasaurus' Party she’ll be attending in a few months.
 I guess the entire day consists of eating some tasty and delicious meat. Instead of going through multiple plastic forks Kaitra, her boy, and a friend will be environmentally friendly as they have their sturdy silverware to enjoy the goodies.
  Close up…
Easily removing action so a person can quickly get to some delicious meat!
It was an interesting challenge and I’m pretty happy with how it turned out. I can’t wait to hear the verdict on how they survive ‘Meatasaurus.’
My Wonderful Sponsors!
Fat Quarter Shop
Spice Berry Cottage

10% OFF all fabrics!
use coupon code KIMSCRAFTY
Generation Q Magazine

Etsy Treasury Team

Popular Posts
-
I am so happy to be sharing with you an interview with one of season 1’s participants – Lisa Penny of PennyFabricArt . Due to other commit...
-
WOW! WOW! WOW! I was absolutely blown away by the number of amazing entries that were submitted for the first challenge! You all made a ...
-
I just have to say you all are so TALENTED! I'm in awe with ALL the projects submitted for this challenge! If it weren't for you (th...
-
I can’t wait to share with you the entries for this weeks challenge – a fantastic, creative job done by everyone! It was a difficult challe...
-
 For some reason I decided to have a Pampered Chef party at my house tonight so my preparation for the Quilts by Barb Quilt Retreat had to g...


